- 홈
- /
- 문서

 이 문서에서
Salesforce를 나가지 않고 Webex에서 필요한 모든 것을 얻을 수 있습니다. 중요한 고객 상호 작용을 한 곳에 통합합니다. Salesforce 기록 또는 홈 페이지에서 제공하는 컨텍스트로 Webex 기능에 액세스합니다. 언제든지 메시지를 확인하고, 전화를 걸거나 Salesforce 기록을 관리합니다. Webex는 Salesforce 개체에 인바운드 및 아웃바운드 통화를 쉽게 링크할 수 있게 합니다.
Salesforce에서 Webex에 로그인
| 1 |
Salesforce 홈 페이지의 Webex 위젯에서 로그인을 클릭합니다. |
| 2 |
이메일 주소를 입력하고 다음을 클릭합니다. |
Salesforce에서 개체에 기반한 Webex 앱 스페이스를 만들 수 있습니다. 개체는 Salesforce가 Salesforce에서 조직에 국한된 데이터를 저장할 수 있게 하는 데이터베이스 표입니다.
Salesforce에서 귀하가 멤버로 속한 모든 스페이스를 확인할 수 있습니다. Salesforce 개체에 기반한 스페이스를 만들 때 해당 개체의 소유자는 귀하가 작성하는 스페이스에 자동으로 추가됩니다.
| 1 |
Salesforce 홈 페이지에서 개체를 기회 또는 사례로 만들거나, 이미 생성한 옵션을 선택합니다. | ||
| 2 |
스페이스 만들기를 선택합니다. | ||
| 3 |
스페이스에 자동으로 이름을 지정하고 이 개체에 연계된 그룹에서 모든 그룹 멤버를 추가하려면 세부 사항으로 자동 입력을 선택합니다. | ||
| 4 |
개체가 변경된 후 스페이스에서 봇 알림을 수신하려면 알림 봇 포함을 선택합니다.
| ||
| 5 |
스페이스 이름을 입력하고 사용자를 스페이스에 추가한 후 만들기를 클릭합니다. |
기존의 Webex 앱 스페이스를 기회 또는 사례와 같은 Salesforce 개체에 링크하면 모든 사람이 논의되고 있는 내용을 이해할 수 있습니다.
| 1 |
Salesforce 홈 페이지에서 개체를 선택합니다. | ||
| 2 |
기존의 스페이스를 링크 필드에서 링크하고자 하는 스페이스의 이름을 검색합니다. | ||
| 3 |
링크하고자 하는 스페이스 옆에 있는 링크를 선택합니다.
|
다른 스페이스 멤버가 포함된 스페이스 미팅을 시작하고, 개체에서 스페이스를 링크 해제, 스페이스 이름을 변경하거나, Salesforce의 모든 스페이스에서 사용자를 추가하고 제거할 수 있습니다.
| 1 |
Salesforce 홈 페이지에서 관리하고자 하는 스페이스와 링크된 개체를 선택합니다. | ||
| 2 |
정보 i 기호를 선택합니다. | ||
| 3 |
선택:
| ||
| 4 |
저장을 선택합니다. |
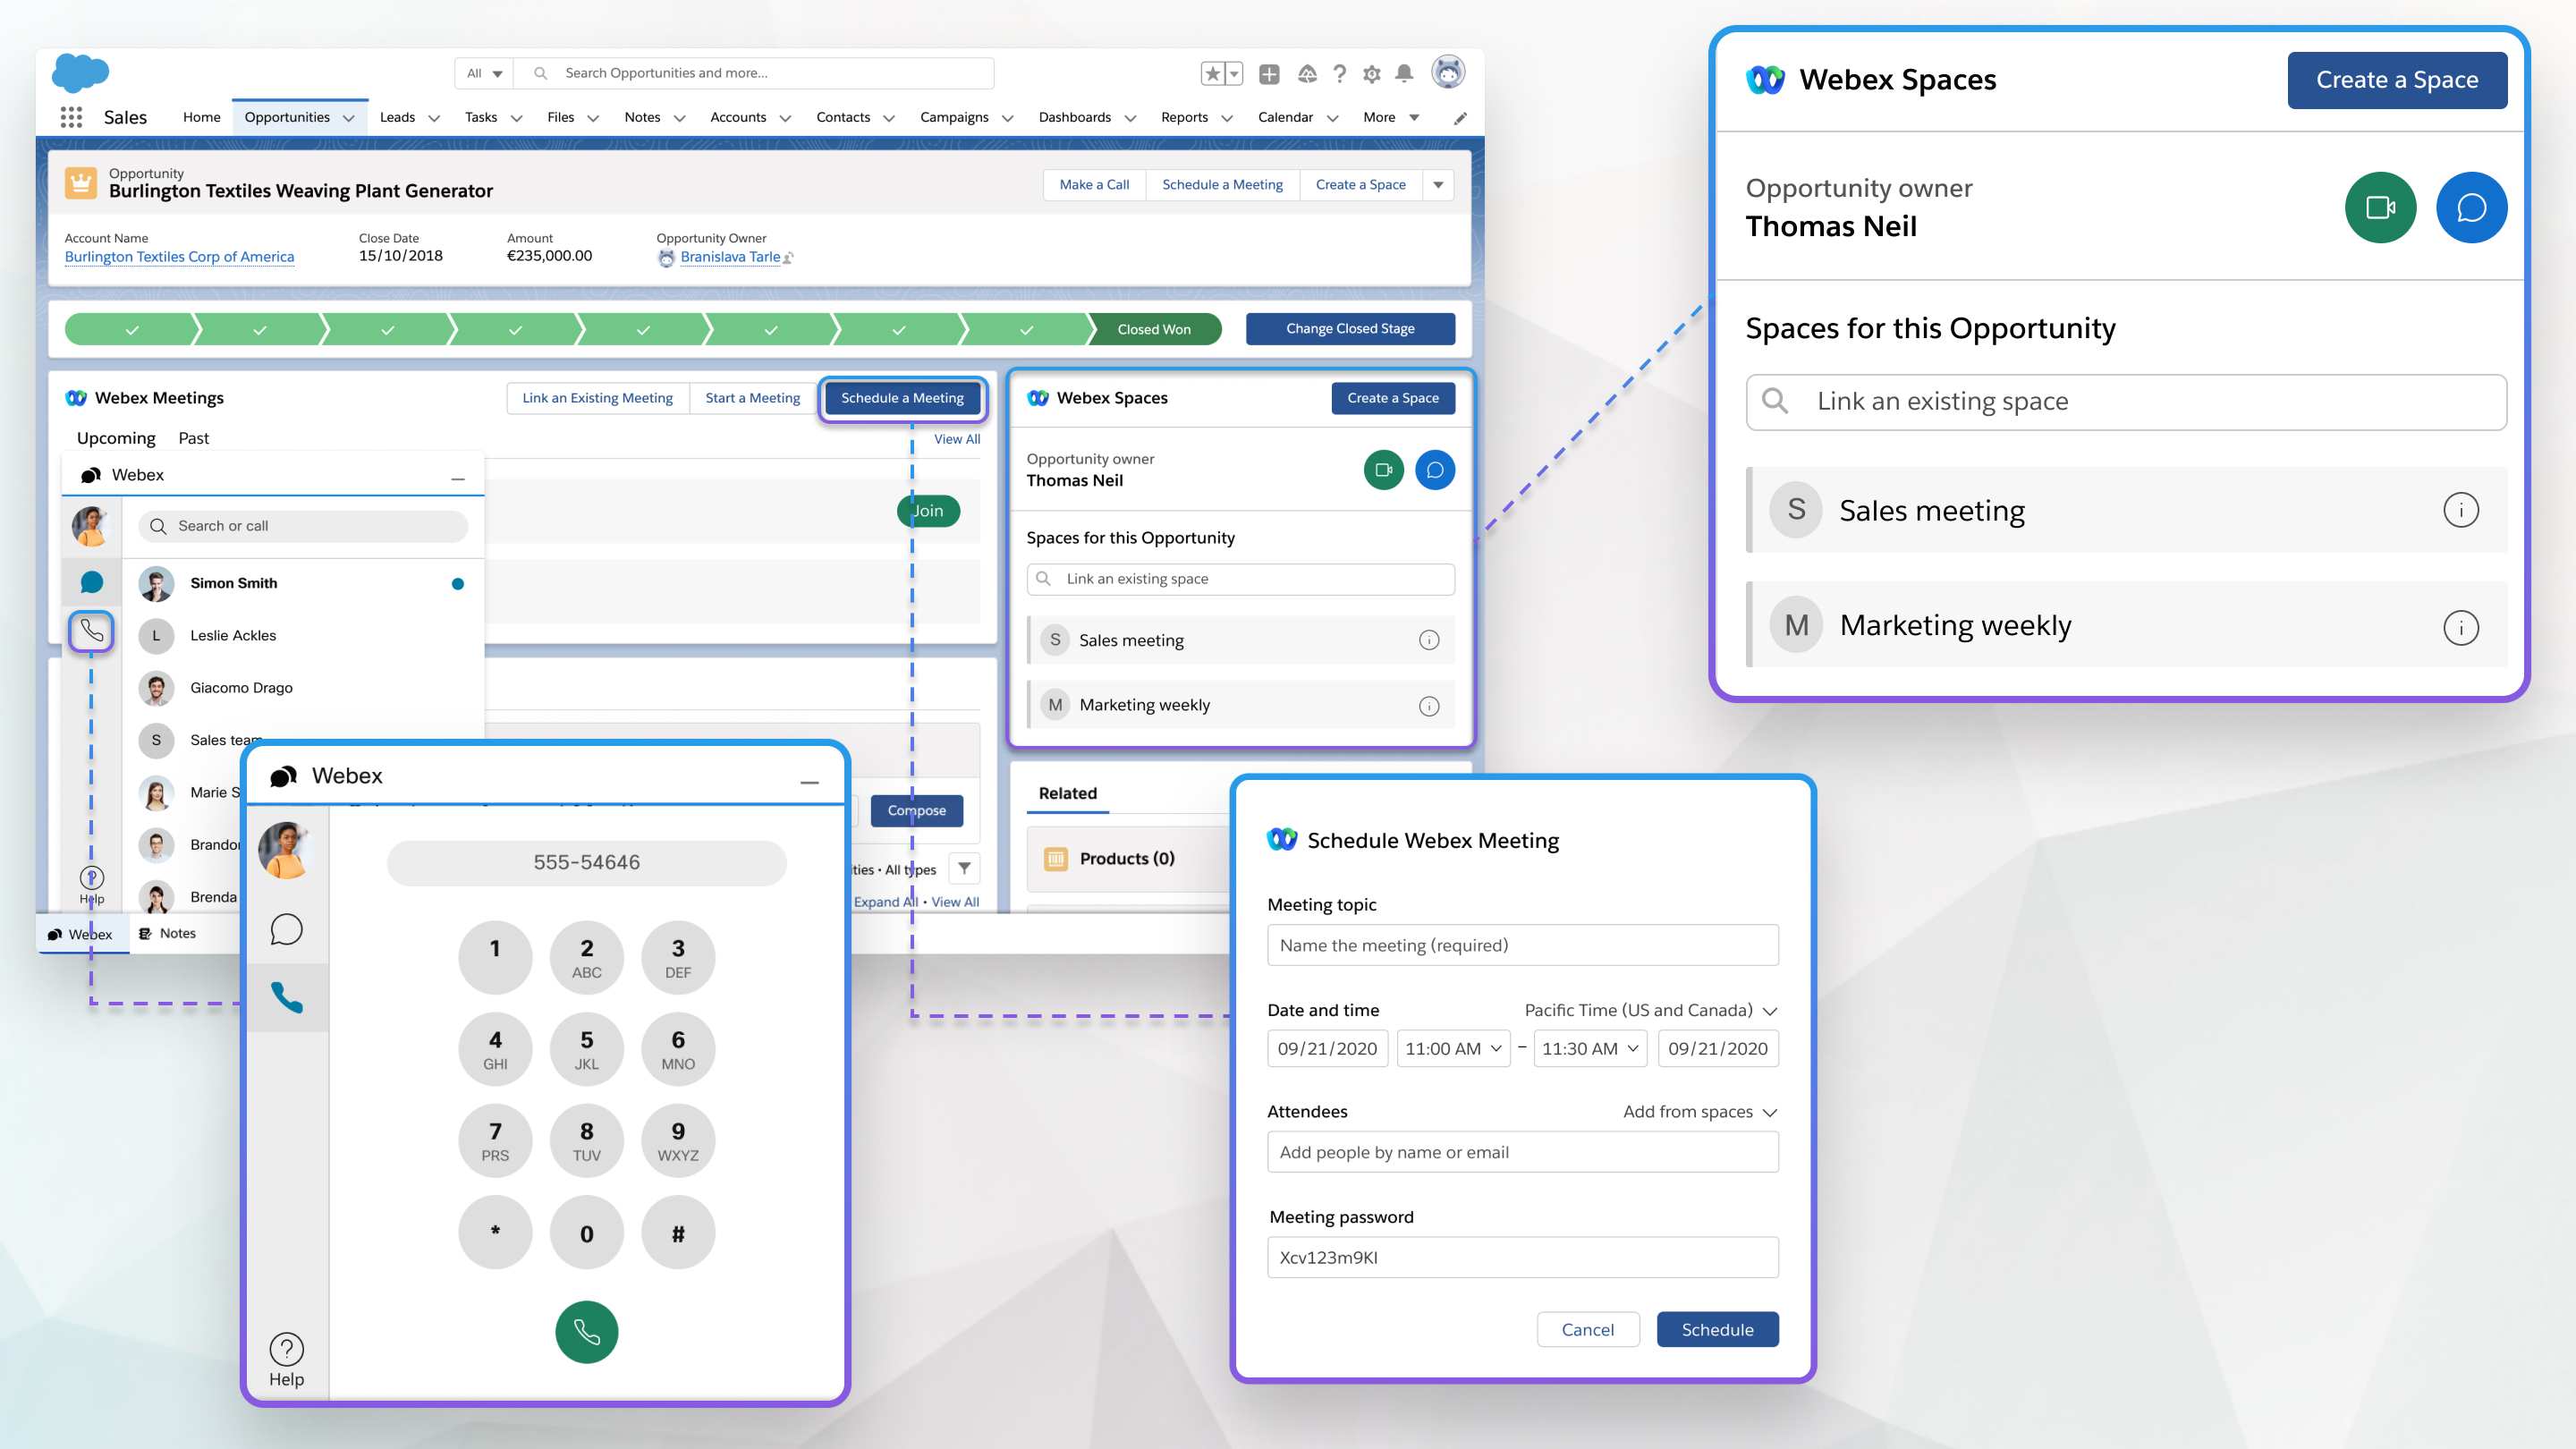
개체와 관련된 Webex 미팅을 예약할 수 있습니다.
| 1 |
Salesforce 홈 페이지에서 미팅을 예약하고자 하는 개체를 선택합니다. | ||
| 2 |
미팅 예약하기를 선택합니다. | ||
| 3 |
미팅 주제를 입력합니다. | ||
| 4 |
미팅에 대한 날짜 및 시간을 선택합니다. | ||
| 5 |
미팅에 첨부 파일을 추가합니다.
| ||
| 6 |
캘린더를 사용하여 추가하는 참석자에 대한 대화 가능 여부를 확인합니다.
| ||
| 7 |
예약을 선택합니다. 미팅 정보가 나타납니다. |
|
Salesforce 홈 페이지에서 다음 중 하나를 선택합니다.
|
개체와 관련된 내용을 논의해야 하는 경우에 캘린더에서 기회 또는 사례와 같은 Salesforce 개체에 기존의 Webex 미팅을 링크할 수 있습니다.
| 1 |
Salesforce 홈 페이지에서 개체를 선택합니다. | ||
| 2 |
기존의 미팅 링크를 선택합니다. | ||
| 3 |
시작 날짜 및 종료 날짜 필드를 사용하여 해당 기간에 발생한 모든 Webex 미팅을 표시합니다. | ||
| 4 |
링크하고자 하는 미팅 옆에 있는 링크를 선택합니다.
|
| 1 |
Salesforce 홈 페이지에서 미팅을 녹화한 개체를 선택합니다. |
| 2 |
과거를 선택하고 녹화 대화 내용을 선택합니다. |
| 1 |
Salesforce의 페이지에서 Webex를 선택합니다. | ||
| 2 |
통화를 클릭하고 전화 번호를 입력한 후 오디오 통화를 선택합니다.
| ||
| 3 |
Webex 앱에서 전화를 걸고자 하는지 확인합니다. |
Salesforce 개체에 연계된 모든 연락처에게 전화할 수 있습니다.
| 1 |
Salesforce 홈 페이지에서 전화하고자 하는 연락처와 연계된 개체를 선택합니다. |
| 2 |
전화하고자 하는 연락처에 대해 전화 걸기를 선택하고 오디오 통화를 선택합니다. |
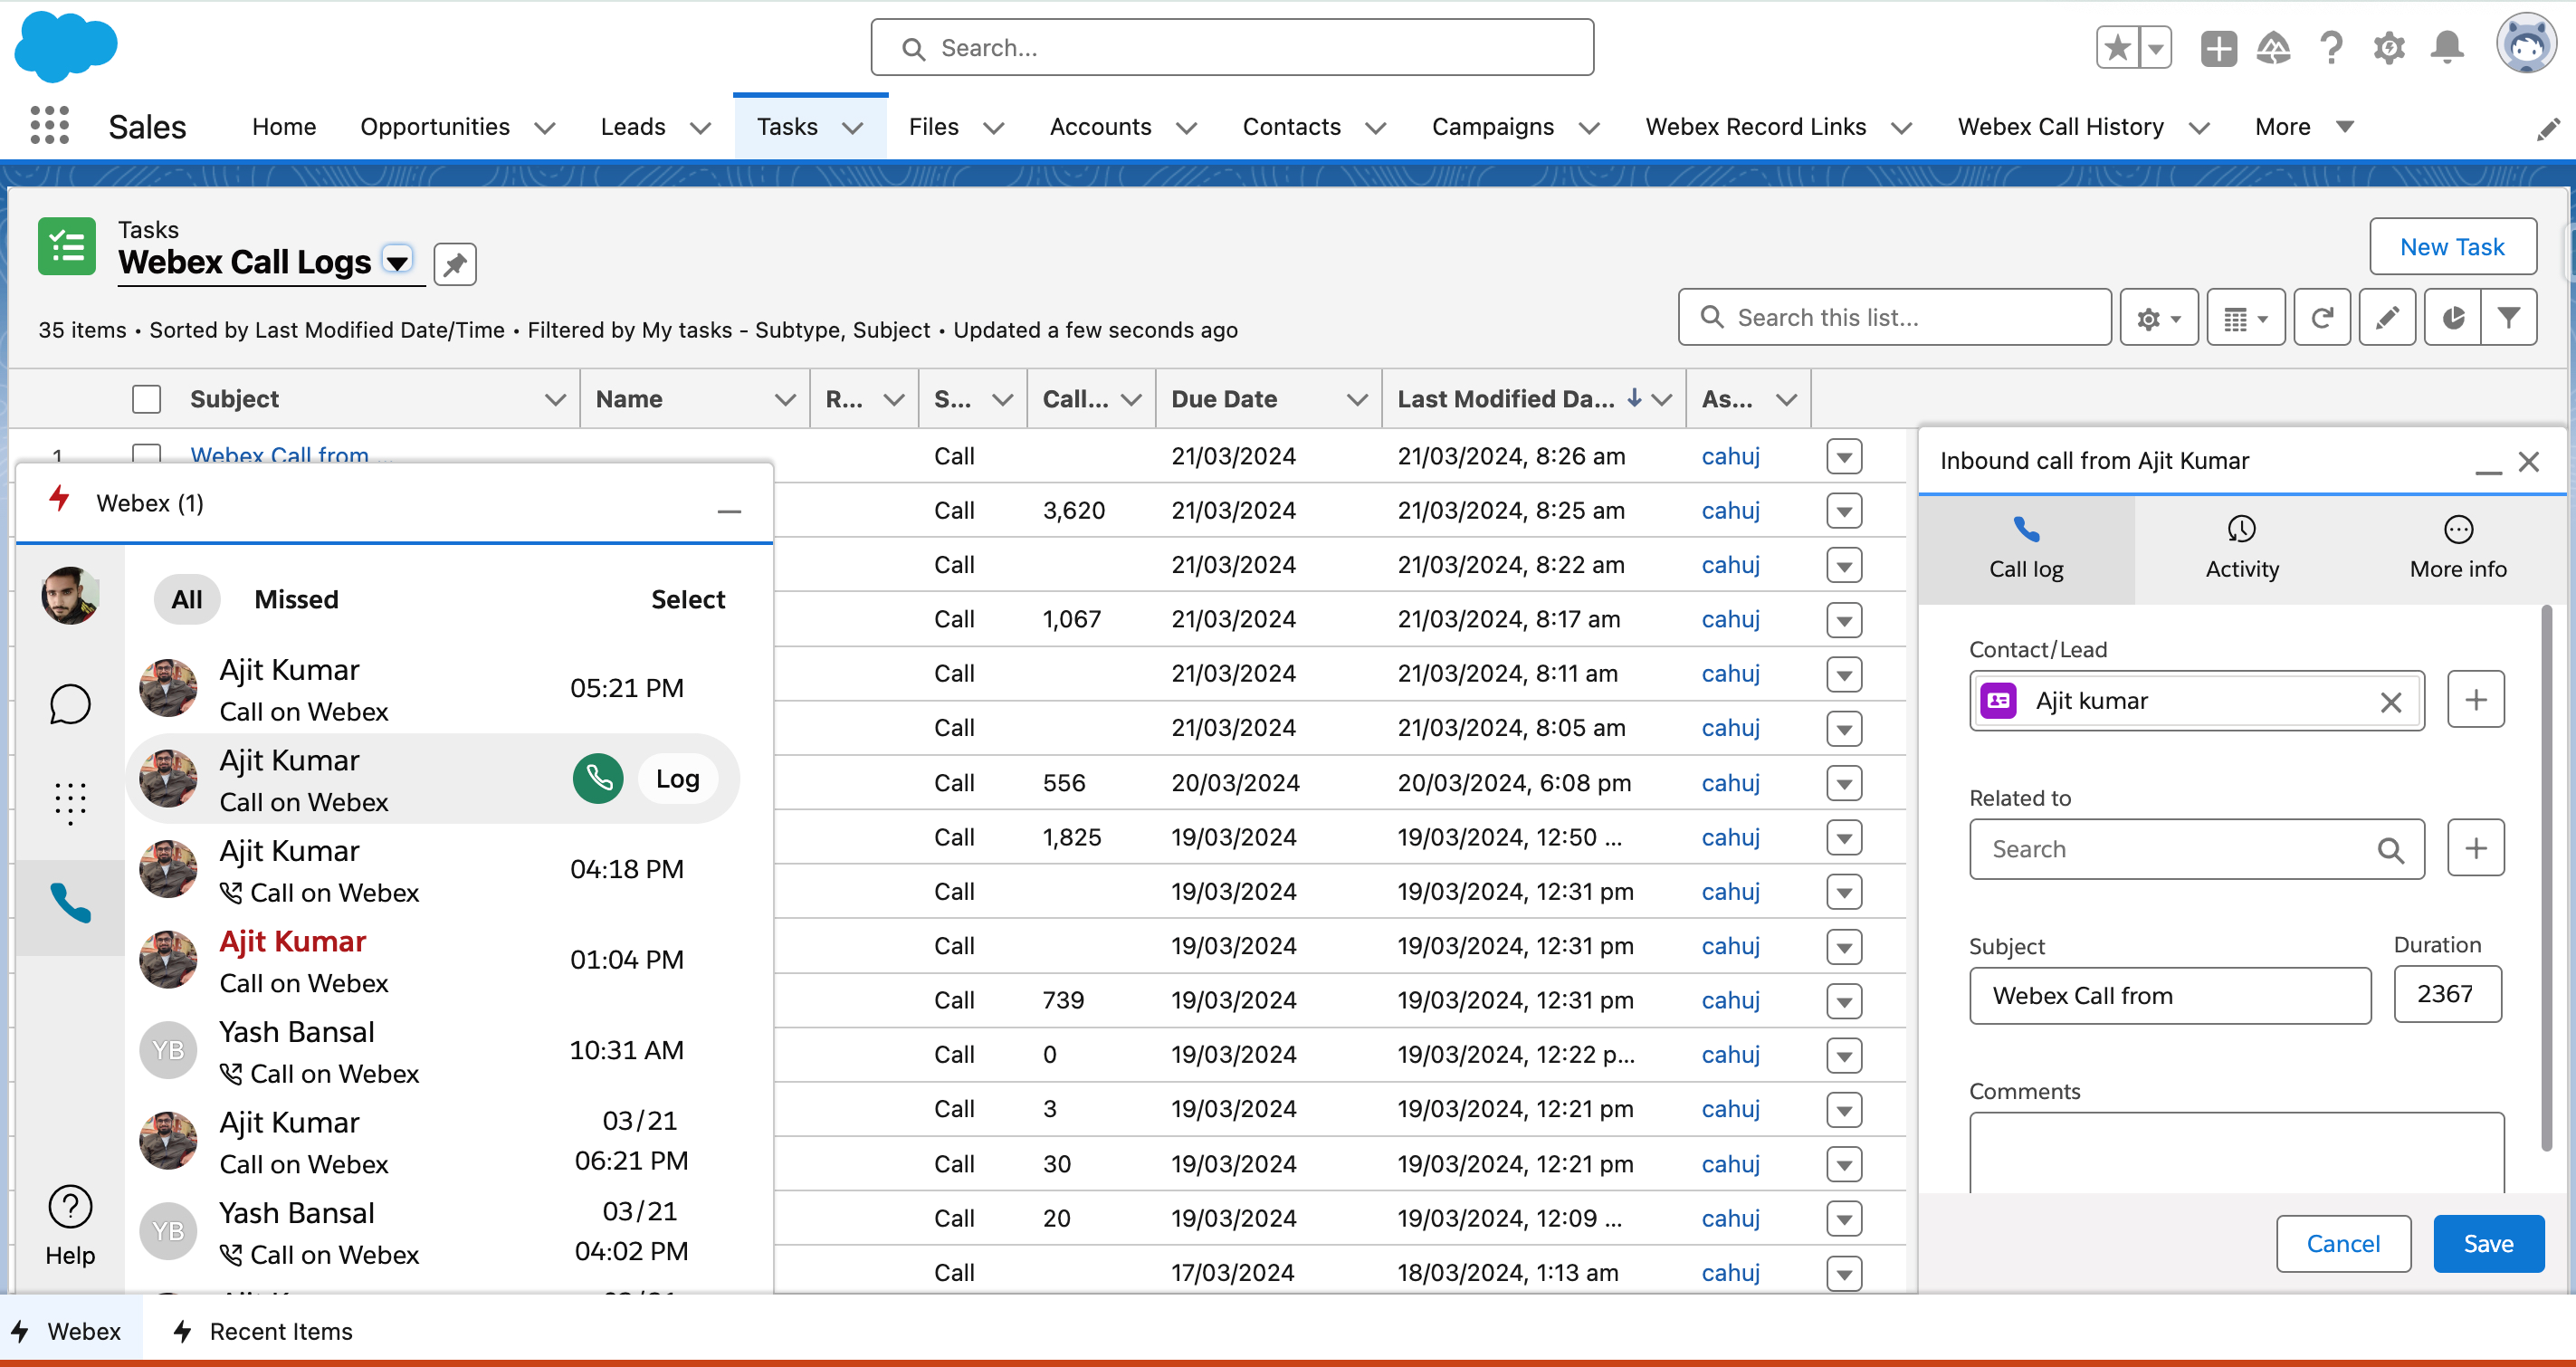
인바운드 또는 아웃바운드 통화를 실행하는 동안 Salesforce 기록을 관리할 수 있습니다. 새로운 연락처 또는 리드인 사용자와 대화하고 있는 경우, 해당 연락처를 데이터베이스에 추가하는 동시에 관련된 개체를 만들 수 있습니다.
| 1 |
통화하고 있는 사용자에 대해 Salesforce 기록이 존재하지 않는 경우, 새 연락처 또는 새 리드를 선택합니다.
| ||
| 2 |
연락처/리드 필드에서 기록을 검색하고 선택하여 Salesforce 기록에 링크합니다. | ||
| 3 |
If you want to create a new object related to this case, such as a case or opportunity, select New <object>. | ||
| 4 |
관련 필드에서 개체를 검색하고 선택하여 연락처 또는 리드에 링크합니다. | ||
| 5 |
통화와 관련된 제목 및 코멘트를 추가할 수도 있습니다. | ||
| 6 |
활동 탭을 사용하여 이 연락처 또는 리드에 대한 통화 내역을 확인합니다.
| ||
| 7 |
추가 정보 탭을 사용하여 이 연락처나 리드와 관련된 모든 개체를 확인합니다.
|
Using the Webex for Salesforce integration's Call History feature, you can see a complete log of recent as well as missed calls, log a single call or multiple calls at once, and return calls directly from call history entries.
If you don't have access to the Call History tab, you'll need to have your administrator enable it as described in Enable or disable call history. |
A Webex Call History widget implementing the complete functionality documented here is also available from any Salesforce records page if enabled by your administrator. |
Call history displays the most recent 7 days of calls, up to a maximum of 100. |
Review recent and missed calls
To review your recent and missed calls:
- Select the Webex utility component at the bottom of any page view and select the telephone handset icon to display your call history.
- You can scroll through All calls or select the Missed calls tab to view calls you've missed.

Missed calls are also displayed in the All calls tab in a red bold font. - Select a call entry to see further details including a list of incoming/outgoing calls to the contact.
Log a call
To log an individual call:
- Select the Webex utility component at the bottom of any page view and select the telephone handset icon to display your call history.
- Hover over the call log entry you're interested in, and select Log adjacent the entry.
Call entries that have already been logged are denoted by a small folder icon adjacent the entry in the Call Log view. - Enter any details you like in the Call log entry and select Save.
The caller is automatically matched with a Salesforce Contact or Lead if one exists. - You can view your logged calls by searching for Tasks in the Search apps and items search box or select the Task tab from your Sales App Navigation bar if you've added it there, and choose Webex Call Logs from the task type list.
Log multiple calls
To log multiple calls:
- Select the Webex utility component at the bottom of any page view and select the telephone handset icon to display your call history.
- Select Select, toggle the check boxes adjacent the calls you'd like to log, and select Log multiple calls.
- The calls are logged and automatically matched to an existing Salesforce Contact or Lead if one exists.
- You can view your logged calls by searching for Tasks in the Search apps and items search box or select the Task tab from your Sales App Navigation bar if you've added it there, and choose Webex Call Logs from the task type list.
You'll also receive a Salesforce notification that you can select to view the log entries.
Return a call from history
To return a call from your call history:
- Select the Webex utility component at the bottom of any page view and select the telephone handset icon to display your call history.
- Hover over the contact you'd like to call and select the green telephone icon to place a call.
You can import attendee data from your scheduled and completed Webex Webinars and attach them to a Salesforce campaign as well.
Before continuing, make sure your Salesforce Administrator has configured Webinar import and added the Webinar component to your home page as described in Integrate Salesforce with Webex App. |
To import attendee data from your Webex webinar:
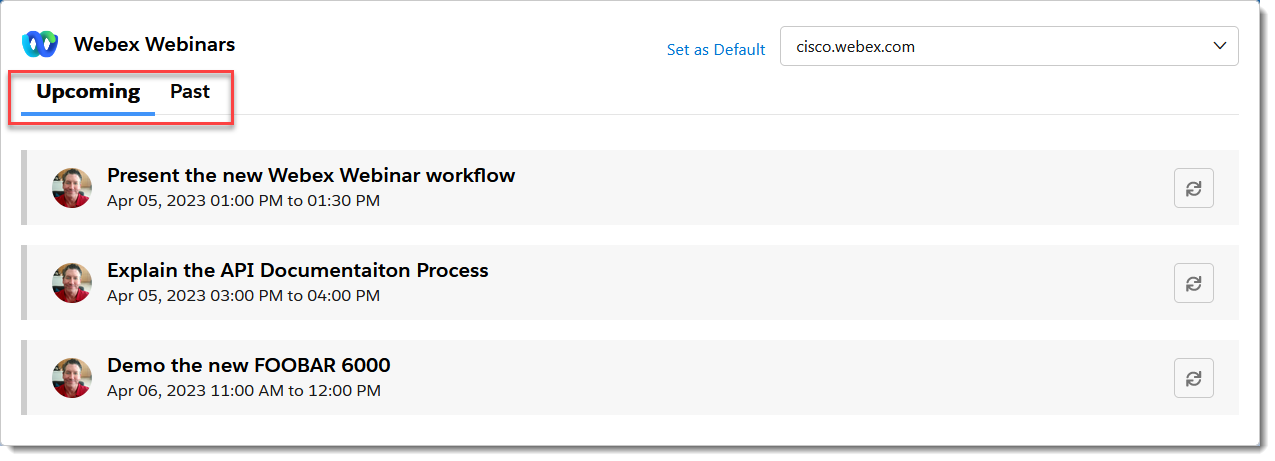
- Find the Webex webinar component on your home page, and choose the Webex domain in which you created your webinars:
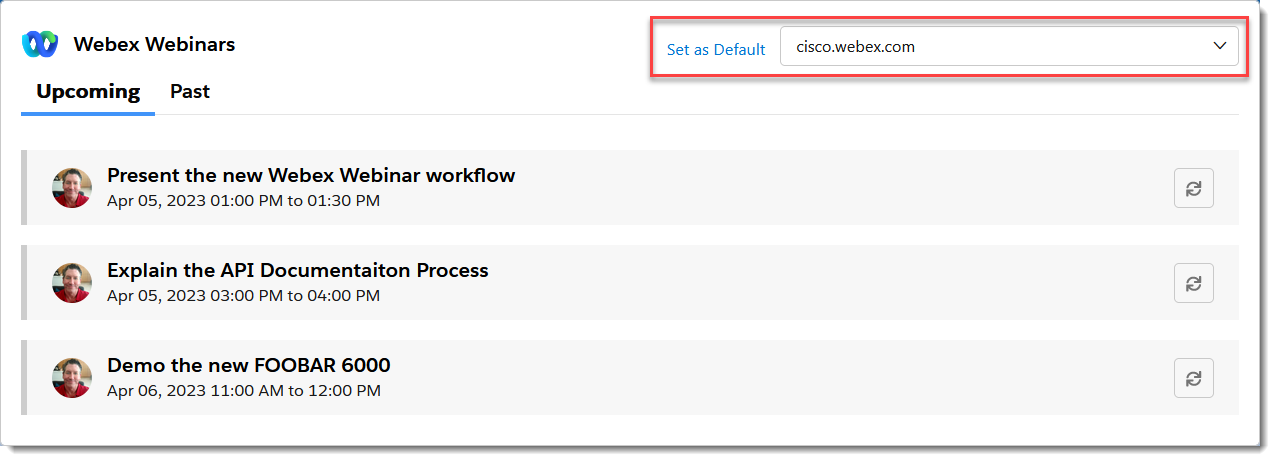
- Choose from either Upcoming or Past webinars:
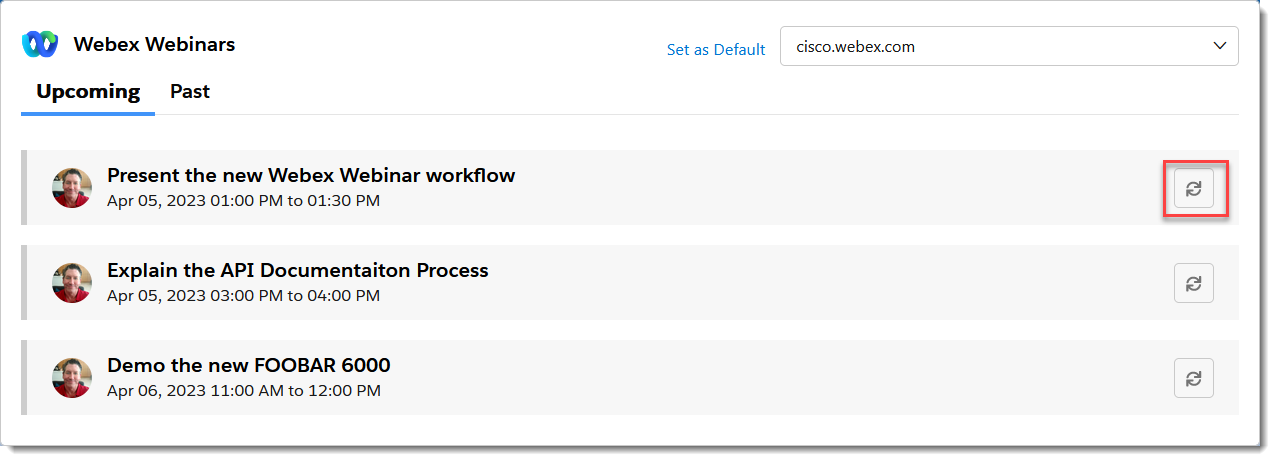
- Click the import button adjacent the webinar whose data you’d like to import:
- In the Import dialog, if required, search for an existing campaign or click + to create a new campaign into which you want to import the webinar data:
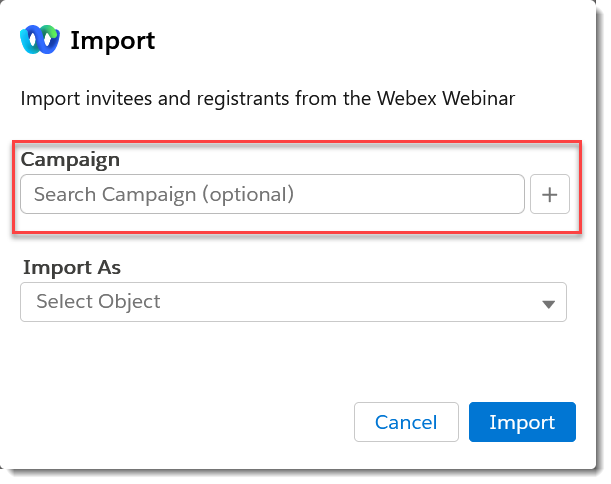
참고: You’ll need the appropriate Salesforce permissions to create new campaigns.
- If you’re importing data from an Upcoming webinar, choose the type of Salesforce object from Import As and then click Import.
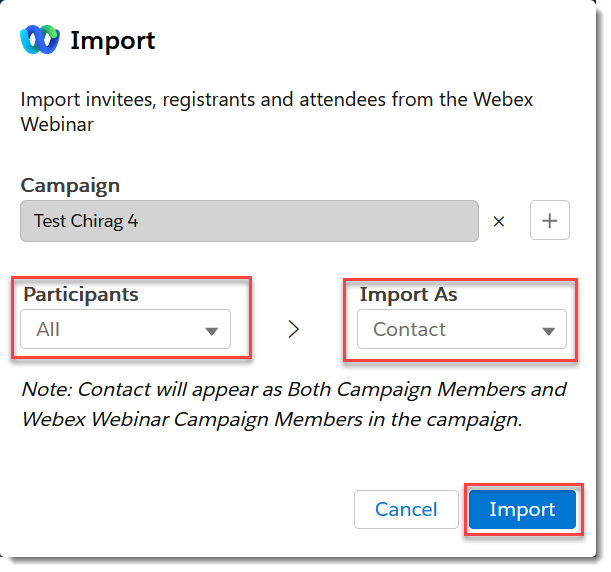
The note below Import As indicates where the imported information will appear in the campaigns depending upon the import settings mapped by your administrator. - If you’re importing data from a Past webinar, you can choose the status of the webinar Participants records you’d like to import (All, Attended, or No show), and then select the type of Salesforce object from Import As. Click Import:
The note below Import As indicates where the imported information will appear in the campaigns depending upon the import settings mapped by your administrator.
- If you’re importing data from an Upcoming webinar, choose the type of Salesforce object from Import As and then click Import.
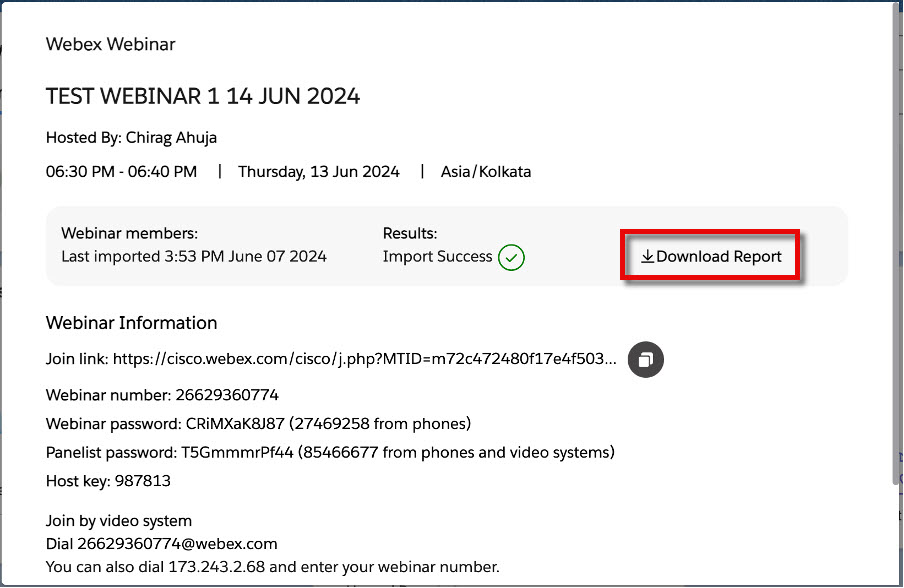
- You’ll see a banner indicating that the data is being imported and receive a notification once the import has completed:

- The import process generates a comma separated values (CSV) report file for all imports, including successful, partially failed, and failed ones. The report details each failure or success and includes links to the mapped Salesforce records for each successfully imported row. Select Download Report to download and review the CSV report:
-
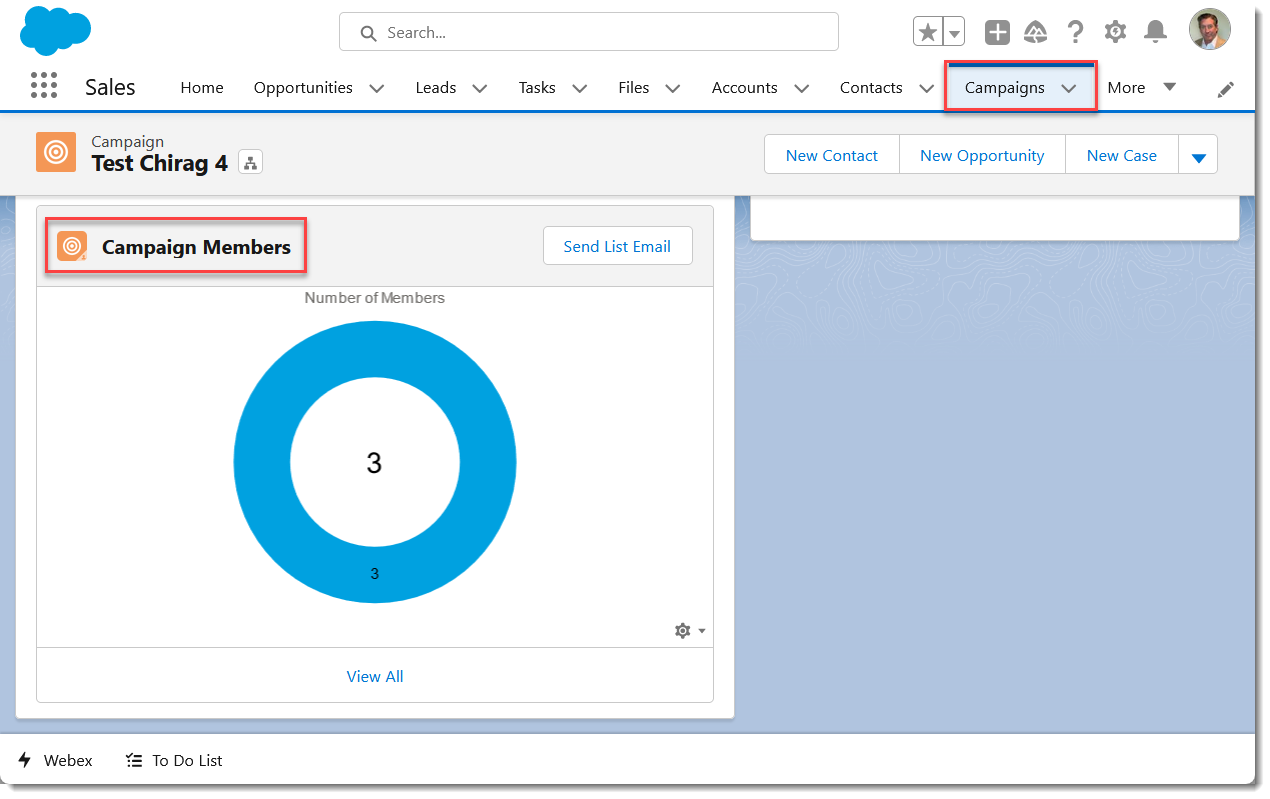
The Webinar data is imported as the selected Salesforce object type, and is available in the Webex Webinar Campaign Member or Campaign Members panel in the Salesforce Campaign tab, if a campaign was selected while importing, and depending upon how the Webinar data import was configured by your administrator.
From the example above, the Webinar data is imported as Salesforce Contact objects and is available, as explained in the note, in both the Campaign Members, as well as the Webex Webinar Campaign Members panels (only the Campaign Members panel is shown below):