- Startseite
- /
- Artikel

Danke für Ihr Feedback.

Konfigurieren und Verwalten von Webex Calling-Geräten
 In diesem Artikel
 Feedback?
Sie können Geräte für Benutzer und Arbeitsbereiche in Control Hub zuweisen und verwalten. Wählen Sie, ob sie über die MAC-Adresse hinzugefügt werden möchten oder indem Sie einen Aktivierungscode generieren, den Sie auf dem Gerät selbst eingeben möchten.
Beim Hinzufügen eines Geräts wird ein 16-stelliger Aktivierungscode angezeigt. Der Aktivierungscode verfällt nach 30 Tagen bei MPP-Telefonen und nach 7 Tagen bei Room-Geräten.
Fügen Sie einem Benutzer ein Telefon hinzu.
Mit Control Hub können Sie einem Benutzer ein Telefon zur persönlichen Nutzung zuweisen. Die hier aufgeführten Telefone unterstützen Webex Calling. Obwohl alle diese Telefone über eine MAC-Adresse hinzugefügt werden können, kann nur die folgende Teilmenge über einen Aktivierungscode registriert werden:
-
Multiplattform-Telefone der Cisco IP-Telefon-Serie 6800 (Audiotelefone 6821, 6841, 6851, 6861, 6871)
-
Cisco-IP-Telefone (Multiplattform-Telefone) der Serie 7800 (Audiotelefone – 7811, 7821, 7841, 7861)
-
Cisco-IP-Telefone (Multiplattform-Telefone) der Serie 8800 (Audiotelefone – 8811, 8841, 8851, 8861)
-
Multiplattform-Telefone der Cisco IP-Telefon-Serie 8800 (Videotelefone 8845, 8865)
-
Cisco IP-Konferenztelefon 7832 und 8832
-
Cisco Video Phone 8875
-
Cisco Tischtelefon der 9800-Serie
Im Control Hub können Sie nur DECT-Basisstationen (nicht DECT-Mobilteile) zuweisen. Nachdem Sie einem Benutzer eine Basisstation zugewiesen haben, koppeln Sie ein DECT-Mobilteil manuell mit dieser Basisstation. Weitere Informationen finden Sie unter Verbinden des Handsets mit der Basisstation.
| 1 | |
| 2 |
Gehe zu . Sie können dem Benutzer auch im Bereich „Benutzer“ ein Gerät hinzufügen, indem Sie zu > Wählen Sie einen Benutzer aus > .
|
| 3 |
Wählen Sie Persönliche Nutzung, um einem Benutzer ein Gerät zuzuweisen, und klicken Sie dann auf Weiter. |
| 4 |
Geben Sie entweder den Benutzernamen oder den tatsächlichen Namen des Telefonbesitzers ein, wählen Sie den Benutzer aus den Ergebnissen aus und klicken Sie dann auf Weiter. |
| 5 |
Wählen Sie den Gerätetyp aus, den Sie für den Benutzer einrichten möchten:
|
Hinzufügen eines Telefons zu einem neuen Arbeitsbereich
Wenn Menschen am Arbeitsplatz sind, versammeln sie sich an Orten wie Kantinen, Lobbys und Konferenzräumen. Sie können in diesen Arbeitsbereichen gemeinsam genutzte Webex-Geräte einrichten, Dienste hinzufügen und dann die Zusammenarbeit beobachten.
Ein Workspaces-Gerät wird nicht einem bestimmten Benutzer, sondern einem physischen Standort zugeordnet, wodurch eine gemeinsame Nutzung ermöglicht wird.
Die aufgeführten Geräte unterstützen Webex Calling. Die meisten dieser Geräte können Sie über eine MAC-Adresse registrieren, nur die folgende Teilmenge lässt sich über einen Aktivierungscode registrieren:
-
Multiplattform-Telefone der Cisco IP-Telefon-Serie 6800 (Audiotelefone 6821, 6841, 6851)
-
Cisco-IP-Telefone (Multiplattform-Telefone) der Serie 7800 (Audiotelefone – 7811, 7821, 7841, 7861)
-
Cisco-IP-Telefone (Multiplattform-Telefone) der Serie 8800 (Audiotelefone – 8811, 8841, 8851, 8861)
-
Multiplattform-Telefone der Cisco IP-Telefon-Serie 8800 (Videotelefone 8845, 8865)
-
Cisco IP-Konferenztelefon 7832 und 8832
-
Cisco Tischtelefon der 9800-Serie
Vorbereitungen
- Mit einer professionellen Workspace-Lizenz können Sie bis zu fünf Cisco-Tischtelefone, Cisco MPP-Telefone, drahtlose Geräte, ATAs, Telefon-Betriebssysteme oder Geräte von Drittanbietern zu einem Workspace hinzufügen.
- Mehrere Geräte können Sie einem professionellen Arbeitsbereich nur über die Seite „Neuer Arbeitsbereich“ hinzufügen. Aktivieren Sie →...
- Mit einer Workspace-Lizenz für einen gemeinsamen Arbeitsbereich können Sie nur ein Gerät zu einem Workspace hinzufügen.
| 1 | |
| 2 |
Gehe zu . Sie können einem neuen Arbeitsbereich auch ein Gerät hinzufügen, indem Sie zu .
|
| 3 |
Wählen Sie Gemeinsame Nutzungund klicken Sie dann auf Weiter. |
| 4 |
Wählen Sie Neuer Arbeitsbereichund klicken Sie dann auf Weiter. |
| 5 |
Geben Sie einen Namen für den Arbeitsbereich ein (z. B. den Namen des physischen Raums), wählen Sie den Raumtyp aus, geben Sie die Raumkapazität an und wählen Sie den Standort des Arbeitsbereichs aus. Klicken Sie auf Weiter. Ein Arbeitsbereichsname darf nicht länger als 128 Zeichen sein und darf keine folgenden Merkmale aufweisen: %, #, <, >, /, \, und " Zeichen. |
| 6 |
Wählen Sie den Gerätetyp aus, den Sie für den Arbeitsbereich einrichten möchten:
|
| 7 |
Klicken Sie auf den Dienst Calling und wählen Sie den Abonnement- und Lizenztyp aus, den Sie dem Arbeitsbereich zuweisen möchten.
Weitere Informationen zu den in den Lizenzen enthaltenen Funktionen finden Sie unter Verfügbare Funktionen nach Lizenztyp für Webex Calling. |
| 8 |
Weisen Sie einen Standort und eine Telefonnummer zu (hängt vom gewählten Standort ab), und klicken Sie auf Speichern. Zudem können Sie einen Anschluss zuweisen. Der Standort wird während der nächtlichen Resynchronisierung aktualisiert. Wenn Sie zusätzliche Geräte zu einem professionellen Arbeitsbereich hinzufügen möchten, können Sie dies auf eine der folgenden Arten tun:
Informationen zum Ändern oder Verwalten der dem Arbeitsbereich zugewiesenen Geräte finden Sie im Abschnitt Verwalten eines Geräts für einen Arbeitsbereich. |

Ein vorhandenes Telefon einem anderen Benutzer oder Gerät zuweisen
Gehen Sie folgendermaßen vor, um ein Telefon wiederzuverwenden, das einem Webex Calling einem anderen Benutzer Webex Calling Workspace zugewiesen ist:
| 1 | |
| 2 |
Gehe zu User/Workspace wo das Gerät derzeit zugewiesen ist. Sie können das Gerät in folgenden Szenarien neu zuweisen:
|
| 3 |
Gehen Sie am Telefon zum Menü "Einstellungen" und führen Sie die folgenden Schritte aus, um das Telefon neu zu zuweisen. |
| 4 |
Befolgen Sie die Anweisungen im Bereich "Telefon hinzufügen und Benutzer zuweisen" oder "Telefon zu einem neuen Arbeitsbereich hinzufügen", um einem Benutzer/Workspace ein Telefon zu zuweisen oder ein Telefon hinzuzufügen. |
| 5 |
Nachdem Sie das Gerät im Control Hub hinzugefügt haben, führen Sie diese Schritte auf dem Telefon aus: |
Fügen Sie einem Benutzer ein Board, einen Schreibtisch oder ein Raumgerät hinzu.
Wenn Sie jemandem ein Board-, Desk- oder Raumgerät als persönliches Gerät zuweisen, können diese Personen ihre Webex-Anrufe und -Meetings direkt auf ihrem Gerät empfangen. Weitere Details finden Sie unter Zuweisen eines persönlichen Board-, Desk- oder Raumgeräts zu einem Benutzer.
Fügen Sie einem neuen Arbeitsbereich ein Board, einen Schreibtisch oder ein Raumgerät hinzu.
Wenn Personen bei der Arbeit sind, treffen sie sich in vielen Arbeitsbereichen wie Pausenräumen, Lobbys und Konferenzräumen. Sie können in diesen Arbeitsbereichen freigegebene Cisco WebEx-Geräte einrichten, Dienste hinzufügen und die produktive Zusammenarbeit fördern.
Das Grundprinzip eines Workspaces-Geräts besteht darin, dass es nicht einem bestimmten Benutzer, sondern einem physischen Standort zugeordnet ist, was eine gemeinsame Nutzung ermöglicht.
Die hier aufgeführten Geräte unterstützen Webex Calling.
| 1 | |
| 2 |
Gehe zu . Sie können einem neuen Arbeitsbereich auch ein Gerät hinzufügen, indem Sie im Bereich „Arbeitsbereiche“ zu .
|
| 3 |
Wählen Sie Gemeinsame Nutzung und klicken Sie auf Weiter. |
| 4 |
Wählen Sie Neuer Arbeitsbereich und klicken Sie auf Weiter. |
| 5 |
Geben Sie einen Namen für den Arbeitsbereich ein (z. B. den Namen des physischen Raums), wählen Sie den Raumtyp aus, geben Sie die Raumkapazität an und wählen Sie den Standort für den Arbeitsbereich aus. Klicken Sie anschließend auf Weiter. |
| 6 |
Wählen Sie Cisco Room and Desk Gerät. |
| 7 |
Wählen Sie einen der folgenden Dienste aus und klicken Sie auf Weiter.
|
| 8 |
Wenn Sie sich für einen Cisco Webex Calling -Dienst entschieden haben, wählen Sie anschließend das Abonnement und den Lizenztyp aus, den Sie dem Arbeitsbereich zuweisen möchten.
Weitere Informationen zu den in den Lizenzen enthaltenen Funktionen finden Sie unter Verfügbare Funktionen nach Lizenztyp für Webex Calling. |
| 9 |
Weisen Sie einen Standort, eine Telefonnummer (hängt vom gewählten Standort ab) und eine Durchwahl zu, und klicken Sie dann auf Speichern. |
| 10 |
Aktivieren Sie das Gerät über den angegebenen Code. Sie können den Aktivierungscode kopieren, per E-Mail senden oder ausdrucken. |
Massenhinzufügen und -zuweisen von Geräten
Um Benutzern und Arbeitsbereichen mehrere Geräte zuzuordnen, können Sie eine CSV-Datei mit den erforderlichen Informationen füllen und diese Geräte in nur wenigen einfachen Schritten aktivieren.
- Mit einer Professional Workspace-Lizenz können Sie bis zu 5 Cisco Desk Phones, Cisco MPP-Telefone, ATAs oder Geräte von Drittanbietern zu einem Workspace hinzufügen.
- Mit einer Lizenz für einen Gemeinschaftsarbeitsbereich können Sie nur ein Gerät zu einem Arbeitsbereich hinzufügen.
Die hier aufgeführten Geräte unterstützen Webex Calling. Sie können alle Geräte über eine MAC-Adresse registrieren; die folgende Teilmenge der Geräte muss jedoch über einen Aktivierungscode registriert werden:
-
Multiplattform-Telefone der Cisco IP-Telefon-Serie 6800 (Audiotelefone 6821, 6841, 6851)
-
Cisco-IP-Telefone (Multiplattform-Telefone) der Serie 7800 (Audiotelefone – 7811, 7821, 7841, 7861)
-
Cisco-IP-Telefone (Multiplattform-Telefone) der Serie 8800 (Audiotelefone – 8811, 8841, 8851, 8861)
-
Multiplattform-Telefone der Cisco IP-Telefon-Serie 8800 (Videotelefone 8845, 8865)
-
Cisco IP-Konferenztelefon 7832 und 8832
-
Cisco Video Phone 8875
-
Cisco Tischtelefon der 9800-Serie
| 1 | ||||||||||||||||||||||||||||||||||||||
| 2 |
Gehe zu . | |||||||||||||||||||||||||||||||||||||
| 3 |
Wählen Sie eine der folgenden Optionen und klicken Sie auf Herunterladen.
Sie können die folgende Tabelle verwenden, um Ihre CSV-Datei vorzubereiten.
Die folgenden Felder sind Pflichtfelder, wenn ein Gerät Webex Calling-Benutzern und -Arbeitsbereichen zugewiesen wird:
Diese Felder für Telefonnummer und Durchwahl hießen zuvor Rufnummer und Direktwahl. ; Diese Spaltennamen werden noch für kurze Zeit unterstützt. Wir empfehlen, die Anzahl der Geräte auf 1.000 pro CSV-Datei zu beschränken. Wenn Sie mehr als 1000 Geräte hinzufügen möchten, verwenden Sie eine zweite CSV-Datei. | |||||||||||||||||||||||||||||||||||||
| 4 |
Füllen Sie die Tabelle aus. | |||||||||||||||||||||||||||||||||||||
| 5 |
Laden Sie die CSV-Datei per Drag und Drop hoch oder klicken Sie auf „Datei auswählen“. | |||||||||||||||||||||||||||||||||||||
| 6 |
Wenn die MAC-Adresse leer ist, können Sie auswählen, wohin der Aktivierungscode gesendet werden soll.
Sie oder der Benutzer müssen den Aktivierungscode auf dem Gerät eingeben, um es zu aktivieren. | |||||||||||||||||||||||||||||||||||||
| 7 |
Klicken Sie auf Senden. Zeigt den aktualisierten Status an, sobald die Geräte aktiv werden.
Multiplattform-Geräte müssen mit einer Firmware-Version von 11.3.1 SR2 oder höher laufen, damit Benutzer den Aktivierungscode auf ihrem Gerät eingeben können. Informationen zum Aktualisieren der Telefon-Firmware finden Sie in diesem Artikel. |
Geräteliste exportieren
Wenn Sie die Liste der Benutzern und Arbeitsbereichen zugewiesenen Geräte anzeigen möchten, können Sie die CSV-Datei exportieren.
Melden Sie sich bei Control Hub an und gehen Sie zu Geräte.
Wählen Sie mehrere Geräte aus der Geräteliste aus und wählen Sie die Option Exportieren aus. Sie können die Felder auswählen, die in die CSV-Datei aufgenommen werden sollen, und den Inhalt in einen lokalen Ordner exportieren.
Die im CSV-Dokument angezeigten Felder hängen von der Verbindung des Geräts zur Plattform ab. Daher sind einige Felder in der Ausgabedatei nicht verfügbar.
Verwalten eines Geräts für einen Benutzer
Sie können die Geräte, die Benutzern in Ihrer Organisation zugewiesen sind, hinzufügen, entfernen, neu starten, die Aktivierung überprüfen oder einen neuen Aktivierungscode erstellen. Dies kann hilfreich sein, um Geräte bei Bedarf auf dem Bildschirm des Benutzer anzuzeigen und zu verwalten.
| 1 | |
| 2 |
Gehe zu . |
| 3 |
Wählen Sie einen Benutzer aus und klicken Sie auf Geräte. |
| 4 |
Um diesem Benutzer ein Gerät hinzuzufügen, klicken Sie auf Gerät hinzufügen. Wenn dem Benutzer bereits ein Gerät zugewiesen ist und Sie ein weiteres Gerät hinzufügen möchten, klicken Sie auf . Weitere Informationen zum Hinzufügen des Geräts zu einem Benutzer finden Sie im Abschnitt Hinzufügen von Telefonen zu einem Benutzer. |
| 5 |
Um ein bestehendes Gerät zu ändern, wählen Sie den Gerätenamen aus. Hier gelangen Sie zur Seite „Geräte“. Hier können Sie Geräteeinstellungen anzeigen und bearbeiten, das Gerät löschen, es neu starten oder ggf. einen neuen Aktivierungscode für das Gerät erstellen. Weitere Informationen über das Konfigurieren von Telefoneinstellungen finden Sie unter Konfigurieren und Aktualisieren von Telefoneinstellungen. |
| 6 |
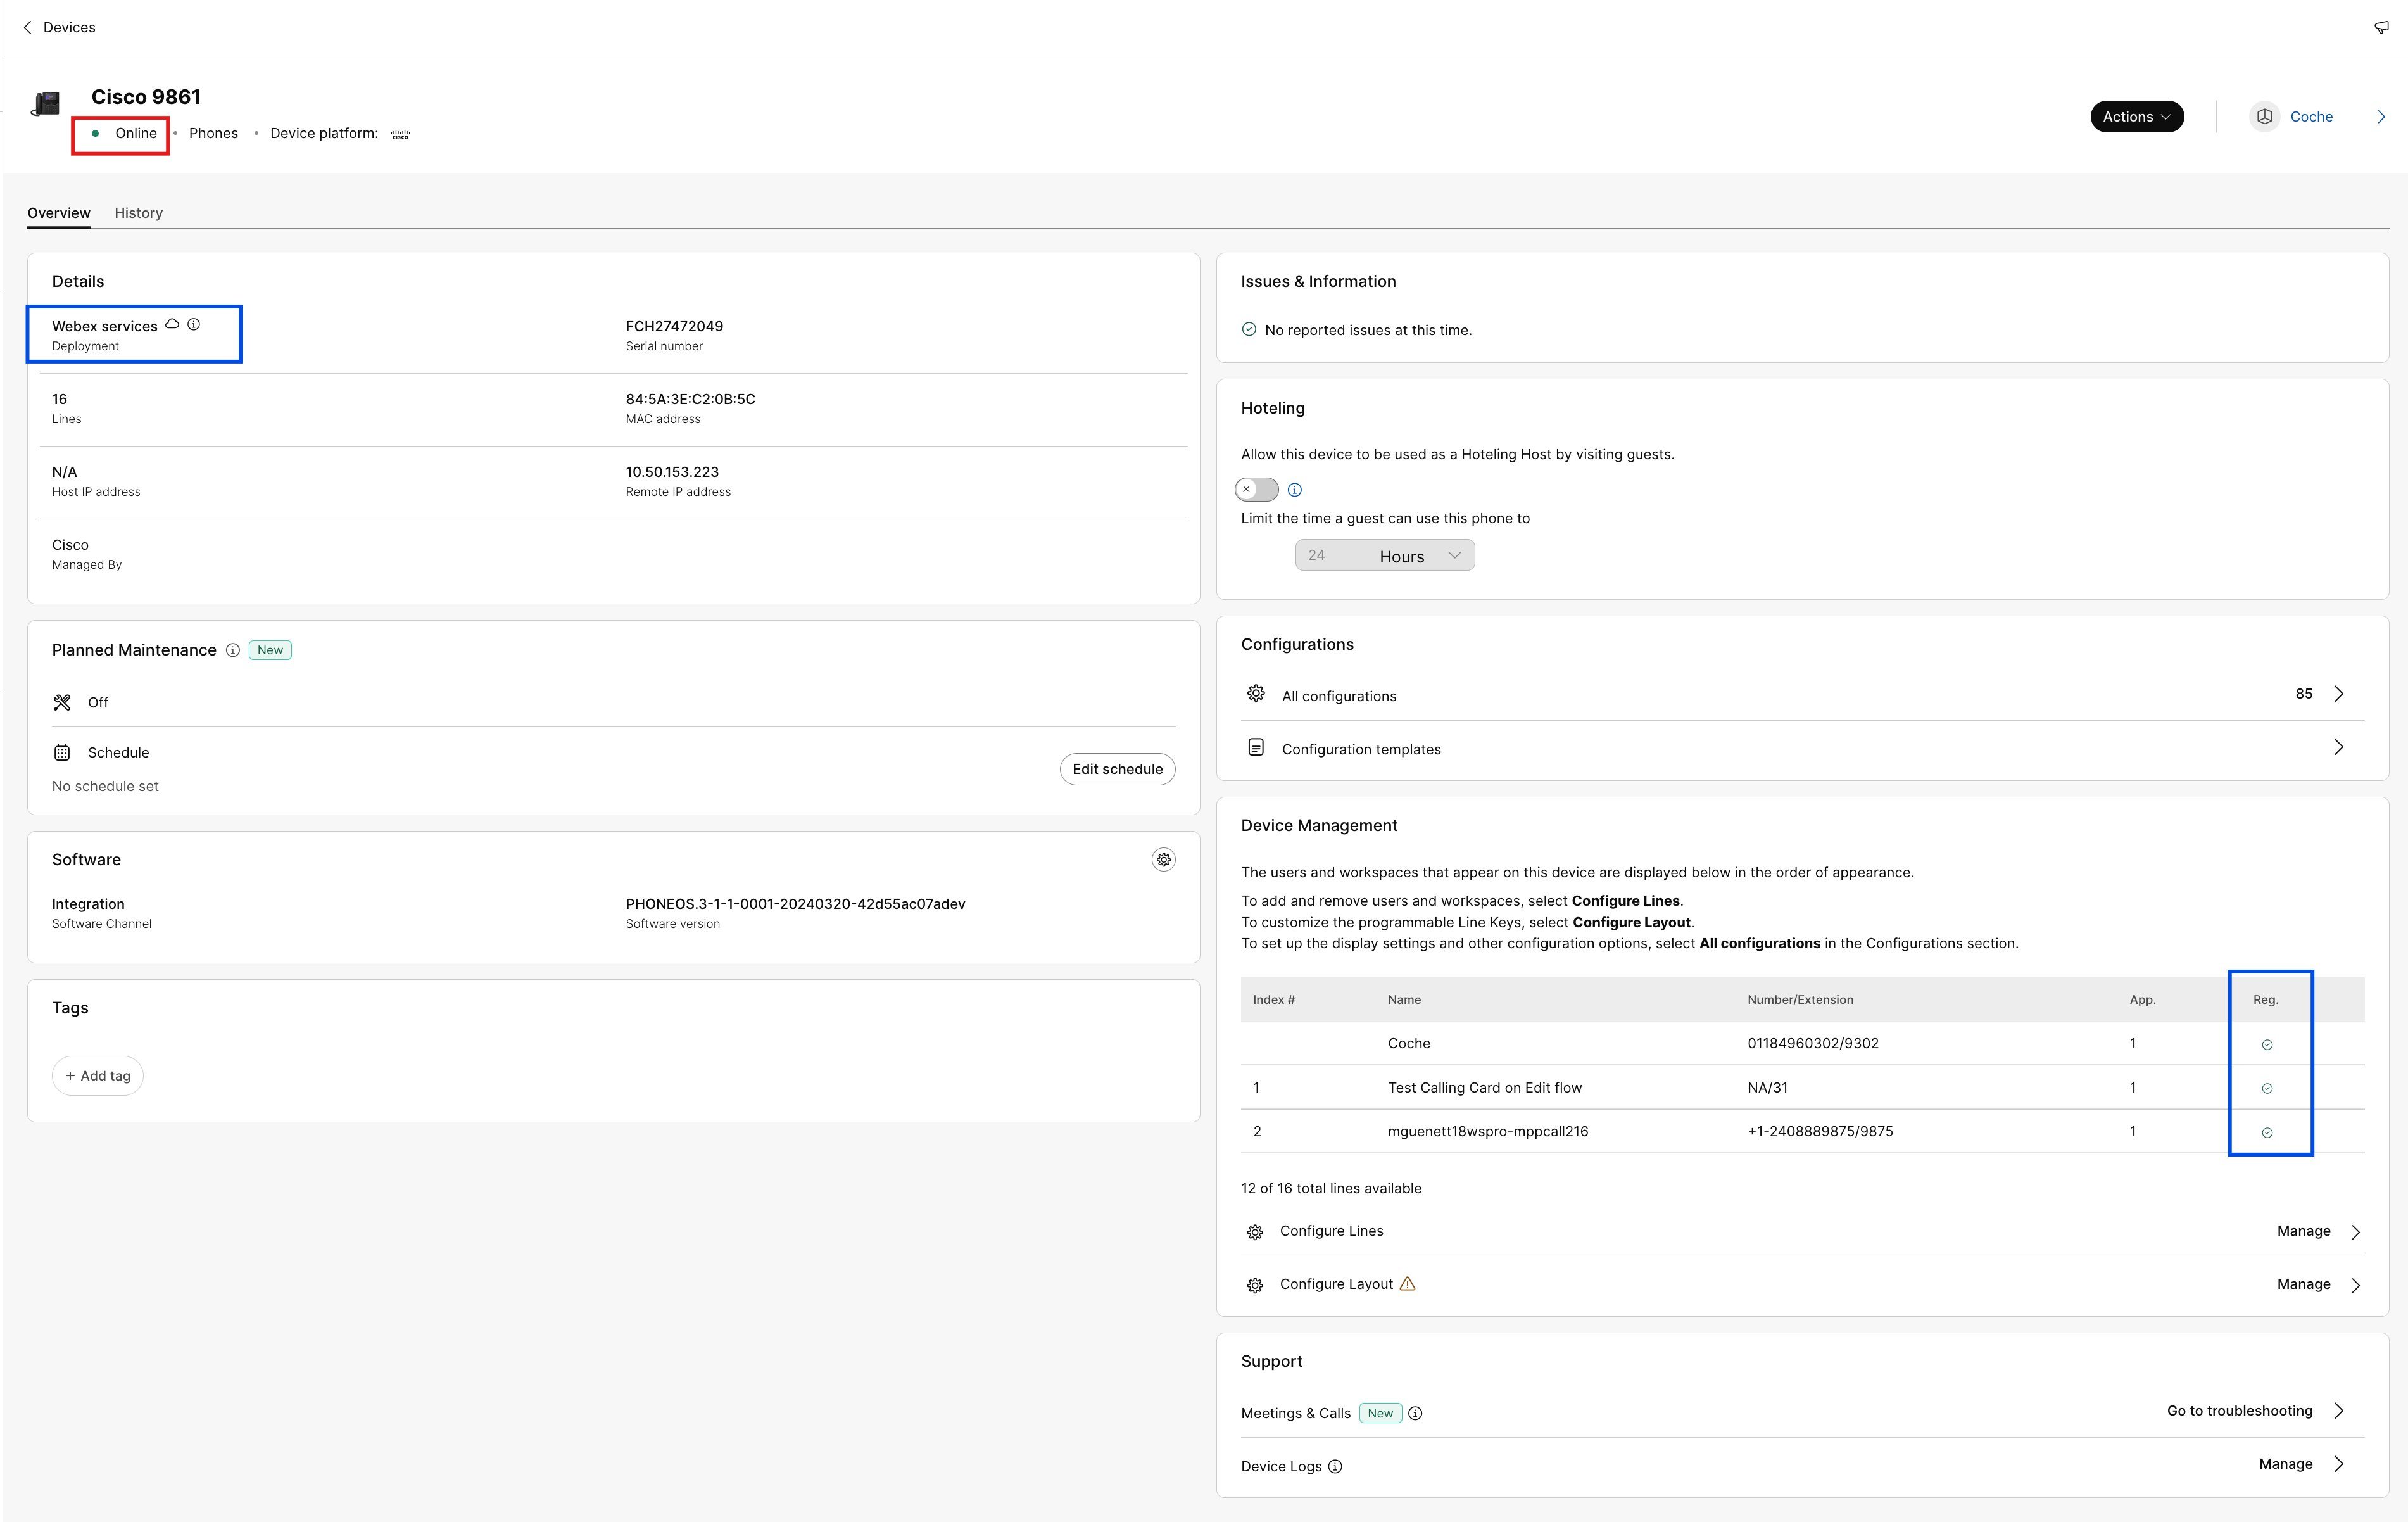
Wenn das dem Benutzer hinzugefügte Gerät Webex Aware ist, wird die Option Webex Aware unter den Geräten angezeigt, wie im Diagramm dargestellt. Webex Aware weist darauf hin, dass das Gerät mit der Webex-Plattform integriert wurde und Zugriff auf vom Telefon unterstützte Webex-Funktionen hat.
|
| 7 |
Klicken Sie auf Aktionen , um das Gerät zu verwalten. Mit der Funktion „Aktionen“ können Sie Konfigurationsänderungen anwenden, das Gerät neu starten, ein Problem melden und Geräteprotokolle sammeln oder das Gerät löschen. Auf der Registerkarte Aktionen stehen für ein Webex Aware-fähiges Gerät die folgenden Optionen zur Verfügung:
|
Verwalten eines Geräts für einen Arbeitsbereich
Sie können Geräte direkt über ein Workspace-Profil hinzufügen und verwalten. Arbeitsbereich-Geräte können ATA-Geräte wie Faxgeräte umfassen. Sie können ein Arbeitsbereich-Gerät auch als Hoteling-Gastgeber einrichten. Weitere Informationen zum Thema Hoteling finden Sie unter Hoteling im Control Hub.
| 1 | |
| 2 |
Gehe zu . |
| 3 |
Wählen Sie den zu bearbeitenden Arbeitsbereich aus. |
| 4 |
Um ein Gerät hinzuzufügen, klicken Sie in der Kachel Geräte auf Gerät hinzufügen. Weitere Informationen zum Hinzufügen von Geräten zu einem Arbeitsbereich finden Sie im Abschnitt Hinzufügen eines Telefons zu einem neuen Arbeitsbereich. |
| 5 |
Um ein bestehendes Gerät zu ändern, wählen Sie den Gerätenamen aus. Hier gelangen Sie zur Seite „Geräte“. Hier können Sie Geräteeinstellungen anzeigen und bearbeiten, das Gerät löschen, es neu starten und das Gerät zur Verwendung als Hoteling-Gastgeber aktivieren. Weitere Informationen über das Konfigurieren von Telefoneinstellungen finden Sie unter Konfigurieren und Aktualisieren von Telefoneinstellungen. |
| 6 |
Wenn das dem Workspace hinzugefügte Gerät Webex Aware ist, wird die Option Webex Aware unter den Geräten angezeigt, wie im Diagramm dargestellt. Webex Aware weist darauf hin, dass das Gerät mit der Webex-Plattform integriert wurde und Zugriff auf Webex-Funktionen hat, die vom Telefon unterstützt werden.
|
| 7 |
Klicken Sie auf Aktionen , um das Gerät zu verwalten. Aktionen helfen dabei, Konfigurationsänderungen anzuwenden oder die Firmware für die MPP-Geräte zu aktualisieren. Auf der Registerkarte Aktionen stehen für ein Webex Aware-fähiges Gerät die folgenden Optionen zur Verfügung:
|
Zeilen konfigurieren – Zeilen hinzufügen und neu anordnen
Die Funktion „Leitungen konfigurieren“ zum Zuweisen von primären, gemeinsam genutzten und virtuellen Leitungen zu Telefonen ermöglicht die mehrfache Anzeige einer gemeinsam genutzten Leitung auf demselben Gerät. Die Konfiguration der Ports für ATAs hat sich nicht geändert.
Hier die Aktualisierungen für die Funktion „Leitungen konfigurieren“ für MPP- und PhoneOS-Geräte:
-
Primärlinien
-
Weisen Sie den Besitzer des Geräts zu und stellen Sie sicher, dass dieser die erste Position in der Zeile auf dem Gerät einnimmt.
-
Erhöhen Sie die Anzahl der Darstellungen in dieser Zeile, um weitere Darstellungen hinzuzufügen.
-
-
Gemeinsame Leitungen / Virtuelle Linien
-
Weisen Sie freigegebene Leitungen von jedem Anruffähigen Benutzer oder Arbeitsbereich innerhalb der Organisation mit verfügbaren Shared Call Appearances (SCAs) zu.
-
Erhöhen Sie die Anzahl der Darstellungen in der gemeinsamen Zeilenzeile, um zusätzliche Darstellungen hinzuzufügen.
Die für den Benutzer oder Arbeitsbereich verfügbaren SCA-Limits können die zuweisbaren Darstellungen einschränken.
-
Weisen Sie jeder gemeinsamen Zeile einen Zeilenindex zu. Die gemeinsamen Zeilen können per Drag & Drop neu angeordnet werden.
Die einzelnen Erscheinungsformen einer Linie lassen sich nicht trennen.
-
Verwenden Sie die Benutzereinstellungen zum Anordnen der Position gemeinsam genutzter Leitungsindizes auf einem Gerät.
-
-
Erscheinungsbilder
-
Konfigurieren Sie mehrere Darstellungen derselben primären, gemeinsam genutzten oder virtuellen Linie als individuelle gewichtete Liniensätze.
-
Gewichtete Leitungen werden mit einem Suffix -1, -2 usw. gekennzeichnet (nur Cisco-Telefone).
-
Anrufe werden auf der ersten verfügbaren gewichteten Leitung angenommen.
-
-
Neue zusammenfassende Informationen (am Ende der Seite)
-
Eindeutige SIP-Registrierungsleitungen – Zeigt die Anzahl der eindeutigen SIP-Registrierungskonten an, die das Telefon unterstützen kann. Die maximale Anzahl der aktuell unterstützten Konten beträgt 16.
-
Gesamtzahl der Leitungsdarstellungen – Zeigt die Gesamtzahl der vom Gerät unterstützten zuweisbaren Leitungsdarstellungen an. Wenn das Telefonmodell KEMs unterstützt, beinhaltet die maximale Anzahl der Auftritte die erweiterte Kapazität.
-
-
Massenzuweisung von Leitungen und öffentliche APIs
- Die Bulk-CSV- und Public-API-Methoden zum Zuweisen von Zeilen beinhalten die Funktionalität „Darstellungen“.
Weitere Informationen zur gemeinsamen Nutzung von Leitungen über verschiedene Standorte hinweg finden Sie unter Konfiguration von gemeinsamen Leitungen und virtuellen Leitungen über verschiedene Standorte hinweg.
Wenn einem Telefon durch langes Drücken der gewünschten Leitungstaste eine Kurzwahl hinzugefügt wird, ist die Kurzwahl im Control Hub nicht sichtbar. Eine Kurzwahl kann überschrieben werden, indem eine gemeinsame Leitung auf dieser Leitungstaste konfiguriert wird.
| 1 | |
| 2 |
Gehen Sie zu Benutzer oder Arbeitsbereiche (je nachdem, wo das zu ändernde Gerät zugewiesen ist). |
| 3 |
Wählen Sie einen Benutzer oder einen Arbeitsbereich aus. |
| 4 |
Gehen Sie zu Geräte und klicken Sie auf ein Gerät, für das Sie die gemeinsamen Leitungen hinzufügen oder ändern möchten. Hier gelangen Sie zur Seite „Geräte“. |
| 5 |
Unter Geräteverwaltungklicken Sie auf Leitungen konfigurieren. |
| 6 |
Um eine gemeinsame Leitungsdarstellung hinzuzufügen, klicken Sie auf das Symbol Sie können dieselbe gemeinsame Leitung oder virtuelle Leitung mehreren einzelnen Leitungstasten auf einem Telefon zuweisen. Klicken Sie in der Spalte Darstellungen der jeweiligen Zeile auf das Symbol
Sie können die Zeilen in der Reihenfolge hinzufügen, in der sie erscheinen sollen. Um die Leitungsdarstellung neu anzuordnen, löschen Sie Einträge aus der Liste, und fügen Sie sie in der Reihenfolge hinzu, in der sie erscheinen sollen. Wenn ein Benutzer Nummern von anderen hat users/groups Wenn Sie dies auf Ihren Geräten konfiguriert haben, können Sie eine Leitungsbezeichnung für die gemeinsam genutzte Leitung hinzufügen. Diese Linienbezeichnung hilft dabei, eine gemeinsame Liniendarstellung von der anderen zu unterscheiden. Um eine Leitung zu entfernen, klicken Sie auf das Symbol |
| 7 |
Klicken Sie auf Speichern. Bei großen Organisationen muss der Administrator einen Standort auswählen, bevor er zusätzliche Telefonleitungen konfigurieren kann. Klicken Sie auf das Symbol Bei einer regulären Organisation ist der Standortfilter nicht verfügbar, und der Administrator kann eine Zeile auswählen. |
 , suchen Sie nach Namen oder Telefonnummer und wählen Sie eine Leitung aus.
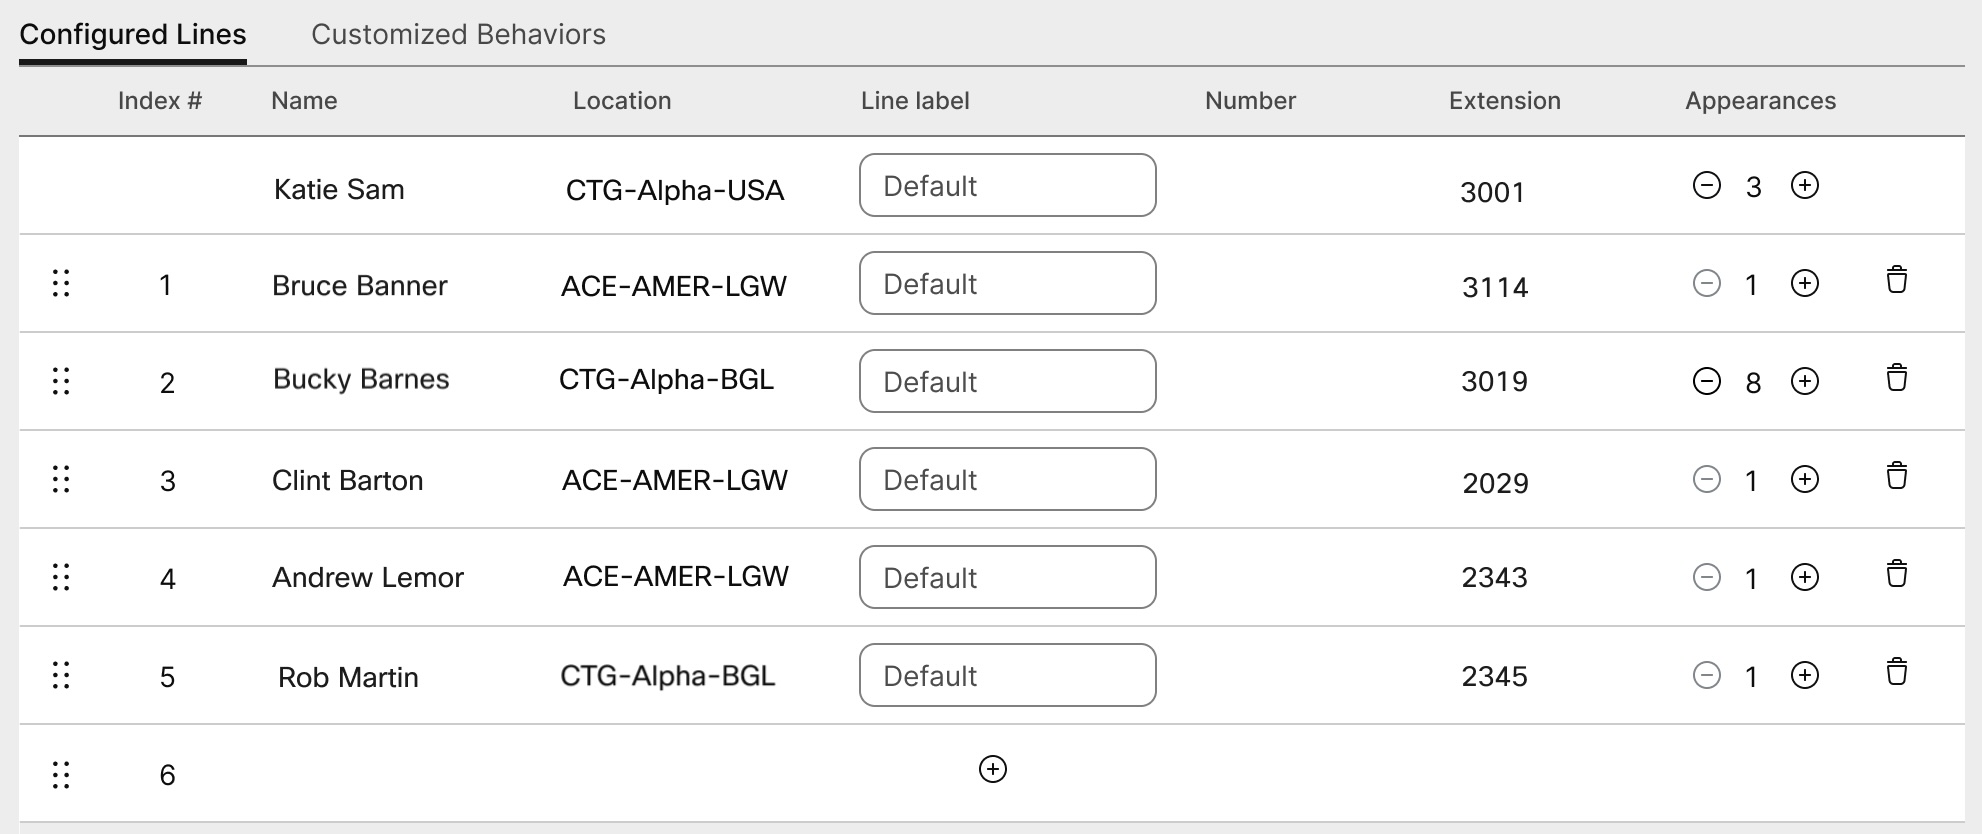
 . Der primäre Benutzer kann nicht online entfernt werden. 1.
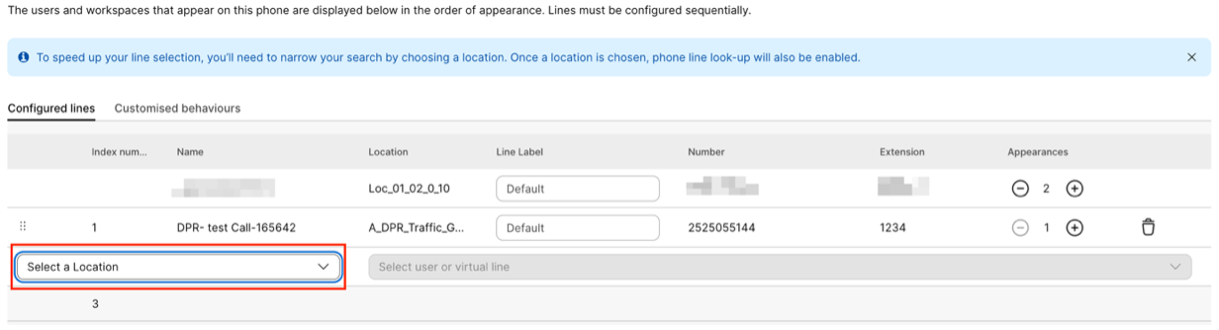
Konfigurieren eines ATA-Geräts für einen Benutzer
Im Control Hub können Sie die Ports eines einem Benutzer zugewiesenen Analog Telephone Adapter (ATA)-Geräts konfigurieren. Aktuell sind zwei Konfigurationen für ATA-Geräte verfügbar: Geräte mit zwei Ports und Geräte mit 24 Ports.
| 1 | |
| 2 |
Gehe zu . |
| 3 |
Wählen Sie einen Benutzer aus, den Sie bearbeiten möchten, und scrollen Sie zu Geräte. |
| 4 |
Wählen Sie ein Gerät aus, dem Sie etwas hinzufügen oder das Sie ändern möchten. |
| 5 |
Klicken Sie unter Benutzer auf diesem Gerät auf Ports konfigurieren. |
| 6 |
Um eine Konfiguration für einen gemeinsam genutzten Port hinzuzufügen, klicken Sie auf das Symbol |
| 7 |
Geben Sie den Namen oder die Telefonnummer ein, wählen Sie aus den angezeigten Optionen aus, und klicken Sie danach auf Speichern. Nur Arbeitsbereiche ohne Geräte werden in der Suche angezeigt. |
| 8 |
Falls das Gerät die T.38-Faxkomprimierung erfordert, aktivieren Sie das Kontrollkästchen in der Spalte T.38 oder überschreiben Sie die benutzerdefinierten Komprimierungsoptionen und klicken Sie anschließend auf Speichern. Ein Arbeitsbereich kann einen ATA haben. Dies ist für Faxgeräte nützlich. |
 .
.Hinzufügen von Nummern zu einem Standort
Sie können in Ihrer Kundenorganisation jederzeit Telefonnummern zu Desk- und Room-Geräten hinzufügen, ganz gleich, ob Sie eine Testversion nutzen oder zu einem kostenpflichtigen Abonnement gewechselt haben.
Wir haben die Anzahl der Telefonnummern, die Sie im Control Hub hinzufügen können, von 250 auf 1000 erhöht.
| 1 | |
| 2 |
Gehen Sie zu und klicken Sie dann auf Zahlen hinzufügen. |
| 3 |
Geben Sie den Standort und den Nummerntyp an. Wenn Sie Rufnummern portieren, geben Sie sowohl Ihre aktuelle als auch Ihre neue Rechnungsnummer ein. |
| 4 |
Geben Sie den Ort, das Bundesland, die Vorwahl, die Vorwahl (optional) an und klicken Sie dann auf Suchen. Es werden die verfügbaren Nummern angezeigt. |
| 5 |
Wählen Sie die Nummern aus, die Sie dem Standort hinzufügen möchten. Die ausgewählten Zahlen werden in das Feld Ausgewählte Zahlen verschoben. |
| 6 |
Klicken Sie auf „Speichern“. |
Überprüfen des Status bestellter PSTN-Nummern
Multiplatform Phone (MPP)-Zubehör – Headsets und Key Expansion Modules (KEMs)
Wenn Sie Zubehör anschließen (Headsets/KEMs) Für ein MPP-Gerät werden sie als Inventargegenstand auf der Registerkarte „Geräte“ im Control Hub angezeigt. Über den Control Hub-Gerätebestand finden Sie Informationen zum Modell des Zubehörgeräts, zum Status und zum Besitzer des Zubehörgeräts. Wenn Sie ein Zubehörgerät auswählen, können Sie zusätzliche Informationen abrufen, z. B. Seriennummer und die aktuelle Softwareversion des Zubehörgeräts. Das Statusfeld des Zubehörgeräts weist den Wert „online“ auf, solange das Zubehör an ein MPP-Gerät angeschlossen ist. Die Software eines an ein MPP-Gerät angeschlossenen Headsets wird automatisch auf die aktuelle Version aktualisiert, die unter „Geräteverwaltung“ verfügbar ist.
|
Telefonmodell |
Cisco-Headset 520-Serie |
Cisco-Headset 530-Serie |
Cisco-Headset 560-Serie |
Cisco-Headset 730-Serie |
|---|---|---|---|---|
|
Cisco IP-Telefon 8811/8841/8845 |
— |
— |
RJ9 UND RJ11 |
— |
|
Cisco IP-Telefon 8851/8861/8865 |
USB |
USB |
USB RJ9 UND RJ11 |
— |
|
Cisco IP-Telefon 7811/7821/7841/7861 |
— |
— |
— |
— |
|
Cisco IP-Telefon 6821/6841/6851/6861 |
— |
— |
— |
— |
|
Cisco IP-Telefon 6871 |
USB |
USB |
USB |
— |
|
Cisco IP-Konferenztelefon 7832/8832 |
— |
— |
— |
— |
|
Telefonmodell |
KEM |
|---|---|
|
Cisco IP-Telefon 8811/8841/8845 |
— |
|
Cisco IP-Telefon 8851/8861/8865 |
BEKEM CP-8800-A-KEM CP-8800-V-KEM |
|
Cisco IP-Telefon 7811/7821/7841/7861 |
— |
|
Cisco IP-Telefon 6821/6841/6861/6871 |
— |
|
Cisco IP-Telefon 6851 |
CP-68KEM-3PCC |
|
Cisco IP-Konferenztelefon 7832/8832 |
— |
Weitere Informationen zur Behebung von Problemen mit Dem Schlüsselerweiterungsmodul (Tastenerweiterungsmodul) auf Telefonen, die auf Webex Calling registriert sind, finden Sie unter Beheben von Problemen mit Schlüsselerweiterungsmodulen Webex Calling System.


