- Página inicial
- /
- Artigo

Obrigado pelos seus comentários.

Configurar e gerenciar dispositivos Webex Calling
 Neste artigo
 Comentários?
Você pode atribuir e gerenciar dispositivos para usuários e workspaces no Control Hub. Escolha adicionar pelo endereço MAC ou gerando um código de ativação para inserir no dispositivo em si.
Ao adicionar um dispositivo, é exibido um código de ativação de 16 dígitos. O código de ativação expira após 30 dias para telefones MPP e após 7 dias para dispositivos Room.
Adicionar um telefone a um usuário
Com o Control Hub, você pode atribuir um telefone a um usuário para uso pessoal. Os telefones listados aqui são compatíveis com o Webex Calling. Embora todos esses telefones possam ser adicionados usando um endereço MAC, apenas o seguinte subconjunto pode ser registrado usando um código de ativação:
-
Telefones multiplataforma Cisco IP Phone 6800 Series (Telefones de áudio—6821, 6841, 6851, 6861, 6871)
-
Telefones multiplataforma Cisco IP Phone 7800 Series (Telefones de áudio—7811, 7821, 7841, 7861)
-
Telefones multiplataforma Cisco IP Phone 8800 Series (Telefones de áudio—8811, 8841, 8851, 8861)
-
Telefones multiplataforma Cisco IP Phone 8800 Series (Telefones de vídeo—8845, 8865)
-
Cisco IP Conference Phone 7832 e 8832
-
Cisco Video Phone 8875
-
Cisco Desk Phone 9800 Series
Você só pode atribuir dispositivos base DECT (e não aparelhos DECT) no Control Hub. Após atribuir uma unidade base a um usuário, emparelhe manualmente um aparelho DECT com essa unidade base. Para obter mais informações, consulte Conectar o aparelho à estação base.
| 1 | |
| 2 |
Acesse . Você também pode adicionar um dispositivo ao usuário na seção Usuários, navegando até > selecione um usuário > .
|
| 3 |
Escolha Uso pessoal para atribuir um dispositivo a um usuário e clique em Próximo. |
| 4 |
Digite o nome de usuário ou o nome real do proprietário do telefone, escolha o usuário nos resultados e clique em Próximo. |
| 5 |
Escolha o tipo de dispositivo que deseja configurar para o usuário:
|
Adicionar um telefone a um novo espaço de trabalho
Quando as pessoas estão no trabalho, elas se reúnem em locais como refeitórios, saguões e salas de conferência. Você pode configurar dispositivos Webex compartilhados nesses Espaços de Trabalho, adicionar serviços e, em seguida, observar a colaboração acontecer.
Um dispositivo de espaço de trabalho não é atribuído a um usuário específico, mas sim a um local físico, permitindo assim o uso compartilhado.
Os dispositivos listados são compatíveis com chamadas Webex. Você pode registrar a maioria desses dispositivos usando um endereço MAC e registrar apenas o seguinte subconjunto usando um código de ativação:
-
Telefones multiplataforma Cisco IP Phone 6800 Series (Telefones de áudio—6821, 6841, 6851)
-
Telefones multiplataforma Cisco IP Phone 7800 Series (Telefones de áudio—7811, 7821, 7841, 7861)
-
Telefones multiplataforma Cisco IP Phone 8800 Series (Telefones de áudio—8811, 8841, 8851, 8861)
-
Telefones multiplataforma Cisco IP Phone 8800 Series (Telefones de vídeo—8845, 8865)
-
Cisco IP Conference Phone 7832 e 8832
-
Cisco Desk Phone 9800 Series
Antes de começar
- Com uma licença profissional de Workspace, você pode adicionar até cinco telefones de mesa Cisco, telefones Cisco MPP, dispositivos sem fio, ATAs, sistemas operacionais para telefones ou dispositivos de terceiros a um Workspace.
- Você só pode adicionar vários dispositivos a um espaço de trabalho profissional a partir da página de novo espaço de trabalho. Ative Experimente novos espaços de trabalho no canto superior direito da página do espaço de trabalho para usar a nova página do espaço de trabalho.
- Com uma licença de espaço de trabalho de área comum, você pode adicionar apenas um dispositivo a um espaço de trabalho.
| 1 | |
| 2 |
Acesse . Você também pode adicionar um dispositivo a um novo Espaço de Trabalho acessando .
|
| 3 |
Selecione Uso compartilhadoe clique em Próximo. |
| 4 |
Escolha Novo espaço de trabalhoe clique em Próximo. |
| 5 |
Insira um nome para o espaço de trabalho (como o nome da sala física), selecione o tipo de sala, adicione a capacidade da sala e escolha a localização do espaço de trabalho. Clique em Próximo. O nome de um espaço de trabalho não pode ter mais de 128 caracteres e não pode conter %, #, <, >, /, \, e "caracteres". |
| 6 |
Escolha o tipo de dispositivo que deseja configurar para o espaço de trabalho:
|
| 7 |
Clique no serviço Chamando e escolha a assinatura e o tipo de licença que deseja atribuir ao espaço de trabalho.
Para saber mais sobre os recursos disponíveis com as licenças, consulte Recursos disponíveis por tipo de licença para Webex Calling. |
| 8 |
Atribua um Local e um Número de telefone (determinado pelo local que você escolher) e clique em Salvar. Você também tem a opção de atribuir um ramal. A localização é atualizada durante a resincronização noturna. Se você deseja adicionar dispositivos adicionais a um espaço de trabalho profissional, pode fazê-lo de uma das seguintes maneiras:
Para modificar ou gerenciar os dispositivos atribuídos ao espaço de trabalho, consulte a seção Gerenciar um dispositivo para um espaço de trabalho. |
 na coluna
 Reatribuir um telefone existente a outro usuário ou dispositivo.
Para reutilizar um telefone atribuído a um Webex Calling/workspace para outro Webex Calling ou workspace, siga estas etapas:
| 1 | |
| 2 |
Vá para o User/Workspace onde o dispositivo está atualmente atribuído. Você pode reatribuir o dispositivo nestes cenários:
|
| 3 |
No telefone, vá para o menu de configurações e conclua estes passos para reatribuir o telefone. |
| 4 |
Siga as instruções em Adicionar e atribuir telefone ao usuário ou Adicionar um telefone a um novo workspace para atribuir ou adicionar um telefone a um usuário/workspace. |
| 5 |
Ao adicionar o dispositivo na Central de Controle, conclua estas ações no telefone: |
Adicionar um quadro, mesa ou dispositivo de sala a um usuário
Atribuir um dispositivo de Quadro, Mesa ou Sala como dispositivo pessoal para alguém permite que essa pessoa receba suas chamadas e reuniões do Webex diretamente em seu dispositivo. Para obter mais detalhes, consulte Atribuir um dispositivo pessoal de Quadro, Mesa ou Sala a um usuário.
Adicione um quadro branco, uma mesa ou um dispositivo de sala a um novo espaço de trabalho.
Quando as pessoas estão trabalhando, elas se reúnem em vários espaços de trabalho, como refeitórios, lobbies e salas de conferência. Você pode configurar dispositivos Cisco Webex compartilhados nesses Espaços de trabalho, adicionar serviços e, em seguida, observar a colaboração acontecer.
O princípio fundamental de um dispositivo Workspaces é que ele não é atribuído a um usuário específico, mas sim a um local físico, permitindo o uso compartilhado.
| 1 | |
| 2 |
Acesse . Você também pode adicionar um dispositivo a um novo espaço de trabalho na seção Espaços de trabalho, navegando até .
|
| 3 |
Selecione Uso compartilhado e clique em Próximo. |
| 4 |
Escolha Novo espaço de trabalho e clique em Próximo. |
| 5 |
Insira um nome para o espaço de trabalho (como o nome da sala física), selecione o tipo de sala, adicione a capacidade da sala e escolha a localização do espaço de trabalho. Em seguida, clique em Próximo. |
| 6 |
Selecione dispositivo Cisco Room and Desk. |
| 7 |
Escolha um dos seguintes serviços e clique em Próximo.
|
| 8 |
Se você escolheu um serviço Cisco Webex Calling, escolha a assinatura e o tipo de licença que deseja atribuir ao espaço de trabalho.
Para saber mais sobre os recursos disponíveis com as licenças, consulte Recursos disponíveis por tipo de licença para Webex Calling. |
| 9 |
Atribua um Local, Número de telefone (determinado pelo local que você escolher), um Ramal e clique em Salvar. |
| 10 |
Ative o dispositivo usando o código fornecido. Você pode copiar, enviar por e-mail ou imprimir o código de ativação. |
Adicionar e atribuir dispositivos em massa
Para atribuir vários dispositivos a usuários e espaços de trabalho, você pode preencher um arquivo CSV com as informações necessárias e ativar esses dispositivos em apenas alguns passos simples.
- Com uma licença de espaço de trabalho Profissional, você pode adicionar até 5 telefones de mesa Cisco, telefones Cisco MPP, ATAs ou dispositivos de terceiros a um espaço de trabalho.
- Com uma licença de espaço de trabalho de área comum, você pode adicionar apenas um dispositivo a um espaço de trabalho.
Os dispositivos listados aqui suportam Webex Calling. Você pode registrar todos os dispositivos usando um endereço MAC; no entanto, registre o seguinte subconjunto de dispositivos usando um código de ativação:
-
Telefones multiplataforma Cisco IP Phone 6800 Series (Telefones de áudio—6821, 6841, 6851)
-
Telefones multiplataforma Cisco IP Phone 7800 Series (Telefones de áudio—7811, 7821, 7841, 7861)
-
Telefones multiplataforma Cisco IP Phone 8800 Series (Telefones de áudio—8811, 8841, 8851, 8861)
-
Telefones multiplataforma Cisco IP Phone 8800 Series (Telefones de vídeo—8845, 8865)
-
Cisco IP Conference Phone 7832 e 8832
-
Cisco Video Phone 8875
-
Cisco Desk Phone 9800 Series
| 1 | ||||||||||||||||||||||||||||||||||||||
| 2 |
Acesse . | |||||||||||||||||||||||||||||||||||||
| 3 |
Escolha uma das seguintes opções e clique em Download.
Você pode usar a tabela a seguir para preparar seu arquivo CSV.
Os seguintes campos são obrigatórios ao atribuir um dispositivo a usuários e espaços de trabalho do Webex Calling:
Estes campos Número de Telefone e Ramal eram anteriormente intitulados Número de Diretório e Linha Direta; Esses nomes de coluna continuam sendo válidos por um curto período de tempo. Recomendamos que você limite o número de dispositivos a 1000 por arquivo CSV. Se você quiser adicionar mais de 1000 dispositivos, use um segundo arquivo CSV. | |||||||||||||||||||||||||||||||||||||
| 4 |
Preencha a planilha. | |||||||||||||||||||||||||||||||||||||
| 5 |
Carregue o arquivo CSV arrastando e soltando ou clicando em Escolher um arquivo. | |||||||||||||||||||||||||||||||||||||
| 6 |
Se o campo do endereço MAC estiver em branco, você terá a opção de escolher para onde o código de ativação será enviado.
Você ou o usuário precisam inserir o código de ativação no dispositivo para ativá-lo. | |||||||||||||||||||||||||||||||||||||
| 7 |
Clique em Enviar. Exibe o status atualizado quando os dispositivos se tornam ativos.
Para que os usuários possam inserir o código de ativação em seus dispositivos multiplataforma, eles devem estar executando uma versão de firmware 11.3.1 SR2 ou posterior. Para obter informações sobre como atualizar o firmware do telefone, consulte este artigo. |
Exportar uma lista de dispositivos
Se você deseja visualizar a lista de dispositivos atribuídos a usuários e espaços de trabalho, pode exportar o arquivo CSV.
Faça login no Hub de Controle e acesse Dispositivos.
Selecione vários dispositivos da lista de dispositivos e selecione a opção Exportar. Você pode escolher os campos a serem incluídos no arquivo CSV e exportar o conteúdo para uma pasta local.
Os campos exibidos no arquivo CSV dependem da conexão do dispositivo com a plataforma. Portanto, alguns campos não estão disponíveis no arquivo de saída.
Gerenciar um dispositivo para um usuário
Você pode adicionar, remover, reinicializar, verificar ativação ou criar um novo código de ativação para os dispositivos que são atribuídos aos usuários dentro da sua organização. Isso pode ser útil para visualizar e gerenciar dispositivos na tela do usuário, quando necessário.
| 1 | |
| 2 |
Acesse . |
| 3 |
Selecione um usuário e clique em Dispositivos. |
| 4 |
Para adicionar um dispositivo a este usuário, clique em Adicionar dispositivo. Se o usuário já tiver um dispositivo atribuído e você quiser adicionar outro dispositivo, clique em . Para obter mais informações sobre como adicionar o dispositivo a um usuário, consulte a seção Adicionar telefones a um usuário. |
| 5 |
Para modificar um dispositivo existente, selecione o nome do dispositivo. Isso leva você à página Dispositivos. Aqui você pode visualizar e editar as configurações do dispositivo, excluir o dispositivo, reinicializar o dispositivo ou criar um novo código de ativação para o dispositivo, se aplicável. Para obter mais informações sobre como definir as configurações do telefone, consulte Definir e atualizar as configurações do telefone. |
| 6 |
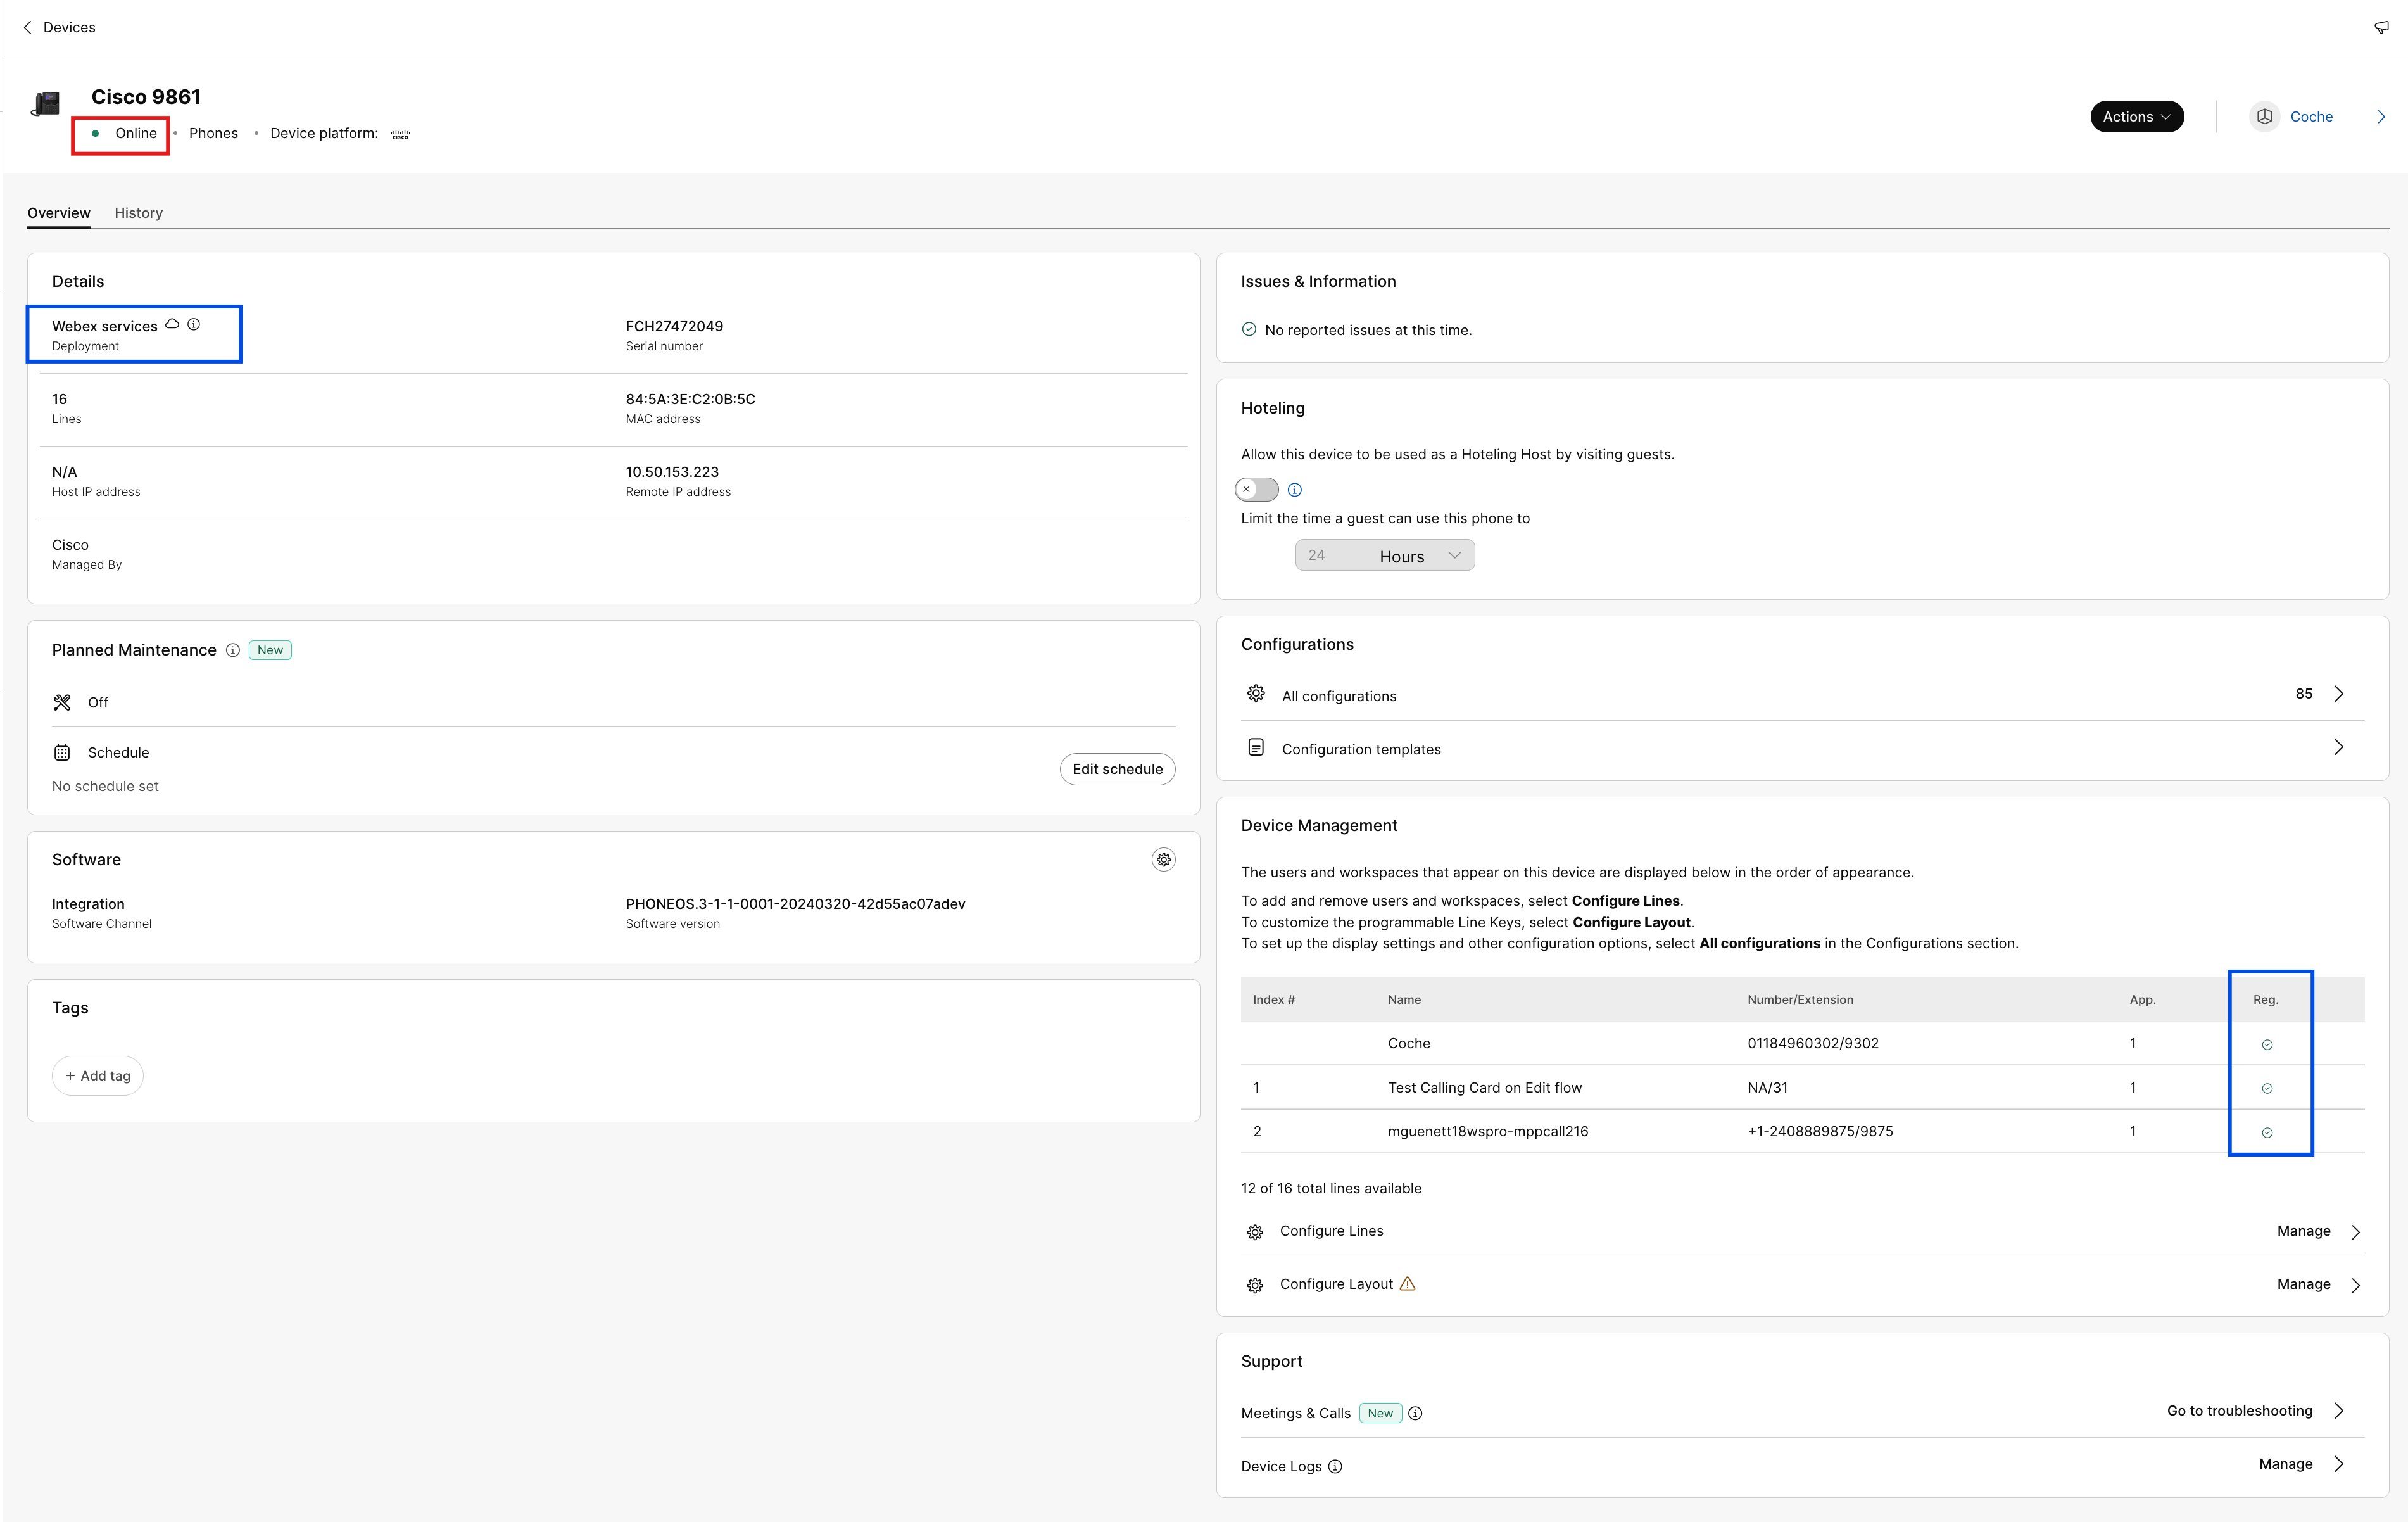
Se o dispositivo adicionado ao usuário for o Webex Aware, a opção do Webex Aware será exibida nos dispositivos conforme mostrado no diagrama. O Webex Aware indica que o dispositivo entrou na plataforma Webex e tem acesso aos recursos Webex suportados pelo telefone.
|
| 7 |
Clique em Ações para gerenciar o dispositivo. A opção Ações permite aplicar alterações de configuração, reiniciar o dispositivo, reportar um problema e coletar registros do dispositivo ou excluir o dispositivo. A guia Ações possui estas opções para um dispositivo habilitado no Webex Aware:
|
Gerenciar um dispositivo para um espaço de trabalho
Você pode adicionar e gerenciar dispositivos diretamente de um perfil de espaço de trabalho. Os dispositivos de espaço de trabalho podem incluir dispositivos ATA, como aparelhos de fax. Você também pode configurar um dispositivo de espaço de trabalho como um Host de local provisório. Para obter mais informações sobre hoteling, consulte Hoteling no Control Hub.
| 1 | |
| 2 |
Acesse . |
| 3 |
Selecione o espaço de trabalho que deseja modificar. |
| 4 |
Para adicionar um dispositivo, clique em Adicionar dispositivo no bloco Dispositivos. Para obter mais informações sobre como adicionar dispositivos ao espaço de trabalho, consulte a seção Adicionar um telefone a um novo espaço de trabalho. |
| 5 |
Para modificar um dispositivo existente, selecione o nome do dispositivo. Isso leva você à página Dispositivos. Aqui você pode visualizar e editar as configurações do dispositivo, excluir o dispositivo, reinicializar o dispositivo e habilitar o dispositivo a ser usado como um Host de local provisório. Para obter mais informações sobre como definir as configurações do telefone, consulte Definir e atualizar as configurações do telefone. |
| 6 |
Se o dispositivo adicionado ao workspace for o Webex Aware, então a opção Webex Aware é exibida nos dispositivos como mostrado no diagrama. O Webex Aware indica que o dispositivo entrou na plataforma Webex e tem acesso a recursos Webex que são suportados pelo telefone.
|
| 7 |
Clique em Ações para gerenciar o dispositivo. Ações ajudam a aplicar alterações de configuração ou atualizar o firmware para os dispositivos MPP. A guia Ações possui estas opções para um dispositivo habilitado no Webex Aware:
|
Configurar linhas - Adicionar e reordenar linhas
O recurso Configurar Linhas, que permite atribuir linhas primárias, compartilhadas e virtuais a telefones, possibilita que uma linha compartilhada apareça várias vezes no mesmo dispositivo. A experiência de configuração de portas para ATAs não foi alterada.
Aqui estão as atualizações para o recurso Configurar Linhas para dispositivos MPP e PhoneOS:
-
Linhas primárias
-
Atribua o proprietário do dispositivo e assegure-se de que ele ocupe a primeira posição na lista de dispositivos.
-
Aumente o número de aparições nessa linha para adicionar mais aparições.
-
-
Linhas compartilhadas / Linhas Virtuais
-
Atribua linhas compartilhadas a partir de qualquer usuário ou espaço de trabalho habilitado para chamadas dentro da organização que possua Aparências de Chamada Compartilhadas (SCAs) disponíveis.
-
Aumente o número de aparições na linha compartilhada para adicionar mais aparições.
Os limites de SCA disponíveis para o usuário ou espaço de trabalho podem limitar as aparências atribuíveis.
-
Atribua um índice de linha a cada linha compartilhada. Você pode reorganizar as linhas compartilhadas arrastando e soltando.
Não é possível separar as ocorrências individuais de uma linha.
-
Use o usuário para organizar a posição dos índices de linha compartilhados em um dispositivo.
-
-
Exibições
-
Configure várias representações da mesma linha primária, compartilhada ou virtual como conjuntos de linhas ponderadas individuais.
-
As linhas ponderadas são terminadas com -1, -2 e assim por diante (somente em telefones Cisco).
-
As chamadas são encaminhadas para a primeira linha ponderada disponível.
-
-
Novas informações resumidas (na parte inferior da página)
-
Linhas de registro SIP exclusivas – Mostra o número de contas de registro SIP exclusivas que o telefone pode suportar. O número máximo de contas atualmente suportado é 16.
-
Total de linhas exibidas – Mostra o número total de linhas atribuíveis suportadas pelo dispositivo. Se o modelo do telefone for compatível com KEMs, o número máximo de aparições inclui a capacidade expandida.
-
-
Atribuição de linhas em massa e APIs públicas
- Os métodos Bulk CSV e API Pública para atribuição de linhas incluem a funcionalidade "Aparências".
Para obter mais informações sobre linhas compartilhadas entre locais, consulte Configuração de linhas compartilhadas e linhas virtuais entre locais.
Quando um número de discagem rápida é adicionado a um telefone pressionando e segurando a tecla da linha desejada, o número de discagem rápida não fica visível no Control Hub. Um número de discagem rápida pode ser substituído configurando uma linha compartilhada nessa tecla.
| 1 | |
| 2 |
Vá para Usuários ou Espaços de trabalho (dependendo de onde o dispositivo a ser modificado está atribuído). |
| 3 |
Selecione um usuário ou espaço de trabalho. |
| 4 |
Vá para Dispositivos e clique em um dispositivo para o qual você deseja adicionar ou modificar as linhas compartilhadas. Isso leva você à página Dispositivos. |
| 5 |
Em Gerenciamento de dispositivos, clique em Configurar linhas. |
| 6 |
Para adicionar uma linha compartilhada, clique no ícone Você pode atribuir a mesma linha compartilhada ou linha virtual a várias teclas de linha individuais em um telefone. Na coluna Aparições da respectiva linha, clique no ícone
Você pode adicionar as linhas na ordem em que deseja que elas apareçam. Para reordenar a apresentação da linha, exclua e adicione à lista na ordem em que deseja que apareçam. Se um usuário tiver números de outras fontes users/groups configurado em seus dispositivos, você pode adicionar um rótulo de linha para a linha compartilhada. Essa etiqueta de linha ajuda a identificar uma aparência de linha compartilhada em relação à outra. Para remover uma linha, clique no ícone |
| 7 |
Clique em Salvar. Para organizações de grande porte, o administrador deve selecionar um local antes de configurar linhas telefônicas adicionais. Clique no ícone Para uma organização comum, o filtro de localização não está disponível e o administrador pode selecionar uma linha. |
 , pesquise por nome ou número de telefone e escolha uma linha.
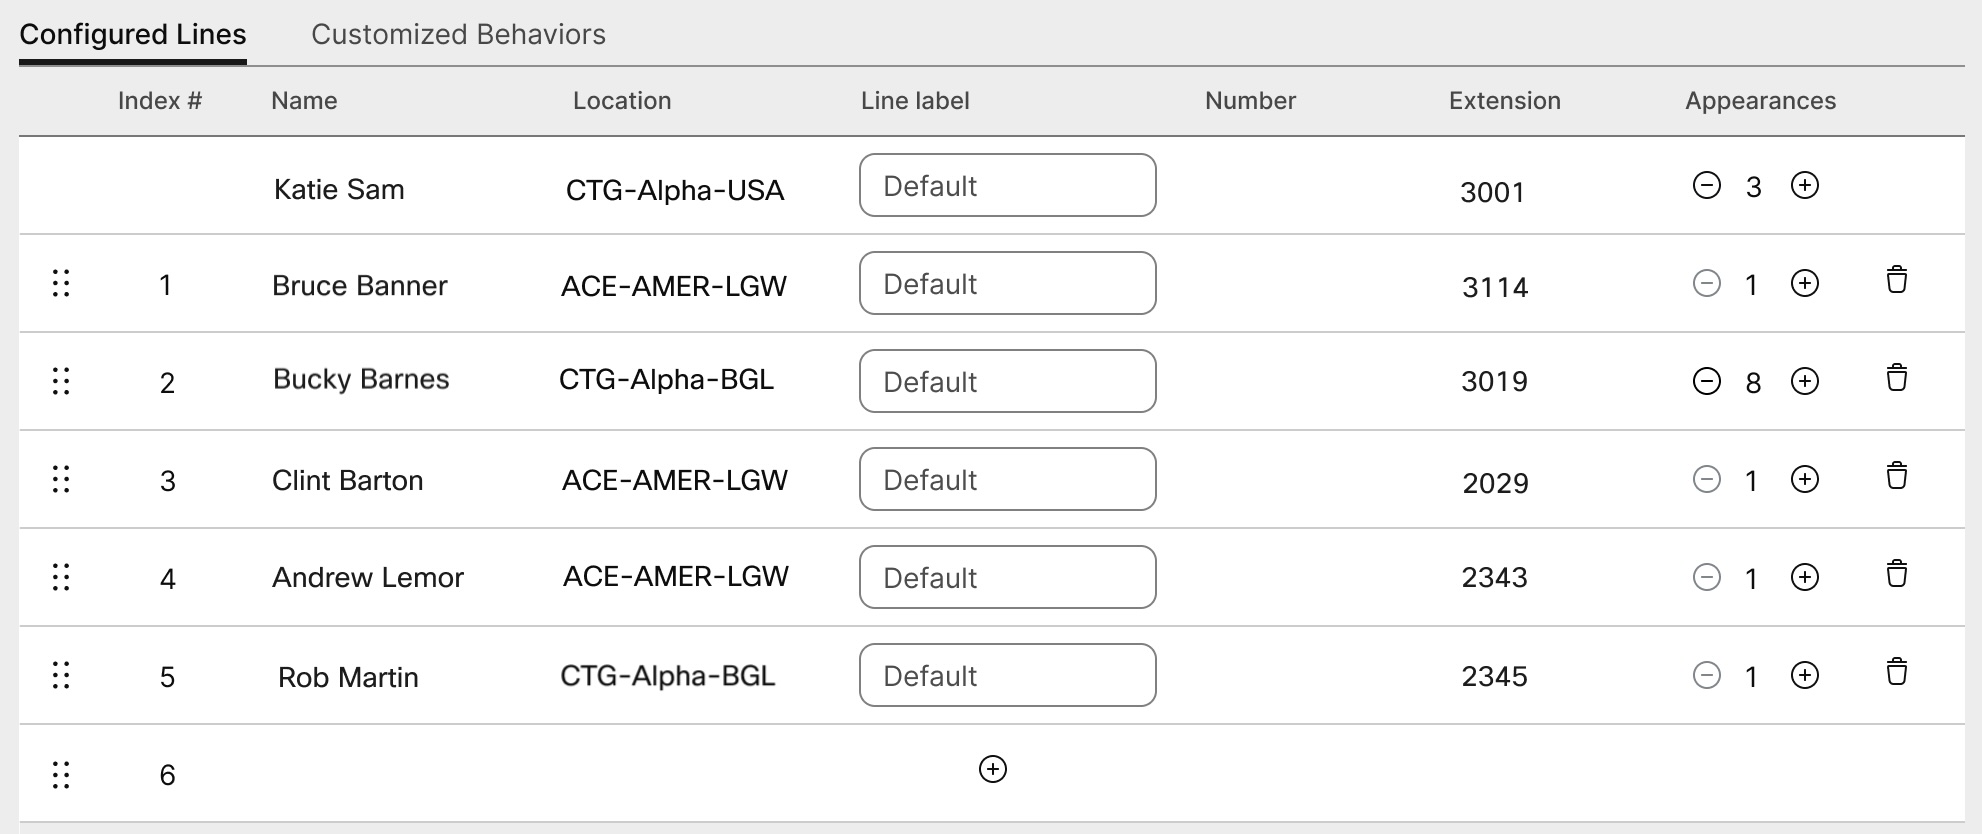
 . Não é possível remover o usuário principal online. 1.
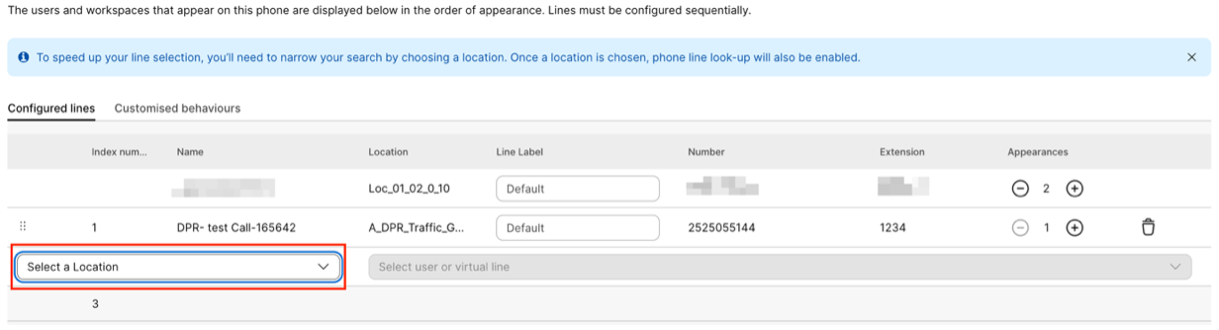
Configurar um dispositivo ATA para um usuário
Você pode configurar as portas em um dispositivo Adaptador de Telefone Analógico (ATA) atribuído a um usuário no Control Hub. Atualmente, as duas configurações disponíveis para dispositivos ATA são para dispositivos com duas portas e dispositivos com 24 portas.
| 1 | |
| 2 |
Acesse . |
| 3 |
Selecione um usuário para modificar e role até Dispositivos. |
| 4 |
Selecione o dispositivo no qual deseja adicionar ou modificar informações. |
| 5 |
Em Usuários neste dispositivo, clique em Configurar portas. |
| 6 |
Para adicionar uma configuração de porta compartilhada, clique no ícone |
| 7 |
Insira o nome ou número de telefone, selecione entre as opções que aparecem e clique em Salvar. Apenas espaços de trabalho sem dispositivos aparecem na pesquisa. |
| 8 |
Se o dispositivo exigir compressão de fax T.38, marque a caixa na coluna T.38 ou substitua as opções de compressão de nível do usuário e clique em Salvar. Um espaço de trabalho pode ter um ATA. Isso é útil para aparelhos de fax. |
 .
.Adicionar números à sua localização
Você pode adicionar números de telefone a dispositivos de mesa e sala na organização do cliente a qualquer momento, esteja você no meio de um teste ou tenha sido convertido para uma assinatura paga.
Aumentamos o número de números de telefone que você pode adicionar no Control Hub de 250 para 1000.
| 1 | |
| 2 |
Acesse e, em seguida, clique em Adicionar números. |
| 3 |
Especifique o Local e o Tipo de número. Se você estiver transferindo números, insira seu número de cobrança atual e o novo. |
| 4 |
Especifique o Local, Estado, Código de área, Prefixo (opcional) e clique em Pesquisar. Os números disponíveis são exibidos. |
| 5 |
Selecione os números que deseja adicionar ao local. Os números que você escolher serão movidos para o campo Números Selecionados. |
| 6 |
Clique em Salvar. |
Verificar o status dos números PSTN solicitados
Acessórios conectados ao Telefone multiplataforma (MPP)—Fones de ouvido e Módulos de expansão de teclas (KEMs)
Ao conectar acessórios (Headsets/KEMs) Para um dispositivo MPP, eles aparecem como um item de inventário na guia Dispositivos do Hub de Controle. No inventário de Dispositivos do Control Hub, você pode descobrir o modelo do acessório, o status e a quem o acessório pertence. Ao selecionar um acessório, informações adicionais podem ser obtidas, como o número de série do acessório e a versão atual do software. O campo de status do acessório é relatado como "on-line", desde que o acessório esteja conectado ao MPP. Um fone de ouvido conectado ao MPP atualizará automaticamente seu software com a versão mais recente disponível do Gerenciamento de dispositivos.
|
Modelo do telefone |
Cisco Headset 520 Series |
Cisco Headset 530 Series |
Cisco Headset 560 Series |
Cisco Headset 730 Series |
|---|---|---|---|---|
|
Cisco IP Phone 8811/8841/8845 |
— |
— |
RJ9 e RJ11 |
— |
|
Cisco IP Phone 8851/8861/8865 |
USB |
USB |
USB RJ9 e RJ11 |
— |
|
Cisco IP Phone 7811/7821/7841/7861 |
— |
— |
— |
— |
|
Cisco IP Phone 6821/6841/6851/6861 |
— |
— |
— |
— |
|
Cisco IP Phone 6871 |
USB |
USB |
USB |
— |
|
Cisco IP Conference Phone 7832/8832 |
— |
— |
— |
— |
|
Modelo do telefone |
KEM |
|---|---|
|
Cisco IP Phone 8811/8841/8845 |
— |
|
Cisco IP Phone 8851/8861/8865 |
BEKEM CP-8800-A-KEM CP-8800-V-KEM |
|
Cisco IP Phone 7811/7821/7841/7861 |
— |
|
Cisco IP Phone 6821/6841/6861/6871 |
— |
|
Cisco IP Phone 6851 |
CP-68KEM-3PCC |
|
Cisco IP Conference Phone 7832/8832 |
— |
Para solucionar os problemas enfrentados com o Módulo de expansão de teclas (módulo de expansão de teclas) em telefones registrados para Webex Calling, consulte Solucionar problemas dos módulos de expansão de teclas Webex Calling para obter detalhes.


