- Home
- /
- Articolo

Grazie per il feedback.

Configurazione e gestione dei dispositivi Webex Calling
 In questo articolo
 Feedback?
È possibile assegnare e gestire i dispositivi per gli utenti e gli spazi di lavoro in Control Hub. Scegliere di eseguire l'aggiunta in base all'indirizzo MAC o generando un codice di attivazione da inserire sul dispositivo stesso.
Quando si aggiunge un dispositivo, viene visualizzato un codice di attivazione di 16 cifre. Il codice di attivazione scade dopo 30 giorni per i telefoni MPP e dopo 7 giorni per i dispositivi Room.
Aggiungi un telefono a un utente
Con Control Hub puoi assegnare un telefono a un utente per uso personale. I telefoni elencati qui supportano Webex Calling. Sebbene tutti questi telefoni possano essere aggiunti tramite un indirizzo MAC, solo il seguente sottoinsieme può essere registrato tramite un codice di attivazione:
-
Telefoni multipiattaforma Cisco IP serie 6800 (telefoni audio —6821, 6841, 6851, 6861, 6871)
-
Telefono multipiattaforma Cisco IP serie 7800 (telefoni audio—7811, 7821, 7841, 7861)
-
Telefoni multipiattaforma Cisco IP serie 8800 (telefoni audio—8811, 8841, 8851, 8861)
-
Telefoni multipiattaforma Cisco IP serie 8800 (telefoni video—8845, 8865)
-
Telefono per conferenze Cisco IP 7832 e 8832
-
Cisco Video Phone 8875
-
Cisco Desk Phone serie 9800
In Control Hub è possibile assegnare solo dispositivi base DECT (non telefoni DECT). Dopo aver assegnato un'unità base a un utente, associare manualmente un ricevitore DECT a tale unità base. Per ulteriori informazioni, vedi Collegamento del ricevitore alla stazione base.
| 1 | |
| 2 |
Vai a . Puoi anche aggiungere un dispositivo all'utente dalla sezione Utenti andando su > seleziona un utente > .
|
| 3 |
Selezionare Utilizzo personale per assegnare un dispositivo a un utente e quindi fare clic su Avanti. |
| 4 |
Inserisci il nome utente o il nome effettivo del proprietario del telefono, scegli l'utente dai risultati e poi clicca su Avanti. |
| 5 |
Scegli il tipo di dispositivo che vuoi configurare per l'utente:
|
Aggiunta di un telefono a un nuovo spazio di lavoro
Quando le persone sono al lavoro, si riuniscono in luoghi come sale da pranzo, hall e sale conferenze. È possibile configurare dispositivi Webex condivisi in questi Workspace, aggiungere servizi e quindi osservare come avviene la collaborazione.
Un dispositivo Workspaces non è assegnato a un utente specifico, ma a una posizione fisica, consentendo così l'utilizzo condiviso.
I dispositivi elencati supportano Webex Calling. È possibile registrare la maggior parte di questi dispositivi utilizzando un indirizzo MAC e registrare solo il seguente sottoinsieme utilizzando un codice di attivazione:
-
Telefoni multipiattaforma Cisco IP serie 6800 (telefoni audio—6821, 6841, 6851)
-
Telefono multipiattaforma Cisco IP serie 7800 (telefoni audio—7811, 7821, 7841, 7861)
-
Telefoni multipiattaforma Cisco IP serie 8800 (telefoni audio—8811, 8841, 8851, 8861)
-
Telefoni multipiattaforma Cisco IP serie 8800 (telefoni video—8845, 8865)
-
Telefono per conferenze Cisco IP 7832 e 8832
-
Cisco Desk Phone serie 9800
Operazioni preliminari
- Con una licenza Workspace professionale puoi aggiungere fino a cinque telefoni fissi Cisco, telefoni Cisco MPP, wireless, ATA, Phone OS o dispositivi di terze parti a un Workspace.
- È possibile aggiungere più dispositivi a un'area di lavoro professionale solo dalla nuova pagina dell'area di lavoro. Attiva Prova nuovi spazi di lavoro dall'angolo in alto a destra della pagina dello spazio di lavoro per utilizzare la nuova pagina dello spazio di lavoro.
- È possibile aggiungere un solo dispositivo a un Workspace con una licenza Workspace per area comune.
| 1 | |
| 2 |
Vai a . Puoi anche aggiungere un dispositivo a un nuovo spazio di lavoro andando su .
|
| 3 |
Selezionare Utilizzo condiviso, quindi fare clic su Avanti. |
| 4 |
Selezionare Nuovo spazio di lavoro, quindi fare clic su Avanti. |
| 5 |
Inserisci un nome per l'area di lavoro (ad esempio il nome della stanza fisica), seleziona il tipo di stanza, aggiungi la capacità della stanza e scegli la posizione dell'area di lavoro. Fare clic su Avanti. Il nome di un'area di lavoro non può essere più lungo di 128 caratteri e non può avere %, #, <, >, /, \, e " caratteri. |
| 6 |
Scegli il tipo di dispositivo che vuoi configurare per l'area di lavoro:
|
| 7 |
Fare clic sul servizio Chiamata e scegliere l'abbonamento e il tipo di licenza che si desidera assegnare all'area di lavoro.
Per saperne di più sulle funzionalità disponibili con le licenze, vedere Funzionalità disponibili in base al tipo di licenza per Webex Calling. |
| 8 |
Assegna una Posizione e un Numero di telefono (determinato dalla posizione scelta), quindi fai clic su Salva. Puoi anche assegnare un interno. La posizione viene aggiornata durante la risincronizzazione notturna. Se desideri aggiungere altri dispositivi a uno spazio di lavoro professionale, puoi farlo in uno dei seguenti modi:
Per modificare o gestire i dispositivi assegnati all'area di lavoro, vedere la sezione Gestire un dispositivo per un'area di lavoro. |
 nella colonna
 Riassegnazione di un telefono esistente a un altro utente o dispositivo
Per riutilizzare un telefono assegnato a un Webex Calling utente/spazio di lavoro a un altro Webex Calling utente/spazio di lavoro, effettuare le seguenti operazioni:
| 1 | |
| 2 |
Vai al User/Workspace a cui è attualmente assegnato il dispositivo. È possibile riassegnare il dispositivo in questi casi:
|
| 3 |
Sul telefono, andare al menu impostazioni e completare le seguenti operazioni per riassegnare il telefono. |
| 4 |
Seguire le istruzioni in Aggiungi e assegna telefono all'utente o Aggiungi un telefono a una nuova area di lavoro per assegnare o aggiungere un telefono a un utente/area di lavoro. |
| 5 |
Dopo aver aggiunto il dispositivo al Control Hub, completare queste azioni sul telefono: |
Aggiungere una lavagna, una scrivania o un dispositivo per la stanza a un utente
Assegnando un dispositivo Board, Desk o Room come dispositivo personale a qualcuno, questa persona potrà ricevere le proprie chiamate e riunioni Webex direttamente sul proprio dispositivo. Per maggiori dettagli, vedere Assegnare un dispositivo Board, Desk o Room personale a un utente.
Aggiungi una lavagna, una scrivania o un dispositivo da sala a un nuovo spazio di lavoro
Quando le persone sono al lavoro, si riuniscono in molti luoghi diversi, come sale mensa, aree di ingresso e sale conferenze. Per facilitare la collaborazione, è sufficiente impostare dispositivi Cisco Webex condivisi in questi spazi di lavoro e aggiungere servizi.
Il principio fondamentale di un dispositivo Workspaces è che non è assegnato a un utente specifico, bensì a una posizione fisica, consentendone l'utilizzo condiviso.
I dispositivi elencati di seguito supportano Webex Calling.
| 1 | |
| 2 |
Vai a . È anche possibile aggiungere un dispositivo a un nuovo spazio di lavoro dalla sezione Spazi di lavoro navigando verso .
|
| 3 |
Selezionare Utilizzo condiviso e fare clic su Avanti. |
| 4 |
Selezionare Nuovo spazio di lavoro e fare clic su Avanti. |
| 5 |
Inserisci un nome per l'area di lavoro (ad esempio il nome della stanza fisica), seleziona il tipo di stanza, aggiungi la capacità della stanza e scegli la posizione per l'area di lavoro. Quindi fai clic su Avanti. |
| 6 |
Selezionare Dispositivo Cisco Room and Desk. |
| 7 |
Scegli uno dei seguenti servizi e clicca su Avanti.
|
| 8 |
Se hai scelto un servizio Cisco Webex Calling, seleziona l'abbonamento e il tipo di licenza che desideri assegnare all'area di lavoro.
Per saperne di più sulle funzionalità disponibili con le licenze, vedere Funzionalità disponibili in base al tipo di licenza per Webex Calling. |
| 9 |
Assegna una Posizione, un Numero di telefono (determinato dalla posizione scelta) e un Interno, quindi fai clic su Salva. |
| 10 |
Attiva il dispositivo utilizzando il codice fornito. Puoi copiare, inviare via e-mail o stampare il codice di attivazione. |
Aggiunta e assegnazione di dispositivi in massa
Per assegnare più dispositivi a utenti e spazi di lavoro, puoi compilare un file CSV con le informazioni richieste e attivare tali dispositivi in pochi semplici passaggi.
- Con la licenza Professional Workspace puoi aggiungere fino a 5 telefoni Cisco Desk Phone, telefoni Cisco MPP, ATA o dispositivi di terze parti a un'area di lavoro.
- Con una licenza per area di lavoro comune è possibile aggiungere un solo dispositivo a un'area di lavoro.
I dispositivi elencati di seguito supportano Webex Calling. È possibile registrare tutti i dispositivi utilizzando un indirizzo MAC; tuttavia, registrare il seguente sottoinsieme di dispositivi utilizzando un codice di attivazione:
-
Telefoni multipiattaforma Cisco IP serie 6800 (telefoni audio—6821, 6841, 6851)
-
Telefono multipiattaforma Cisco IP serie 7800 (telefoni audio—7811, 7821, 7841, 7861)
-
Telefoni multipiattaforma Cisco IP serie 8800 (telefoni audio—8811, 8841, 8851, 8861)
-
Telefoni multipiattaforma Cisco IP serie 8800 (telefoni video—8845, 8865)
-
Telefono per conferenze Cisco IP 7832 e 8832
-
Cisco Video Phone 8875
-
Cisco Desk Phone serie 9800
| 1 | ||||||||||||||||||||||||||||||||||||||
| 2 |
Vai a . | |||||||||||||||||||||||||||||||||||||
| 3 |
Scegli una delle seguenti opzioni e clicca su Scarica.
Per preparare il file CSV puoi utilizzare la seguente tabella.
I seguenti campi sono obbligatori quando si assegna un dispositivo agli utenti e agli spazi di lavoro di Webex Calling:
Questi campi Numero di telefono ed Interno erano precedentemente denominati Numero di directory e Linea diretta; questi nomi di colonna continueranno a essere supportati per un breve periodo. È consigliabile limitare il numero di dispositivi a 1000 per file CSV. Se vuoi aggiungere più di 1000 dispositivi, usa un secondo file CSV. | |||||||||||||||||||||||||||||||||||||
| 4 |
Compila il foglio di calcolo. | |||||||||||||||||||||||||||||||||||||
| 5 |
Carica il file CSV trascinandone la selezione o facendo clic su Scegli un file. | |||||||||||||||||||||||||||||||||||||
| 6 |
Se l'indirizzo MAC è vuoto, puoi scegliere dove inviare il codice di attivazione.
Per attivare il dispositivo, tu o l'utente dovete immettere il codice di attivazione. | |||||||||||||||||||||||||||||||||||||
| 7 |
Fare clic su Invia. Visualizza lo stato aggiornato quando i dispositivi diventano attivi.
I dispositivi multipiattaforma devono eseguire un caricamento del firmware 11.3.1 SR2 o successivo affinché gli utenti possano immettere il codice di attivazione sul proprio dispositivo. Per informazioni sull'aggiornamento del firmware del telefono, vedere questo articolo. |
Esportare un elenco di dispositivi
Se vuoi visualizzare l'elenco dei dispositivi assegnati agli utenti e agli spazi di lavoro, puoi esportare il file CSV.
Accedi a Control Hub e vai a Dispositivi.
Selezionare più dispositivi dall'elenco dei dispositivi e selezionare l'opzione Esporta. È possibile scegliere i campi da includere nel file CSV ed esportare il contenuto in una cartella locale.
I campi visualizzati nel file CSV dipendono dalla connessione del dispositivo alla piattaforma. Pertanto, alcuni campi non sono disponibili nel file di output.
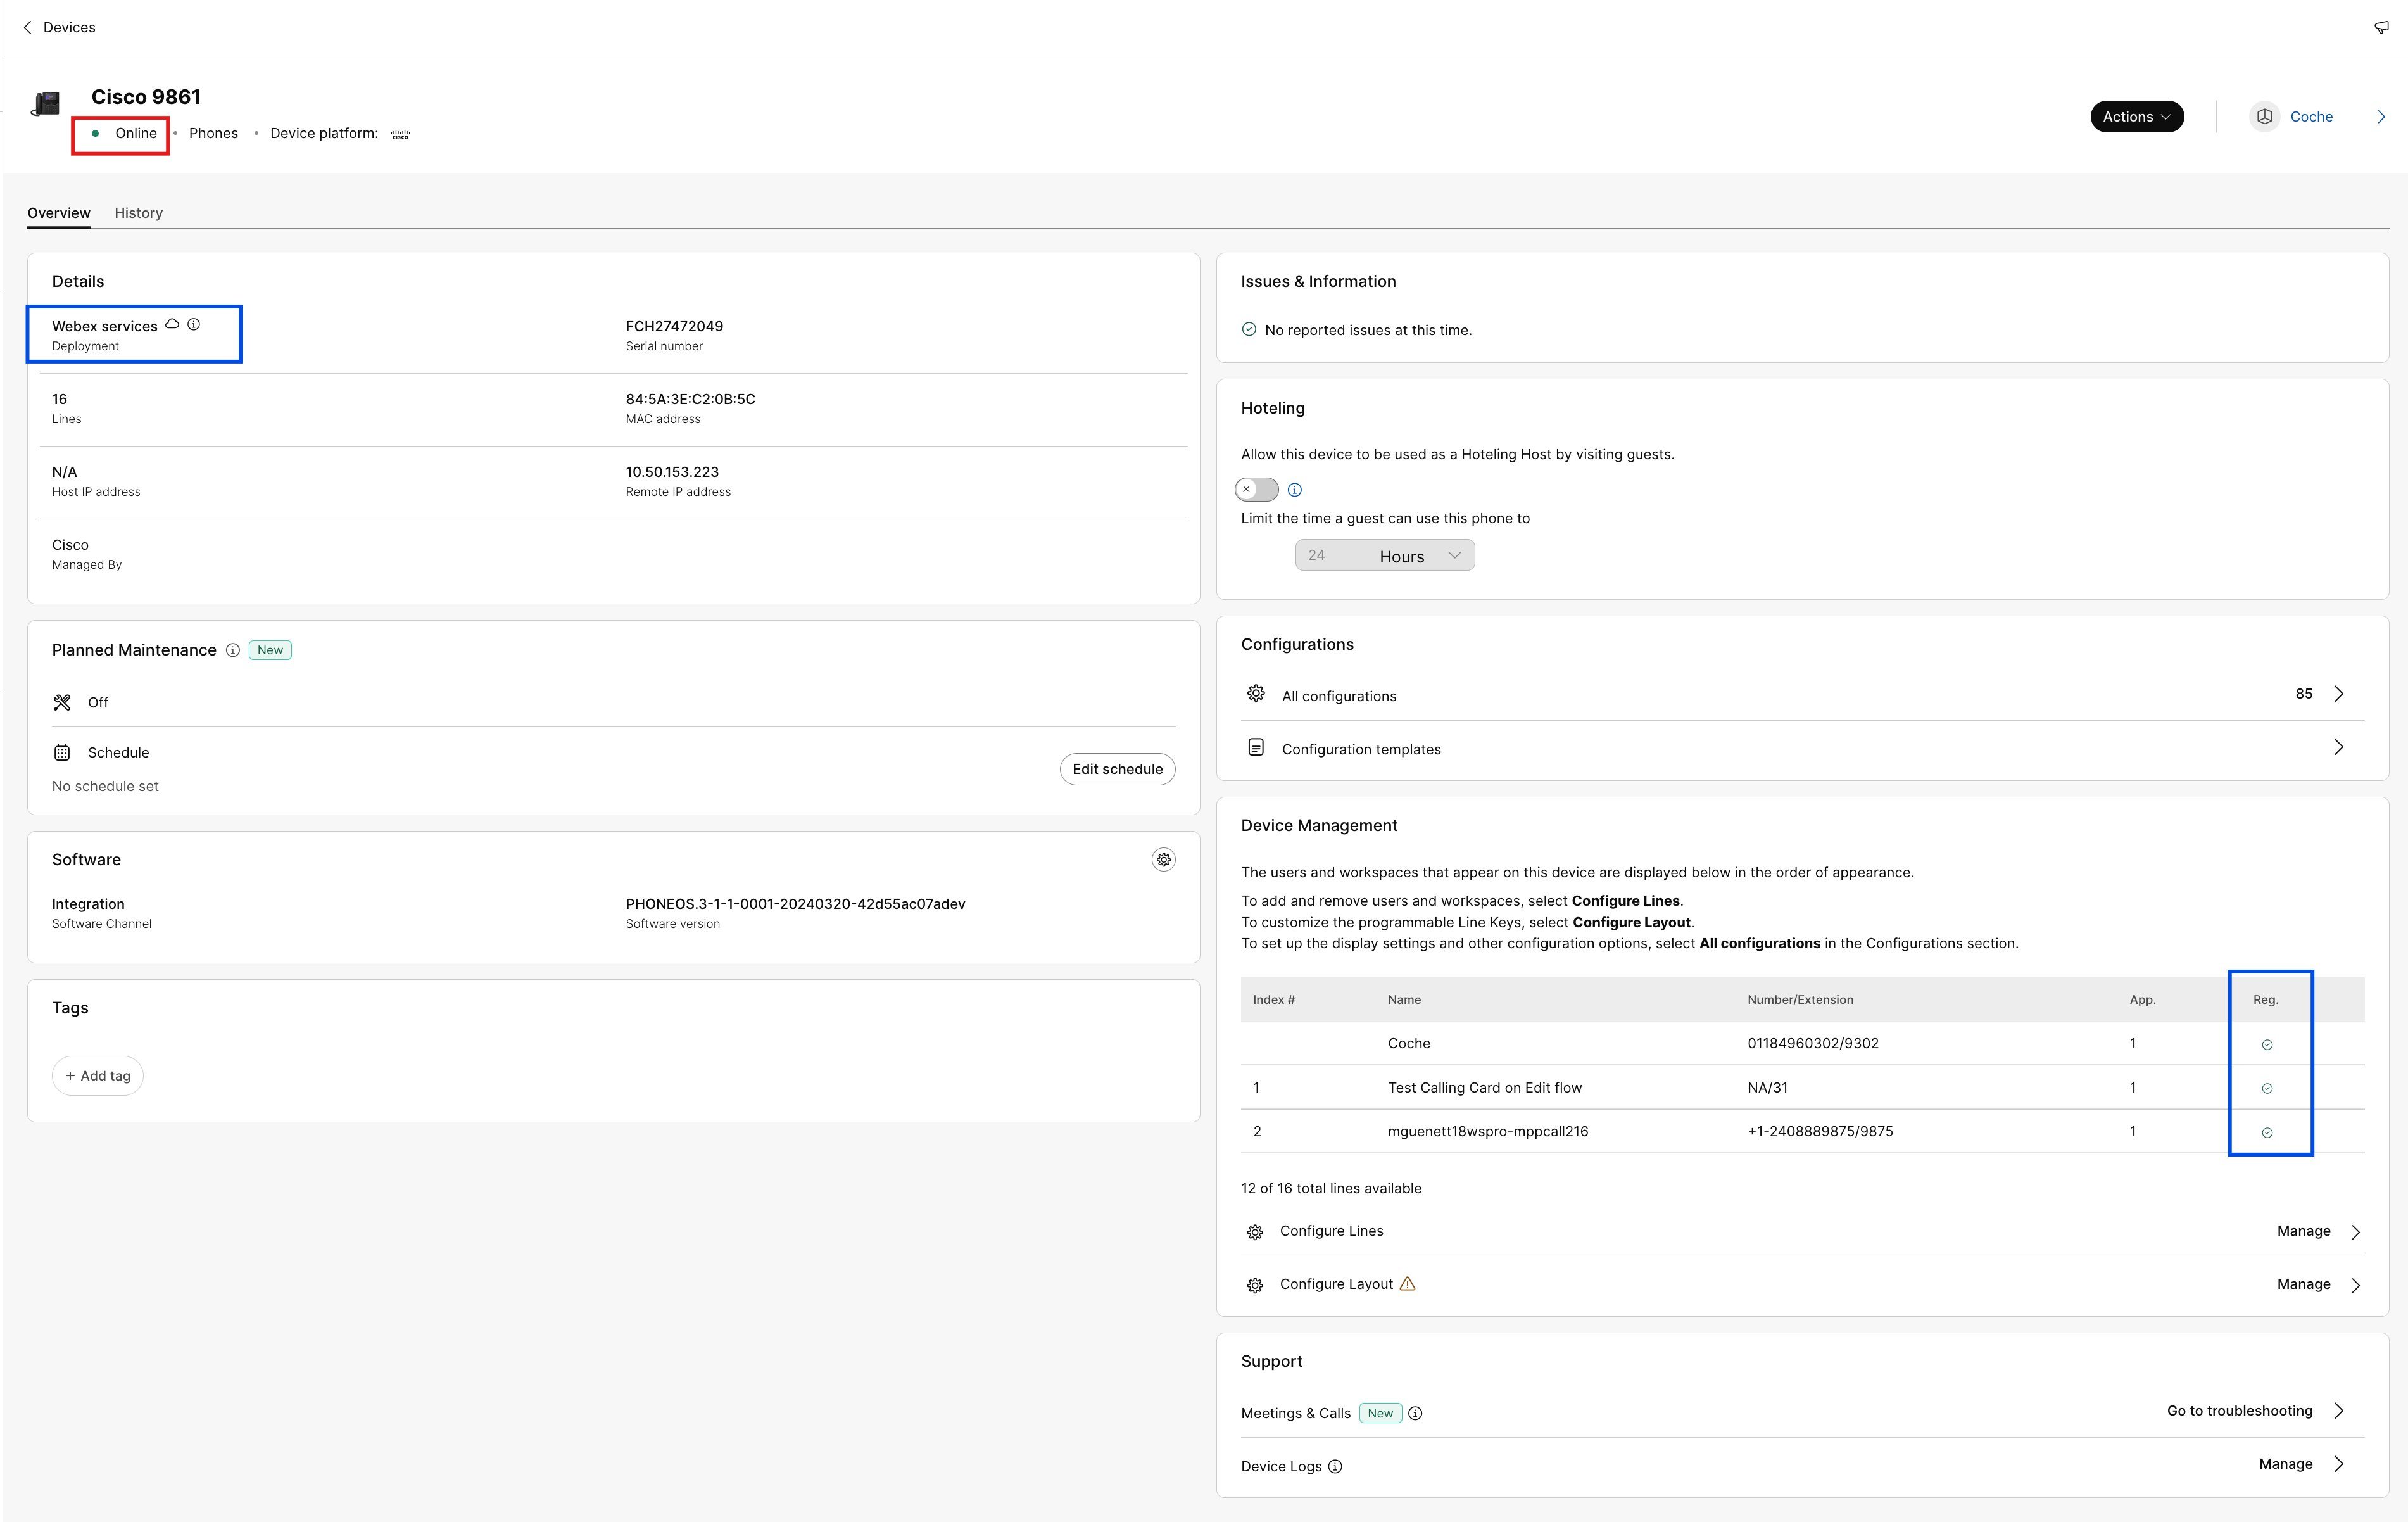
Gestione di un dispositivo per un utente
È possibile aggiungere, rimuovere, riavviare, controllare l'attivazione o creare un nuovo codice di attivazione per i dispositivi assegnati agli utenti all'interno dell'organizzazione. Ciò può risultare utile per visualizzare e gestire i dispositivi nella schermata utenti, quando necessario.
| 1 | |
| 2 |
Vai a . |
| 3 |
Selezionare un utente e fare clic su Dispositivi. |
| 4 |
Per aggiungere un dispositivo a questo utente, fai clic su Aggiungi dispositivo. Se all'utente è già assegnato un dispositivo e si desidera aggiungerne un altro, fare clic su . Per ulteriori informazioni sull'aggiunta del dispositivo a un utente, vedere la sezione Aggiungere telefoni a un utente. |
| 5 |
Per modificare un dispositivo esistente, seleziona il nome del dispositivo. Verrai indirizzato alla pagina Dispositivi. Da qui puoi visualizzare e modificare le impostazioni del dispositivo, eliminare il dispositivo, riavviare il dispositivo o creare un nuovo codice di attivazione per il dispositivo, se applicabile. Per ulteriori informazioni sulla configurazione delle impostazioni del telefono, vedi Configurazione e aggiornamento delle impostazioni telefoniche. |
| 6 |
Se il dispositivo aggiunto all'utente è Webex Aware, l'opzione Webex Aware viene visualizzata sotto i dispositivi come mostrato nel diagramma. Webex Aware indica che il dispositivo è stato ancora utilizzato per accedere alla piattaforma Webex e ha accesso alle funzioni Webex supportate dal telefono.
|
| 7 |
Fare clic su Azioni per gestire il dispositivo. Le azioni consentono di applicare modifiche alla configurazione, riavviare il dispositivo, segnalare un problema e raccogliere i registri del dispositivo oppure eliminare il dispositivo. La scheda Azioni contiene le seguenti opzioni per un dispositivo abilitato Webex Aware:
|
Gestione di un dispositivo per uno spazio di lavoro
È possibile aggiungere e gestire i dispositivi direttamente da un profilo dell'area di lavoro. I dispositivi di spazio di lavoro possono includere dispositivi ATA, come macchine fax. Puoi anche impostare un dispositivo di spazio di lavoro come host della modalità hotel. Per maggiori informazioni sull'hoteling, vedere Hoteling in Control Hub.
| 1 | |
| 2 |
Vai a . |
| 3 |
Selezionare l'area di lavoro da modificare. |
| 4 |
Per aggiungere un dispositivo, fare clic su Aggiungi dispositivo nel riquadro Dispositivi. Per ulteriori informazioni sull'aggiunta di dispositivi all'area di lavoro, vedere la sezione Aggiungere un telefono a una nuova area di lavoro. |
| 5 |
Per modificare un dispositivo esistente, seleziona il nome del dispositivo. Verrai indirizzato alla pagina Dispositivi. Qui puoi visualizzare e modificare le impostazioni del dispositivo, eliminare il dispositivo, riavviare il dispositivo e abilitare il dispositivo da utilizzare come host in modalità hotel. Per ulteriori informazioni sulla configurazione delle impostazioni del telefono, vedi Configurazione e aggiornamento delle impostazioni telefoniche. |
| 6 |
Se il dispositivo aggiunto all'area di workspace è Webex Aware, l'opzione Webex Aware viene visualizzata sotto i dispositivi come mostrato nel diagramma. Webex Aware indica che il dispositivo è stato montaggio sulla piattaforma Webex e ha accesso alle funzioni Webex supportate dal telefono.
|
| 7 |
Fare clic su Azioni per gestire il dispositivo. Le azioni consentono di applicare modifiche di configurazione o aggiornare il firmware per i dispositivi MPP. La scheda Azioni contiene le seguenti opzioni per un dispositivo abilitato Webex Aware:
|
Configura linee - Aggiungi e riordina le linee
La funzione Configura linee per l'assegnazione di linee primarie, condivise e virtuali ai telefoni consente di visualizzare più volte una linea condivisa sullo stesso dispositivo. L'esperienza di configurazione delle porte per gli ATA non è cambiata.
Ecco gli aggiornamenti per la funzionalità Configura linee per i dispositivi MPP e PhoneOS:
-
Linee primarie
-
Assegnare il proprietario del dispositivo e assicurarsi che occupi la prima posizione della riga sul dispositivo.
-
Aumentare le Apparizioni su quella riga per aggiungere altre apparizioni.
-
-
Linee condivise / Linee virtuali
-
Assegna linee condivise da qualsiasi utente o spazio di lavoro abilitato alle chiamate all'interno dell'organizzazione con Shared Call Appearances (SCA) disponibili.
-
Aumentare gli aspetti sulla riga della linea condivisa per aggiungere altri aspetti.
I limiti SCA disponibili per l'utente o l'area di lavoro potrebbero limitare gli aspetti assegnabili.
-
Assegnare un indice di linea a ciascuna linea condivisa. È possibile riorganizzare le linee condivise tramite trascinamento della selezione.
Non è possibile separare i singoli aspetti di una linea.
-
Utilizzare i layout di configurazione dell'utente per organizzare la posizione degli indici di linea condivisi su un dispositivo.
-
-
Identificativi
-
Configura più aspetti della stessa linea primaria, condivisa o virtuale come singoli set di linee ponderate.
-
Le linee pesate sono precedute dal suffisso -1, -2 e così via (solo telefoni Cisco).
-
Le chiamate squillano sulla prima linea pesata disponibile.
-
-
Nuove informazioni riassuntive (in fondo alla pagina)
-
Linee di registrazione SIP univoche: mostra il numero di account di registrazione SIP univoci che il telefono può supportare. Il numero massimo di account attualmente supportati è 16.
-
Numero totale di linee visualizzate: mostra il numero totale di linee visualizzate assegnabili supportate dal dispositivo. Se il modello di telefono supporta i KEM, il numero massimo di apparizioni include la capacità espansa.
-
-
Assegnazione di linee in blocco e API pubbliche
- I metodi Bulk CSV e Public API per l'assegnazione delle linee includono la funzionalità "Aspetti".
Per maggiori informazioni sulla linea condivisa tra più sedi, vedere Configurazione delle linee condivise e delle linee virtuali tra più sedi.
Quando si aggiunge una composizione rapida a un telefono premendo a lungo il tasto della linea desiderata, la composizione rapida non è visibile in Control Hub. È possibile sovrascrivere una composizione rapida configurando una linea condivisa su quel tasto di linea.
| 1 | |
| 2 |
Vai a Utenti o Aree di lavoro (a seconda di dove è assegnato il dispositivo da modificare). |
| 3 |
Seleziona un utente o un'area di lavoro. |
| 4 |
Vai a Dispositivi e fai clic su un dispositivo per il quale desideri aggiungere o modificare le linee condivise. Verrai indirizzato alla pagina Dispositivi. |
| 5 |
In Gestione dispositivi, fare clic su Configura linee. |
| 6 |
Per aggiungere un aspetto di linea condivisa, fare clic sull'icona È possibile assegnare la stessa linea condivisa o linea virtuale a più tasti di linea individuali su un telefono. Nella colonna Apparizioni della rispettiva riga, fare clic sull'icona
Puoi aggiungere le righe nell'ordine in cui desideri che appaiano. Per riordinare l'indicatore di linee, elimina e aggiungi le linee all'elenco nell'ordine in cui desideri che vengano visualizzate. Se un utente ha numeri da altri users/groups configurata sui propri dispositivi, è possibile aggiungere un'etichetta di linea per la linea condivisa. Questa etichetta di linea aiuta a distinguere l'aspetto di una linea condivisa dall'altra. Per rimuovere una linea, fai clic sull'icona |
| 7 |
Fai clic su Salva. Per le organizzazioni di grandi dimensioni, l'amministratore deve selezionare una posizione prima di configurare linee di chiamata aggiuntive. clicca sull'icona Per un'organizzazione normale, il filtro per posizione non è disponibile e l'amministratore può selezionare una riga. |
 , cercare per nome o numero di telefono e scegliere una linea.
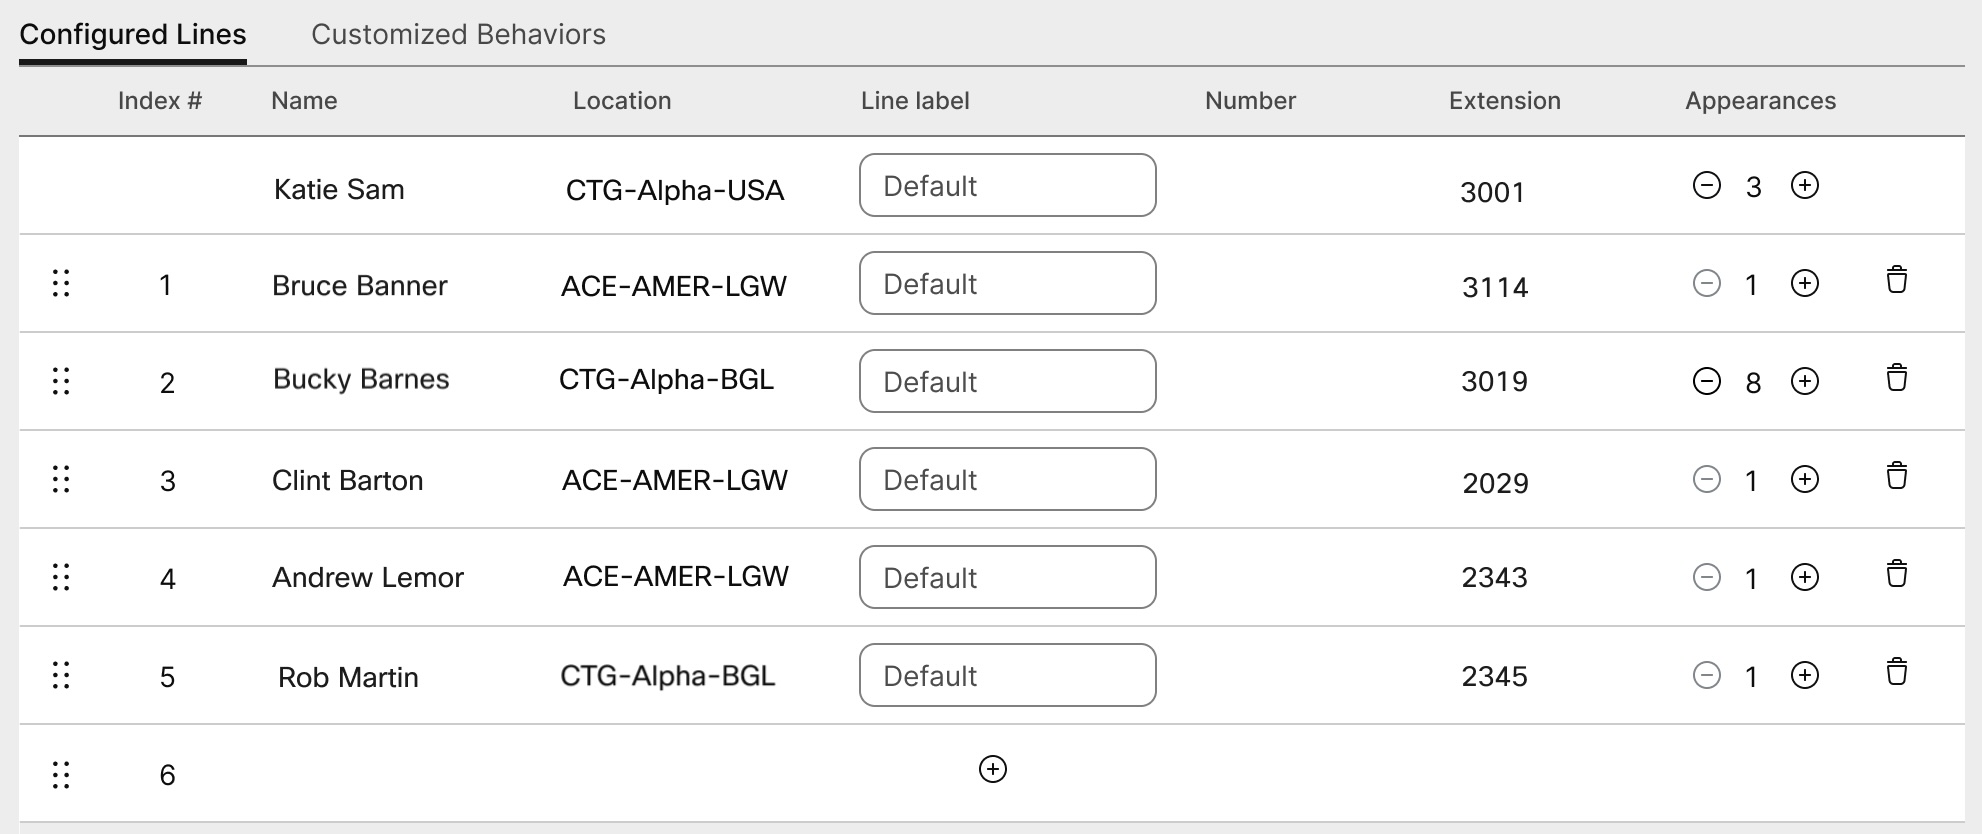
 . Non è possibile rimuovere l'utente principale in linea 1.
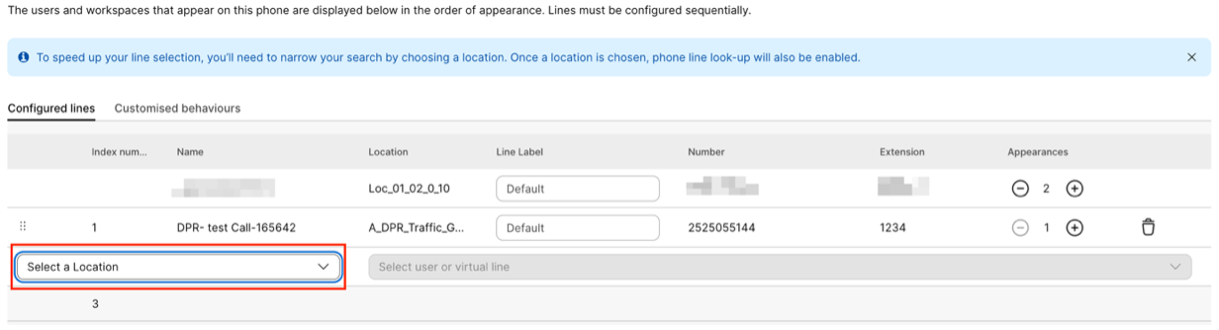
Configurazione di un dispositivo ATA per un utente
È possibile configurare le porte su un dispositivo ATA (Analog Telephone Adapter) assegnato a un utente in Control Hub. Attualmente, le due configurazioni disponibili per i dispositivi ATA sono per dispositivi con due porte e per dispositivi con 24 porte.
| 1 | |
| 2 |
Vai a . |
| 3 |
Selezionare un utente da modificare e scorrere fino a Dispositivi. |
| 4 |
Seleziona un dispositivo che desideri aggiungere o modificare. |
| 5 |
In Utenti su questo dispositivo, fai clic su Configura porte. |
| 6 |
Per aggiungere una configurazione di porta condivisa, fai clic sull'icona |
| 7 |
Inserisci il nome o il numero di telefono ed esegui una selezione dalle opzioni visualizzate, quindi fai clic su Salva. Nella ricerca vengono visualizzati solo spazi di lavoro senza dispositivi. |
| 8 |
Se il dispositivo richiede la compressione fax T.38, selezionare la casella nella colonna T.38 o ignorare le opzioni di compressione a livello utente, quindi fare clic su Salva. Uno spazio di lavoro può disporre di un dispositivo ATA. Ciò è utile per macchine fax. |
 .
.Aggiunta di numeri alla posizione
Puoi aggiungere numeri di telefono a dispositivi da tavolo e di sala nell'organizzazione del tuo cliente in qualsiasi momento, sia durante il periodo di prova che una volta passato a un abbonamento a pagamento.
Abbiamo aumentato il numero di numeri di telefono che è possibile aggiungere in Control Hub da 250 a 1000.
| 1 | |
| 2 |
Vai a , quindi fare clic su Aggiungi numeri. |
| 3 |
Specifica Posizione e Tipo di numero. Se stai trasferendo i numeri, inserisci sia i numeri di fatturazione nuovi che quelli correnti. |
| 4 |
Specificare Posizione, Stato, Prefisso, Prefisso (facoltativo), quindi fare clic su Cerca. Vengono visualizzati i numeri disponibili. |
| 5 |
Seleziona i numeri che vuoi aggiungere alla posizione. I numeri scelti vengono spostati nel campo Numeri selezionati. |
| 6 |
Fai clic su Salva. |
Controllo dello stato dei numeri PSTN ordinati
Accessori collegati al telefono multipiattaforma (MPP): cuffie e moduli di espansione chiave (KEMS)
Quando si collegano gli accessori (Headsets/KEMs) a un dispositivo MPP, vengono visualizzati come elemento di inventario nella scheda Dispositivi nel Control Hub. Dall'inventario dei dispositivi di Control Hub puoi determinare il modello dell'accessorio, lo stato e il proprietario dell'accessorio. Selezionando un accessorio vengono visualizzate ulteriori informazioni come il numero di serie e la versione software corrente dell'accessorio. Il campo di stato dell'accessorio viene riportato come "online" fin tanto che l'accessorio è connesso al dispositivo MPP. Il software di una cuffia connessa a MPP-viene aggiornato automaticamente quando è disponibile l'ultima versione da Gestione dispositivi.
|
Modello telefono |
Cuffia Cisco serie 520 |
Cuffia Cisco serie 530 |
Cuffia Cisco serie 560 |
Cuffia Cisco serie 730 |
|---|---|---|---|---|
|
Telefono Cisco IP 8811/8841/8845 |
— |
— |
RJ9 e RJ11 |
— |
|
Telefono Cisco IP 8851/8861/8865 |
USB |
USB |
USB RJ9 e RJ11 |
— |
|
Telefono Cisco IP 7811/7821/7841/7861 |
— |
— |
— |
— |
|
Telefono Cisco IP 6821/6841/6851/6861 |
— |
— |
— |
— |
|
Telefono Cisco IP 6871 |
USB |
USB |
USB |
— |
|
Telefono per conferenze Cisco IP 7832/8832 |
— |
— |
— |
— |
|
Modello telefono |
KEM |
|---|---|
|
Telefono Cisco IP 8811/8841/8845 |
— |
|
Telefono Cisco IP 8851/8861/8865 |
BEKEM CP-8800-A-KEM CP-8800-V-KEM |
|
Telefono Cisco IP 7811/7821/7841/7861 |
— |
|
Telefono Cisco IP 6821/6841/6861/6871 |
— |
|
Telefono Cisco IP 6851 |
CP-68KEM-3PCC |
|
Telefono per conferenze Cisco IP 7832/8832 |
— |
Per risolvere i problemi relativi ai moduli di espansione chiave (modulo di espansione chiave) sui telefoni registrati Webex Calling, vedere Risoluzione dei problemi dei moduli di espansione chiave Webex Calling per dettagli.


