- 홈
- /
- 문서

피드백을 보내 주셔서 감사합니다.

Webex Calling 장치 구성 및 관리
 이 문서에서
 피드백이 있습니까?
Control Hub에서 사용자 및 작업 공간에 대해 장치를 지정하고 관리할 수 있습니다. MAC 주소로 추가하거나, 장치에 입력할 활성화 코드를 생성하여 추가할지 선택하십시오.
기기를 추가할 때 16자리 활성화 코드가 표시됩니다. 활성화 코드는 MPP 전화기의 경우 30일 후, Room 기기의 경우 7일 후에 만료됩니다.
사용자에게 전화번호를 추가하세요
Control Hub를 사용하면 개인 용도로 사용할 수 있도록 사용자에게 전화기를 할당할 수 있습니다. 여기 에 나열된 전화기는 Webex 통화를 지원합니다. MAC 주소를 사용하여 이러한 모든 전화기를 추가할 수 있지만, 활성화 코드를 사용하여 등록할 수 있는 전화기는 다음 하위 집합에 불과합니다.
-
Cisco IP Phone 6800 시리즈 멀티플랫폼 전화 (오디오 전화—6821, 6841, 6851, 6861, 6871)
-
Cisco IP Phone 7800 시리즈 멀티플랫폼 전화(오디오 전화 — 7811, 7821, 7841, 7861)
-
Cisco IP Phone 8800 시리즈 멀티플랫폼 전화(오디오 전화 — 8811, 8841, 8851, 8861)
-
Cisco IP Phone 8800 시리즈 멀티플랫폼 전화(비디오 전화 — 8845, 8865)
-
Cisco IP Conference Phone 7832 및 8832
-
Cisco Video Phone 8875
-
Cisco Desk Phone 9800 시리즈
| 1 | |
| 2 |
. 사용자 섹션에서 > 사용자를 선택하세요 > .
|
| 3 |
개인용 을 선택하여 사용자에게 장치를 할당한 다음 다음을 클릭합니다. |
| 4 |
사용자 이름이나 휴대폰 소유자의 실제 이름을 입력하고, 결과에서 사용자를 선택한 다음 다음을 클릭합니다. |
| 5 |
사용자에게 설정할 장치 유형을 선택하십시오.
|
전화를 새로운 작업 공간에 추가
사람들은 직장에서 구내식당, 로비, 회의실과 같은 장소에 모입니다. 이러한 워크스페이스에서 공유 Webex 장치를 설정하고 서비스를 추가한 다음 공동 작업이 진행되는 것을 지켜볼 수 있습니다.
워크스페이스 기기는 특정 사용자에게 할당되는 것이 아니라 물리적 위치에 할당되므로 공유 사용이 가능합니다.
나열된 장치는 Webex 통화를 지원합니다. 대부분의 기기는 MAC 주소를 사용하여 등록할 수 있으며, 다음 기기들만 활성화 코드를 사용하여 등록할 수 있습니다.
-
Cisco IP Phone 6800 시리즈 멀티플랫폼 전화(오디오 전화 — 6821, 6841, 6851)
-
Cisco IP Phone 7800 시리즈 멀티플랫폼 전화(오디오 전화 — 7811, 7821, 7841, 7861)
-
Cisco IP Phone 8800 시리즈 멀티플랫폼 전화(오디오 전화 — 8811, 8841, 8851, 8861)
-
Cisco IP Phone 8800 시리즈 멀티플랫폼 전화(비디오 전화 — 8845, 8865)
-
Cisco IP Conference Phone 7832 및 8832
-
Cisco Desk Phone 9800 시리즈
| 1 | |
| 2 |
. .
|
| 3 |
공유 사용을 선택한 다음 다음을 클릭합니다. |
| 4 |
새 작업 공간을 선택한 다음 다음을 클릭합니다. |
| 5 |
작업 공간의 이름(예: 실제 방 이름)을 입력하고, 방 유형을 선택하고, 방 수용 인원을 추가하고, 작업 공간의 위치를 선택하십시오. 다음을 클릭합니다. 워크스페이스 이름은 128자를 초과할 수 없으며, 다음 문자를 포함할 수 없습니다. %, #, <, >, /, \, 그리고 " 문자. |
| 6 |
작업 공간에 사용할 장치 유형을 선택하세요.
|
| 7 |
호출] 서비스를 클릭하고 작업 공간에 할당할 구독 및 라이선스 유형을 선택합니다.
라이선스에서 사용할 수 있는 기능에 대한 자세한 내용은 Webex 통화 라이선스 유형별 사용 가능한 기능을 참조하세요. |
| 8 |
위치 및 전화 번호(선택하는 위치에 따라 결정됨)를 지정한 후 저장을 클릭합니다. 내선 번호를 지정할 수 있는 옵션도 있습니다. 위치 정보는 야간 재동기화 과정에서 업데이트됩니다. 업무 공간에 추가 장치를 추가하려면 다음 방법 중 하나를 사용할 수 있습니다.
워크스페이스에 할당된 장치를 수정하거나 관리하려면 워크스페이스용 장치 관리 섹션을 참조하세요. |
 을 클릭하고
 기존 전화기를 다른 사용자 또는 기기에 재할당하기
사용자/작업 공간에 지정된 전화를 다른 Webex Calling 사용자/workspace에 Webex Calling 다음 단계를 따르십시오.
| 1 | |
| 2 |
가세요 User/Workspace 현재 해당 장치가 할당된 위치입니다. 다음 시나리오에서 장치를 재지정할 수 있습니다.
|
| 3 |
전화에서 설정 메뉴로 이동하고 다음 단계를 완료하여 전화를 재지정합니다. |
| 4 |
사용자/ workspace 에 전화를 지정하거나, 새로운 workspace 에 전화를 추가하고 추가에 있는 안내를 따르고 사용자/workspace에 전화를 추가합니다. |
| 5 |
제어 허브에 장치를 추가한 후 휴대폰에서 다음 작업을 완료하십시오. |
새로운 작업 공간에 보드, 책상 또는 회의실 장치를 추가하세요.
사용자가 업무하고 있을 때 식당, 로비, 회의실 등 다양한 작업 공간에 모일 수 있습니다. 이러한 작업 공간에서 공유 Cisco Webex 장치를 설정하고, 서비스를 추가한 후 협업이 진행되도록 지켜볼 수 있습니다.
워크스페이스 장치의 핵심 원칙은 특정 사용자에게 할당되는 것이 아니라 물리적 위치에 할당되어 공유 사용이 가능하다는 점입니다.
여기에 나열된 장치는 Webex Calling을 지원합니다.
| 1 | |
| 2 |
. 워크스페이스 섹션에서 .
|
| 3 |
공유 사용 을 선택하고 다음을 클릭합니다. |
| 4 |
새 작업 공간 을 선택하고 다음을 클릭합니다. |
| 5 |
작업 공간의 이름(예: 실제 방 이름)을 입력하고, 방 유형을 선택하고, 방 수용 인원을 추가하고, 작업 공간의 위치를 선택하십시오. 그 후 다음을 클릭합니다. |
| 6 |
Cisco 룸 및 데스크 장치를 선택하십시오. |
| 7 |
다음 서비스 중 하나를 선택하고 다음을 클릭하십시오.
|
| 8 |
Cisco Webex Calling 서비스를 선택한 경우 작업 공간에 할당할 구독 및 라이선스 유형을 선택하십시오.
라이선스에서 사용할 수 있는 기능에 대한 자세한 내용은 Webex 통화 라이선스 유형별 사용 가능한 기능을 참조하세요. |
| 9 |
위치, 전화 번호(선택하는 위치에 의해 결정됨), 내선 번호를 지정한 후 저장을 클릭합니다. |
| 10 |
제공된 코드를 사용하여 장치를 활성화합니다. 활성화 코드를 복사하고 이메일로 보내거나 인쇄할 수 있습니다. |
장치를 일괄적으로 추가 및 지정
여러 장치를 사용자와 작업 공간에 할당하려면 필요한 정보를 CSV 파일에 입력하고 몇 가지 간단한 단계만으로 해당 장치를 활성화할 수 있습니다.
- Professional 워크스페이스 라이선스를 사용하면 최대 5대의 Cisco 데스크폰, Cisco MPP폰, ATA 또는 타사 장치를 워크스페이스에 추가할 수 있습니다.
- 공용 영역 작업 공간 라이선스가 있는 경우 작업 공간에 장치를 하나만 추가할 수 있습니다.
여기에 나열된 장치는 Webex Calling을 지원합니다. MAC 주소를 사용하여 모든 기기를 등록할 수 있지만, 다음 기기들은 활성화 코드를 사용하여 등록해야 합니다.
-
Cisco IP Phone 6800 시리즈 멀티플랫폼 전화(오디오 전화 — 6821, 6841, 6851)
-
Cisco IP Phone 7800 시리즈 멀티플랫폼 전화(오디오 전화 — 7811, 7821, 7841, 7861)
-
Cisco IP Phone 8800 시리즈 멀티플랫폼 전화(오디오 전화 — 8811, 8841, 8851, 8861)
-
Cisco IP Phone 8800 시리즈 멀티플랫폼 전화(비디오 전화 — 8845, 8865)
-
Cisco IP Conference Phone 7832 및 8832
-
Cisco Video Phone 8875
-
Cisco Desk Phone 9800 시리즈
| 1 | ||||||||||||||||||||||||||||||||||||||
| 2 |
. | |||||||||||||||||||||||||||||||||||||
| 3 |
다음 옵션 중 하나를 선택하고 다운로드를 클릭하세요.
다음 표를 참고하여 CSV 파일을 준비할 수 있습니다.
Webex 통화 사용자 및 워크스페이스에 장치를 할당할 때 다음 필드는 필수 입력 사항입니다.
이 전화번호 및 내선 번호 필드는 이전에는 전화번호 및 직통 번호로 표시되었습니다. ; 이러한 열 이름은 잠시 동안 계속 지원됩니다. CSV 파일당 1000개의 장치로 수를 제한할 것을 권장합니다. 1000개 이상의 장치를 추가하려면 두 번째 CSV 파일을 사용하십시오. | |||||||||||||||||||||||||||||||||||||
| 4 |
스프레드시트를 기입합니다. | |||||||||||||||||||||||||||||||||||||
| 5 |
드래그하고 드롭하거나 파일 선택을 클릭하여 CSV 파일을 업로드합니다. | |||||||||||||||||||||||||||||||||||||
| 6 |
MAC 주소가 비어 있으면 활성화 코드를 받을 위치를 선택하는 옵션이 표시됩니다.
기기를 활성화하려면 사용자 또는 본인이 기기에 활성화 코드를 입력해야 합니다. | |||||||||||||||||||||||||||||||||||||
| 7 |
제출을 클릭합니다. 기기가 활성화되면 업데이트된 상태를 표시합니다.
멀티플랫폼 기기에서 사용자가 활성화 코드를 입력하려면 펌웨어 버전이 11.3.1 SR2 이상이어야 합니다. 휴대폰 펌웨어 업그레이드에 대한 정보는 이 문서를 참조하세요. |
기기 목록을 내보내기
사용자와 워크스페이스에 할당된 장치 목록을 보려면 CSV 파일로 내보내면 됩니다.
Control Hub 에 로그인하고 장치로 이동합니다.
장치 목록에서 여러 장치를 선택하고 내보내기 옵션을 선택합니다. CSV 파일에 포함할 필드를 선택하고 내용을 로컬 폴더로 내보낼 수 있습니다.
CSV 파일에 표시되는 필드는 기기와 플랫폼의 연결 상태에 따라 달라집니다. 따라서 일부 필드는 출력 파일에서 사용할 수 없습니다.
사용자에 대해 장치 관리
조직 내에서 사용자에게 지정된 장치에 대해 추가, 제거, 재부팅, 활성화 확인 또는 새로운 활성화 코드를 만들 수 있습니다. 이는 필요할 때 사용자 화면에서 장치를 보고 관리하는 데 유용할 수 있습니다.
| 1 | |
| 2 |
. |
| 3 |
사용자를 선택하고 장치를 클릭합니다. |
| 4 |
이 사용자에게 장치를 추가하려면 장치 추가를 클릭합니다. 이미 사용자에게 장치가 할당된 상태에서 다른 장치를 추가하려면 . 기기를 사용자에게 추가하는 방법에 대한 자세한 내용은 사용자에게 휴대폰 추가 섹션을 참조하세요. |
| 5 |
기존 장치를 수정하려면 장치 이름을 선택합니다. 이렇게 하면 장치 페이지로 이동합니다. 여기에서 장치 설정 보기 및 편집, 장치 삭제, 장치 재부팅 또는 장치의 새로운 활성화 코드 만들기 작업을 수행할 수 있습니다. 전화 설정 구성에 대한 자세한 정보는 전화 설정 구성 및 업데이트를 참조하십시오. |
| 6 |
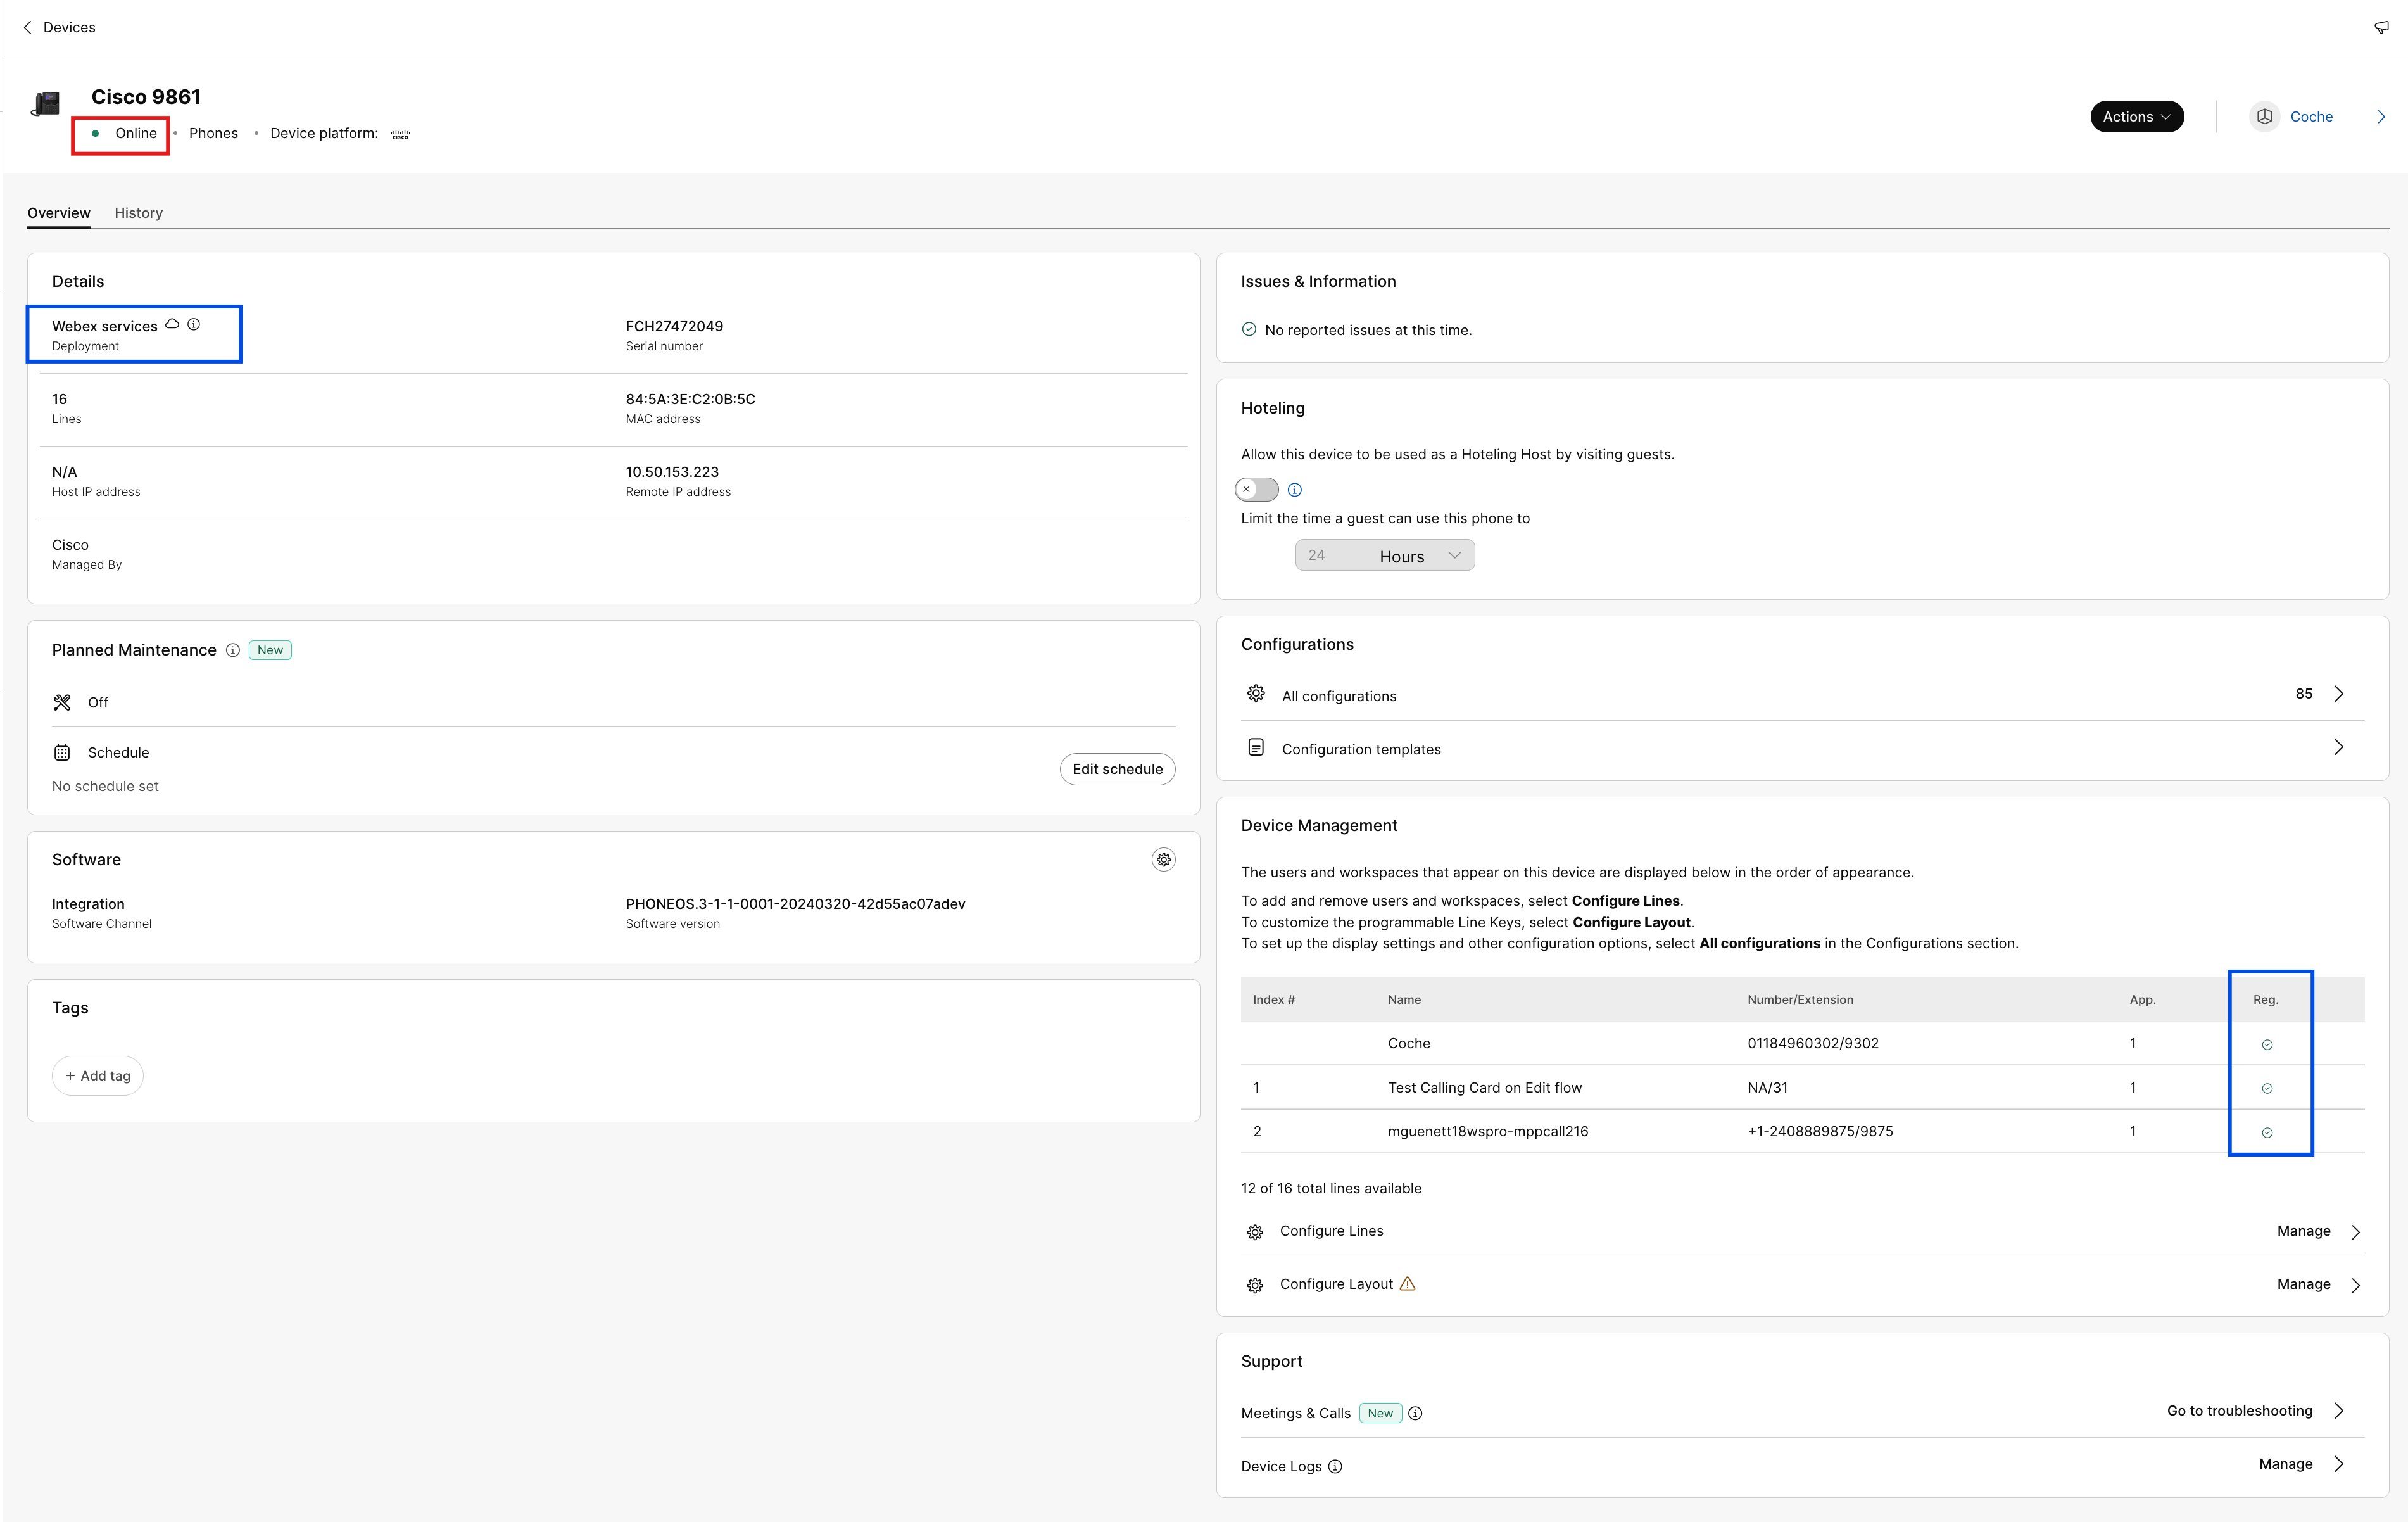
사용자에게 추가된 장치가 Webex Aware인 경우, 다이어그램에 표시된 같이 Webex 인식 옵션이 장치 아래에 표시됩니다. Webex Aware는 장치가 Webex 플랫폼에보드된 후 전화에서 지원하는 Webex 기능에 액세스할 수 있는 권한을 나타냅니다.
|
| 7 |
작업을 클릭하여 장치를 관리합니다. 작업 메뉴를 사용하면 구성 변경 사항을 적용하거나, 장치를 재부팅하거나, 문제를 보고하고 장치 로그를 수집하거나, 장치를 삭제할 수 있습니다. 작업 탭에는 Webex 인식이 활성화된 장치에 대한 다음 옵션이 있습니다.
|
작업 공간에 대해 장치 관리
워크스페이스 프로필에서 직접 장치를 추가하고 관리할 수 있습니다. 작업 공간 장치에는 팩스와 같은 ATA 장치가 포함할 수 있습니다. 작업 공간 장치를 호텔링 호스트로 설정할 수 있습니다. 호텔링에 대한 자세한 내용은 Control Hub의 호텔링을 참조하세요.
| 1 | |
| 2 |
. |
| 3 |
수정할 작업 영역을 선택하세요. |
| 4 |
장치를 추가하려면 장치 [] 타일에서 장치 추가 를 클릭하십시오. 워크스페이스에 장치를 추가하는 방법에 대한 자세한 내용은 새 워크스페이스에 휴대폰 추가 섹션을 참조하세요. |
| 5 |
기존 장치를 수정하려면 장치 이름을 선택합니다. 이렇게 하면 장치 페이지로 이동합니다. 여기에서 장치 설정 보기 및 편집, 장치 삭제, 장치 재부팅, 그리고 장치를 호텔링 호스트로 사용하도록 활성화 작업을 수행할 수 있습니다. 전화 설정 구성에 대한 자세한 정보는 전화 설정 구성 및 업데이트를 참조하십시오. |
| 6 |
Workspace에 추가된 장치가 Webex Aware인 경우, 다이어그램에 표시된 같이 장치 아래에 Webex 인식 옵션이 표시됩니다. Webex Aware는 장치가 Webex 플랫폼에보드된 후 전화에서 지원하는 Webex 기능에 액세스할 수 있는 권한을 나타냅니다.
|
| 7 |
작업을 클릭하여 장치를 관리합니다. MPP 장치에 대해 구성 변경 사항을 적용하거나 펌웨어를 업데이트하기 위한 작업 도움말. 작업 탭에는 Webex 인식이 활성화된 장치에 대한 다음 옵션이 있습니다.
|
회선 구성 - 회선 추가 및 순서 변경
전화기에 기본 회선, 공유 회선 및 가상 회선을 할당하는 회선 구성 기능을 사용하면 동일한 장치에서 공유 회선이 여러 개 나타날 수 있습니다. ATA의 포트 구성 환경은 변경되지 않았습니다.
MPP 및 PhoneOS 기기의 회선 구성 기능에 대한 업데이트 사항은 다음과 같습니다.
-
주요 회선
-
기기의 소유자를 지정하고 해당 소유자가 기기 정보의 첫 번째 줄에 위치하도록 하십시오.
-
해당 행의 '등장 횟수' 값을 늘리면 등장 횟수가 추가됩니다.
-
-
공유 회선 / 가상선
-
조직 내 통화 기능이 활성화된 사용자 또는 작업 공간에서 사용 가능한 공유 통화 표시(SCA)를 통해 공유 회선을 할당할 수 있습니다.
-
공유 행의 표시 횟수를 늘려 추가 표시를 추가하세요.
사용자 또는 작업 공간에 사용할 수 있는 SCA 제한으로 인해 할당 가능한 모양이 제한될 수 있습니다.
-
공유되는 각 회선에 회선 인덱스를 할당합니다. 공유된 선들은 드래그 앤 드롭으로 재배치할 수 있습니다.
선의 개별적인 모양을 분리할 수는 없습니다.
-
사용자 장치에서 공유 라인 인덱스의 위치를 정렬합니다.
-
-
모양
-
기본 회선, 공유 회선 또는 가상 회선의 여러 모양을 개별 가중치 회선 세트로 구성할 수 있습니다.
-
가중 회선에는 -1, -2 등의 접미사가 붙습니다(시스코 전화기에만 해당).
-
통화는 사용 가능한 가장 빠른 가중치 회선으로 연결됩니다.
-
-
새로운 요약 정보(페이지 하단 참조)
-
고유 SIP 등록 회선 수 – 전화기가 지원할 수 있는 고유 SIP 등록 계정 수를 보여줍니다. 현재 지원되는 최대 계정 수는 16개입니다.
-
총 회선 표시 개수 – 기기에서 지원하는 할당 가능한 회선 표시 개수의 총합을 보여줍니다. 휴대폰 모델이 KEM을 지원하는 경우 최대 표시 횟수에는 확장된 용량이 포함됩니다.
-
-
대량 회선 배정 및 공개 API
- 대량 CSV 및 공개 API를 이용한 라인 할당 방식에는 "외관" 기능이 포함되어 있습니다.
위치 간 공유 회선에 대한 자세한 내용은 위치 간 공유 회선 및 가상 회선 구성을 참조하세요.
원하는 회선 키를 길게 눌러 단축 다이얼을 전화기에 추가하면 제어 허브에서 단축 다이얼이 표시되지 않습니다. 단축 다이얼은 해당 회선 키에 공유 회선을 설정하여 덮어쓸 수 있습니다.
| 1 | |
| 2 |
사용자 또는 작업 공간 으로 이동합니다(수정할 장치가 할당된 위치에 따라 다름). |
| 3 |
사용자 또는 작업 공간을 선택하세요. |
| 4 |
장치 로 이동하여 공유 회선을 추가하거나 수정하려는 장치를 클릭합니다. 이렇게 하면 장치 페이지로 이동합니다. |
| 5 |
장치관리아래에서 회선구성을 클릭합니다. |
| 6 |
공유 회선을 추가하려면 전화기의 여러 개별 회선 키에 동일한 공유 회선 또는 가상 회선을 할당할 수 있습니다. 해당 회선의 표시 횟수 열에서
원하는 순서대로 줄을 추가할 수 있습니다. 라인 모양을 다시 정렬하려면 삭제하고 표시할 순서대로 목록에 추가합니다. 사용자가 다른 사람으로부터 번호를 받은 경우 users/groups 기기에 설정된 경우 공유 회선에 대해 회선 레이블 을 추가할 수 있습니다. 이 선 레이블은 공통으로 나타나는 선들을 서로 구별하는 데 도움이 됩니다. 라인을 제거하려면 |
| 7 |
저장을 클릭합니다. 규모가 큰 조직의 경우 관리자는 추가 통화 회선을 구성하기 전에 위치를 선택해야 합니다. 일반적인 조직의 경우 위치 필터는 사용할 수 없으며 관리자는 줄을 직접 선택할 수 있습니다. |
 아이콘을 클릭하고 이름 또는 전화번호로 검색한 다음 회선을 선택하세요.
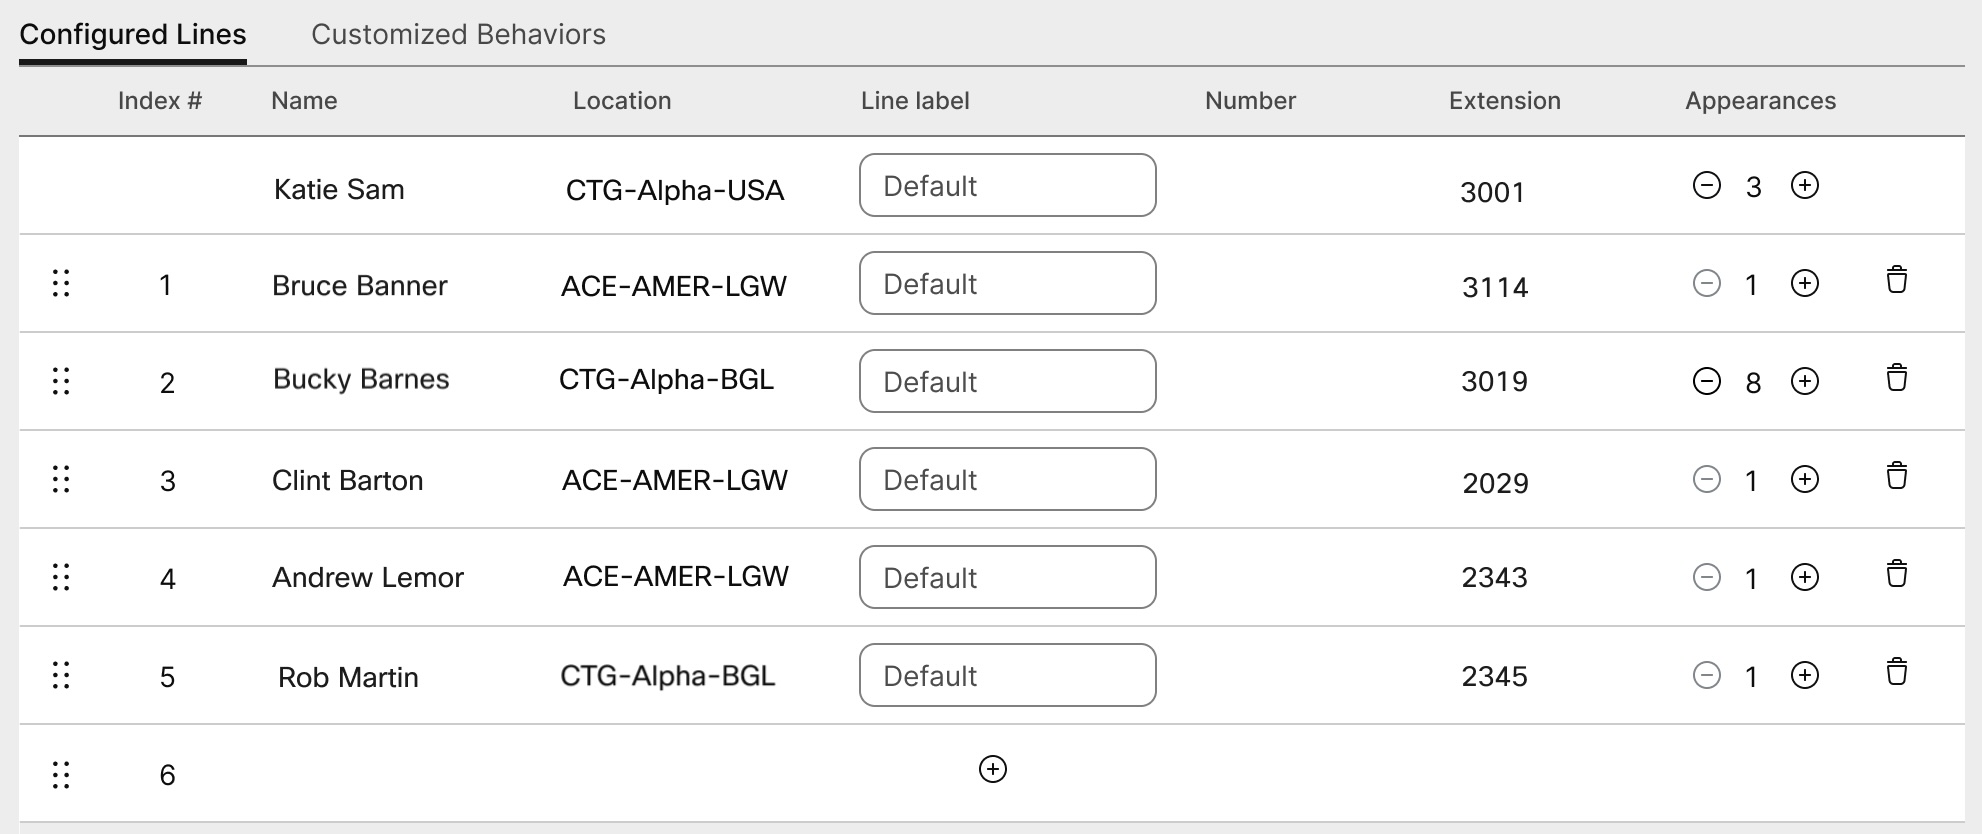
 아이콘을 클릭합니다. 온라인에서 기본 사용자를 삭제할 수 없습니다. 1.
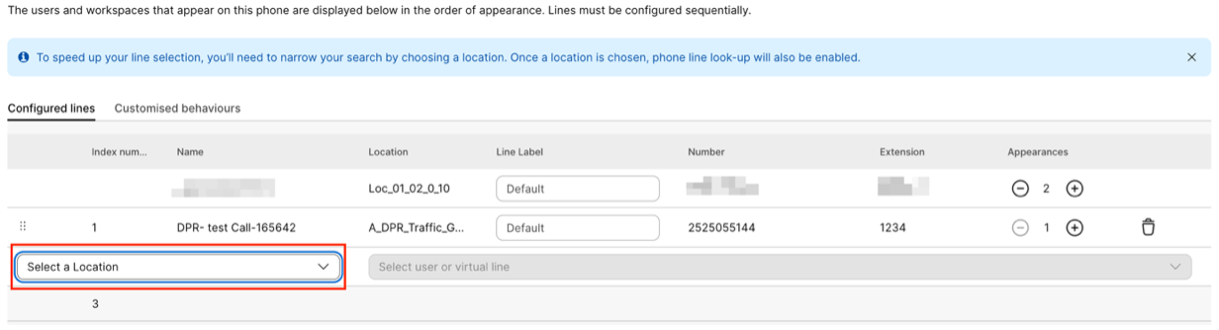
사용자에 대해 ATA 장치 구성
Control Hub에서 사용자에게 할당된 아날로그 전화 어댑터(ATA) 장치의 포트를 구성할 수 있습니다. 현재 사용 가능한 ATA 장치 구성은 2포트 장치용과 24포트 장치용 두 가지입니다.
| 1 | |
| 2 |
. |
| 3 |
수정할 사용자를 선택하고 장치로 스크롤합니다. |
| 4 |
추가 또는 수정할 장치를 선택하세요. |
| 5 |
이 장치의 사용자 아래에서 포트 구성을 클릭합니다. |
| 6 |
공유된 포트 구성을 추가하려면 |
| 7 |
이름 또는 전화 번호를 입력하고 표시되는 옵션 중에서 선택한 후 저장을 클릭합니다. 장치 없는 작업 공간만 조회 창에 나타납니다. |
| 8 |
장치에 T.38 팩스 압축이 필요한 경우 T.38 열의 확인란을 선택하거나 사용자 수준 압축 옵션을 재정의한 다음 저장을 클릭합니다. 작업 공간에는 ATA가 있을 수 있습니다. 팩스기에서 유용합니다. |
 아이콘을 클릭합니다.
위치에 번호 추가
고객 조직에서 언제든지 데스크 및 회의실 장치에 전화 번호를 추가할 수 있습니다. 평가판을 사용하고 있거나 유료 가입으로 변환했는지 여부와 관계없습니다.
Control Hub에 추가할 수 있는 전화번호 개수를 250개에서 1000개로 늘렸습니다.
| 1 | |
| 2 |
를 입력한 다음 숫자 추가를 클릭합니다. |
| 3 |
위치 및 번호 유형을 지정합니다. 번호를 포트하는 경우, 현재 비용 청구 번호 및 새로운 비용 청구 번호를 입력합니다. |
| 4 |
위치, 주, 지역번호, 접두사 (선택사항)를 지정한 다음 검색을 클릭합니다. 사용 가능한 번호가 표시됩니다. |
| 5 |
위치에 추가할 숫자를 선택하세요. 선택한 숫자는 선택된 숫자 필드로 이동합니다. |
| 6 |
저장을 클릭합니다. |
주문된 PSTN 번호의 상태 확인
멀티플래폼 전화(MPP) 연결된 보조자—헤드셋 및 키 확장 모듈(KEM)
액세서리를 연결할 때 (Headsets/KEMs) MPP 장치의 경우, 해당 장치는 제어 허브의 장치 탭 아래에 인벤토리 항목으로 표시됩니다. Control Hub 장치 인벤토리에서 보조 프로그램 모델, 상태 및 해당 프로그램이 소속된 사용자를 찾을 수 있습니다. 보조 프로그램을 선택할 때 보조 프로그램 시리얼 번호 및 현재 소프트웨어 버전과 같은 추가 정보를 확인할 수 있습니다. 보조 프로그램 필드는 보조 프로그램이 MPP에 연결되어 있는 한 "온라인"이라고 보고합니다. MPP 연결된 헤드셋은 장치 관리에서 사용할 수 있는 최신 버전으로 소프트웨어를 자동으로 업그레이드합니다.
|
전화 모델 |
Cisco 헤드셋 520 시리즈 |
Cisco 헤드셋 530 시리즈 |
Cisco 헤드셋 560 시리즈 |
Cisco 헤드셋 730 시리즈 |
|---|---|---|---|---|
|
Cisco IP Phone 8811/8841/8845 |
— |
— |
RJ9 및 RJ11 |
— |
|
Cisco IP Phone 8851/8861/8865 |
USB |
USB |
USB RJ9 및 RJ11 |
— |
|
Cisco IP Phone 7811/7821/7841/7861 |
— |
— |
— |
— |
|
Cisco IP Phone 6821/6841/6851/6861 |
— |
— |
— |
— |
|
Cisco IP Phone 6871 |
USB |
USB |
USB |
— |
|
Cisco IP Conference Phone 7832/8832 |
— |
— |
— |
— |
|
전화 모델 |
KEM |
|---|---|
|
Cisco IP Phone 8811/8841/8845 |
— |
|
Cisco IP Phone 8851/8861/8865 |
BEKEM CP-8800-A-KEM CP-8800-V-KEM |
|
Cisco IP Phone 7811/7821/7841/7861 |
— |
|
Cisco IP Phone 6821/6841/6861/6871 |
— |
|
Cisco IP Phone 6851 |
CP-68KEM-3PCC |
|
Cisco IP Conference Phone 7832/8832 |
— |


